Background
The MiG-21MT (Fishbed K) was developed at the behest of foreign customers requesting longer range. A larger capacity internal fuel tank in the fuselage spine was fitted increasing the volume from 510 litres 900 litres. To accommodate the new fuel tank, the MiG-21MT developed a distinctive hump on the spine. As a result of the increased weight the more powerful engine R-13F-300 was installed. On the plus side the range increased by some 250 km, unfortunately even with the increased range and the uprated engine it was at the expense of performance. As a result of the lack of performance only fifteen MiG-21MTs were built at Moscow’s Znamya Truda [No. 30] factory and none were ordered by foreign customers. Despite the disappointing performance a production line for MiG-21SMT was set up at factory No. 21 at Gorkyi, with production starting in 1971. In all 116 units were built. The SMT was identical to the MT externally, though the cockpit was different. The disappointing performance of the MT and SMT resulted in the change of role from an interceptor to a fighter bomber role. It could carry up to 1300 kg of ordnance on four underwing pylons.


Eduard’s quarter scale MiG-21 series started off in 2011 with the MiG-21MF. The first MiG-21MT/SMT were released in the same year. To be accurate this Weekend release from Eduard features two MiG-21MT’s and two MiG-21SMT’s. Although as noted they were identical airframes produced at different factories. The recessed and raised detail looks very good indeed. There is a high parts count, but as you can see with the blue shading on the parts map in the instructions many are not used.
Inside the top opening box, you will find:
- 7 x plastic sprues
- 1 x clear plastic sprue
- 2 x decal sheets
- 1 x 16-page construction manual


There around 18 plastic parts making up the cockpit. Detail can be realised either by using the raised relief on the plastic parts or using decals on the alternate flat plastic parts. The decal instruments actually look pretty good and worth considering. The excellent looking ejection seat is made up from an amazing 18 plastic parts. Harnesses are supplied as decals.


The canopy and windscreen are separate so the side opening canopy can be displayed open without problem. There are a number of decals representing the seal between the glass and the framework. There is a clear part representing a mirror that need carefully gluing to the canopy.


The two-part fuselage has a fair number of items to fit inside before joining. There is the cockpit/front undercarriage bay, engine, radome and a couple of bulk heads. So, there will be lots of test fitting as each component is attached. Thankfully the main undercarriage bay can be slide into the fuselage once the halves are joined. Parts of the air brake need cutting out if you are going to display the air brakes open. There are a couple of parts that fit in the cut outs forming the interior of the airbrake. The distinctive hump on the spine is made from two parts and includes the vertical tail. The rudder is separate and one piece. The fin under the tail is also a separate one-piece part. At the pointy end is a one-piece air inlet lip.


The rear part of the Tumansky R-13F-300 engine is made up from 11 nicely detailed parts. The jet pipe is made from two parts which is split lengthways. The turbine blades, re-heat matrix and jet nozzle are really well detailed.


The main undercarriage bay is built using 10 detailed parts, while the front undercarriage bay is made up from 7 detailed parts. The floor of the cockpit is used as the ceiling of the front undercarriage bay. Each main wheel is made up from five parts and the nose wheel has four parts. Detail looks very good indeed. The legs, retraction actuators and gear doors all look well detailed.


The main wing is three-piece with separate ailerons and flaps. There are a number of flap and aileron actuator to add, though these are all designed for the flaps and ailerons to be set in the neutral position. The lower wing is one piece and needs a fair bit of detail adding to it before attaching to the fuselage. There is additional detail including walls and gas bottles for the undercarriage bay that extends into the wing. There are several holes that need to be drilled if you are attaching the weapon and fuel tank pylons.


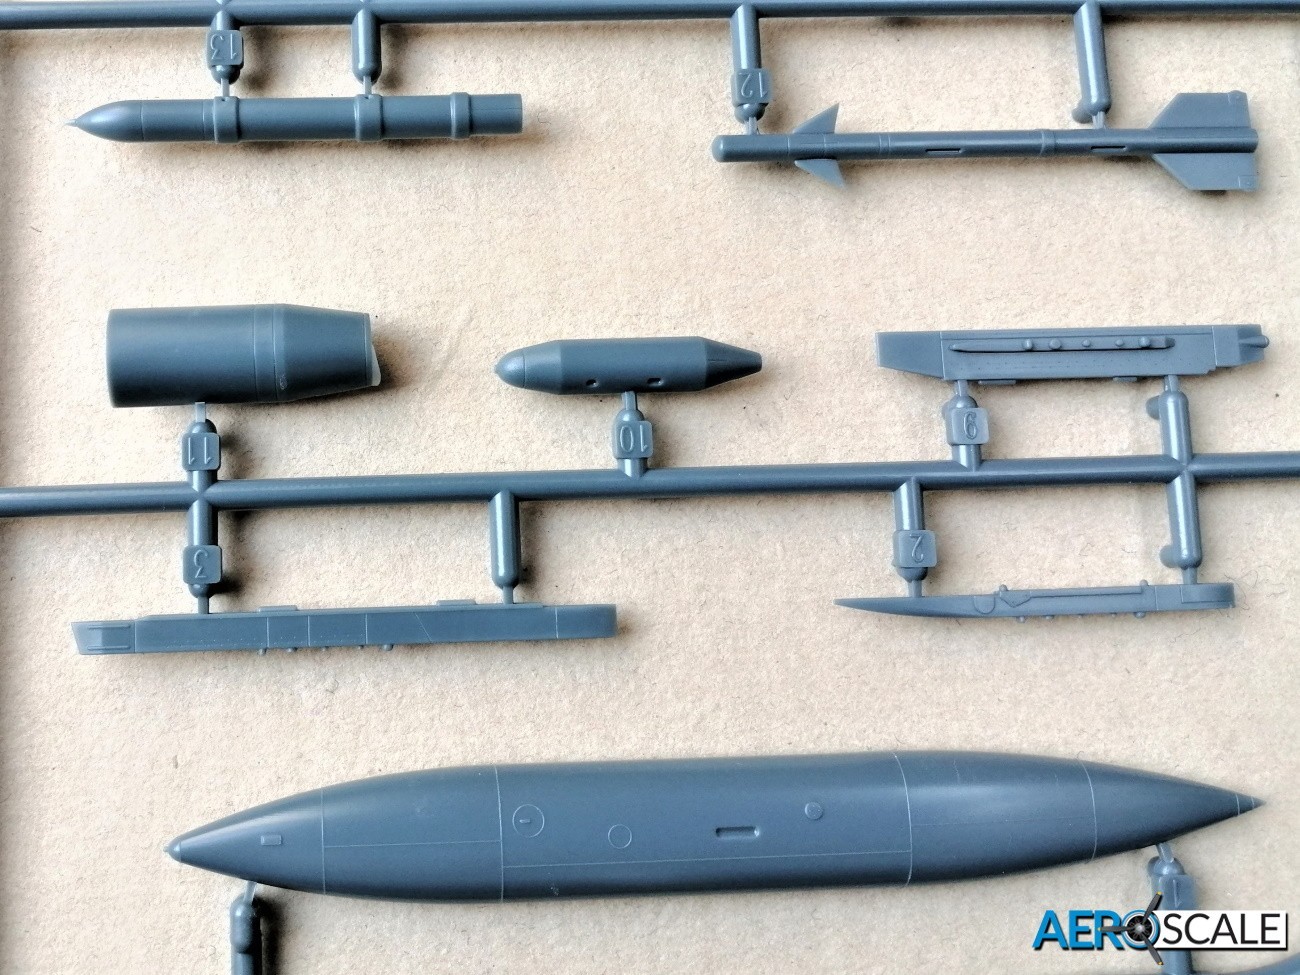
Ordnance includes:
- 3 x 490 litre fuel tanks
- 2 x S-24 Fragmentation rockets
- 2 x FAB-250 General purpose high drag bombs
- 2 x SPRD-99 RATO
- 1 x GSh-23 20mm twin-barrel cannon


There are five sets of pylons to hang the various selection of ordnance. You can fit a single fuel tank under the fuselage or two tanks under the wings. The GSh-23 20mm twin-barrel cannon is made up from 5 parts and fits just aft of the front undercarriage bay. The artwork on the box lid is a little misleading, suggesting that four S-24’s can be fitted, when there are only two S-24’s in the box. Alternatively, you can add a pair of FAB 250kg bombs. There are a couple of RATO bottles to add to the fuselage if you fancy.


The two sheets of decals look very well printed with good definition and density of colour. The larger sheet has a scary number of stencils on it, even the smallest type looks legible. There are decals include for the framing of the outside of the canopy and windscreen.


There are four marking options including:
- A. MiG-21MT, No 96.40.15, Dolgoye Ledovo, Russia, early 1980’s
- B. MiG-21SMT, 515 IAP,Tӧkӧl, Hungary, late 1970’s
- C. MiG-21MT, No 96.40.14, Dolgoye Ledovo, Russia, mid 1980’s
- D. MiG-21SMT, 582 IAP, Chojna, Poland, late 1970’s
Option B and D are finished in natural metal, while option A has a three-colour upper camouflage scheme and option C has four colours. Paint references used are for Gunze [Aqueous and Mr Color], Mr Metal Color, Mr Color Super Metallic and Mission Models. Options B and D have an interesting grey painted area under the nose. I thought it might be a fake canopy, but no it was just a proactive coat of paint on the aluminium.


Instruction booklet contains sixteen pages with four-way views for the painting guide. There is a single page dedicated to the application of the numerous stencils on the airframe. There is even a page for the ordnance, pylons and fuel tanks. Paint references utilise GSI Creos [Gunze Sangyo] Aqueous, Mr Color and Mr Metal as well as Mission Model paints
Price: £ 19.70 from Eduard


Conclusions
Always good to see Eduard’s MiG-21’s being re-released. The MiG-21SMT certainly doesn’t look like the sleek interceptor of the early models. Though the dorsal hump does give a certain amount of character. The Weekend Edition is a no-frills kit ie. no PE or paint masks. One great advantage of the lack of pre-painted PE parts for the instruments is there is no worries about trying to match up the distinctive interior green colour whilst painting the cockpit.
Our thanks to Eduard for this review sample.
84180 – MiG-21SMT Weekend – 1:48
Please remember, when contacting retailers or manufacturers, to mention that you saw their products highlighted here - on AEROSCALE