Spitfire Mk.Ia ProfiPACK
Item No: 82151
Background
Normally a brief history of the model subject is written here, but I think there is no need for that with the Spitfire. Instead its worth highlighting the comments from Vladimir Sulc the CEO Eduard who is quite candid about the difficulties faced with this particular project.
“Even our road to this Spitfire wasn’t an easy one, and getting to this point required all of our resources, abilities and faith in ourselves. In some ways, our story of the development of this kit mirrors the story of the development of the actual airplane. Even a kit goes through a sometimes-difficult development, evolves, and much like the designers of the original item, we too have had to try to find the best road to the best end, and we have to live with the notion that we have not yet achieved perfection in what we are doing. Perhaps, you will be disappointed in the sink marks in the exhausts that we were not able to eliminate by the time production began. Even so, we are now able to offer a beautiful kit, that offers many interesting features and a lot of finesse, that I venture to say has never been offered before at this level and at this concentration in one product”. ……Vladimir Sulc CEO Eduard
First Impressions
This is the first time that the quarter scale Spitfire Mk. Ia has been released as a ProfiPACK and so there is a considerable drop in price from the Special Editions Eduard has previously released. As with all recent Eduard releases the first thing the draws the eye is the wealth of subtle and consistent recessed detail and the number of parts. The detail around the fuselage particularly the nose is first rate. You can see a subtle difference between the fasteners and the rivets. As this Edition represents the Spitfire Mk.Ia the later fuselage is represented. It features the slightly raised armour plating around the fuel tank and a couple of air scoops just by the windscreen. The breakdown of the parts looks very familiar with the way other manufactures have approached producing the Spitfire. Another feature is how fine the attachment points of the parts are to the sprues. There is a little flash here and there and a few sink marks in the exhaust stack, but nothing serious.
There are quite a few parts to detail the cockpit and some intricate use of PE parts. Eduard has decided to create the cockpit as a separate unit. Attention to detail is first rate and quite jaw dropping. You do wonder if there is a three-way competition at Eduard producing between the teams producing the plastic, photo etch and resin parts. Each department trying to out do the other. The detail evident on the plastic is probably as good as some resin manufactures. The control stick is on example of the zeal to produce as much detail as possible. It is made up from three plastic parts and a PE part. The early Spitfire gear retraction pump handle is included and it’s refreshing to see the pre-coloured Sutton seat harness extending back into the fuselage as it should. The seat has the flare rack moulded on although there is a PE flare rack if you want a slightly more detailed item. The frame that the seat is attached to is different depending on which marking option you are going for. The instrument panel [IP] can be done using the pre-coloured photo etched parts,plastic or decals. There are three small sets of decals for the IP: the group of six centrally placed blind flying instruments and two either side. The hinge for the cockpit door looks like an exercise demanding a steady hand and a test of patience, but a worthwhile one if you’re displaying the door open.
The clear sprue seems to have a wealth of parts.You can display the canopy open or closed. The open option has two parts and the closed has just the one, the canopy is moulded onto the rearmost clear part. A little surgery around the sill of the fuselage is required for the closed canopy. Eduard highlight in the instruction the area on the cockpit sill that needs removing. Eduard has been quite brave including the clear knockout panel on the port side. I have to say they have done really well to reproduce this feature. The release features to types of mirror mounted on the windscreen and these are made from PE parts. There is also a internally fitted mirror attached to the canopy.
The fuselage halves are split left and right and are pretty much complete. The only things to add is the one-piece rudder,paneling under the nose and the access door for the cockpit. There are locating pins and holes to aid with the alignment of the two fuselage halves. A third of the wing fillet from the leading edge is separate. If you want to cutout the radio access hatch then Eduard has engineered a hatch demarcation line on the inside of the port fuselage. There is some internal detail for the cockpit just below the sill, but bear in mind the majority of the detail is in the separate cockpit assembly. The one-piece exhausts do have sink marks, but they look easily fixable. The detail of the tips of the exhaust looks very good. Option ‘A’ has a Rotol propeller and the rest the de Havilland. The Watt fixed two bladed propeller is included, but not used. The propeller blades are one piece and the spinner is made up from two parts. The rudder is separate and one piece. A little care is needed joining the control surfaces on the tail as there seems to be a sequence to follow.
The wings feature an almost full span lower wing featuring separate wing tips. The ailerons are separate and the flaps are in the raised position. There is no internal guidance line to aid the cutting ofthe flaps, you’ll just have to follow the line of the flap on the lower surface. It will need some care though to remove it. The box shaped radiator under the starboard wing is made up from seven plastic including two choices off lap actuator to display it open or closed. There are PE radiator faces included for both the under wing radiator and oil cooler. All the control surfaces feature taped ribs as they were fabric covered. The eight machine gun barrels are included if you want to show them, though you will need to punch holes in the decals representing the canvas barrel covers. I’m a little puzzled by the last build diagram [Pg 12] illustrating the two ways the radio antennae were attached. The final diagram shows the strengthening plates fitted on the upper wing over the wheel bay. There is no other reference to these plates in the instructions. I seem to remember Edgar Brookes mentioning that the plates were retro fitted to the early Spits around August 1942. Anyway a bit of a puzzle as the two aircraft concerned [option F and G] are dated as February 1941 and August 1941 respectively. The gear down indicators on the upper surface are PE parts and a couple of holes need drilling.
The horizontal tail surfaces are each made up from two parts, though the two elevators are one piece. The tail control surfaces don’t look positionable, but I’m pretty sure with you can cagoule them a little with some deft work with a scalpel to cut off the locating pins.
The tyres are devoid of any weighting, but the separate hubs are well detailed. There is a head on view of the ‘Spit’ in the instructions providing guidance on how to set the oleos and wheels. The subtle rivet detail on the walls of the undercarriage bay is worth noting. There’s a choice of a one piece or three-piece tail wheel.
The majority of the pre-coloured photo etched parts are in the main to detail the cockpit.
There are paint masks for the outside of the windscreen and canopy. Also included are masks for the hubs, although the parts number on the mask instructions is wrong. There are masks for the single ID light under the fuselage and the gun sight.
The marking options include:
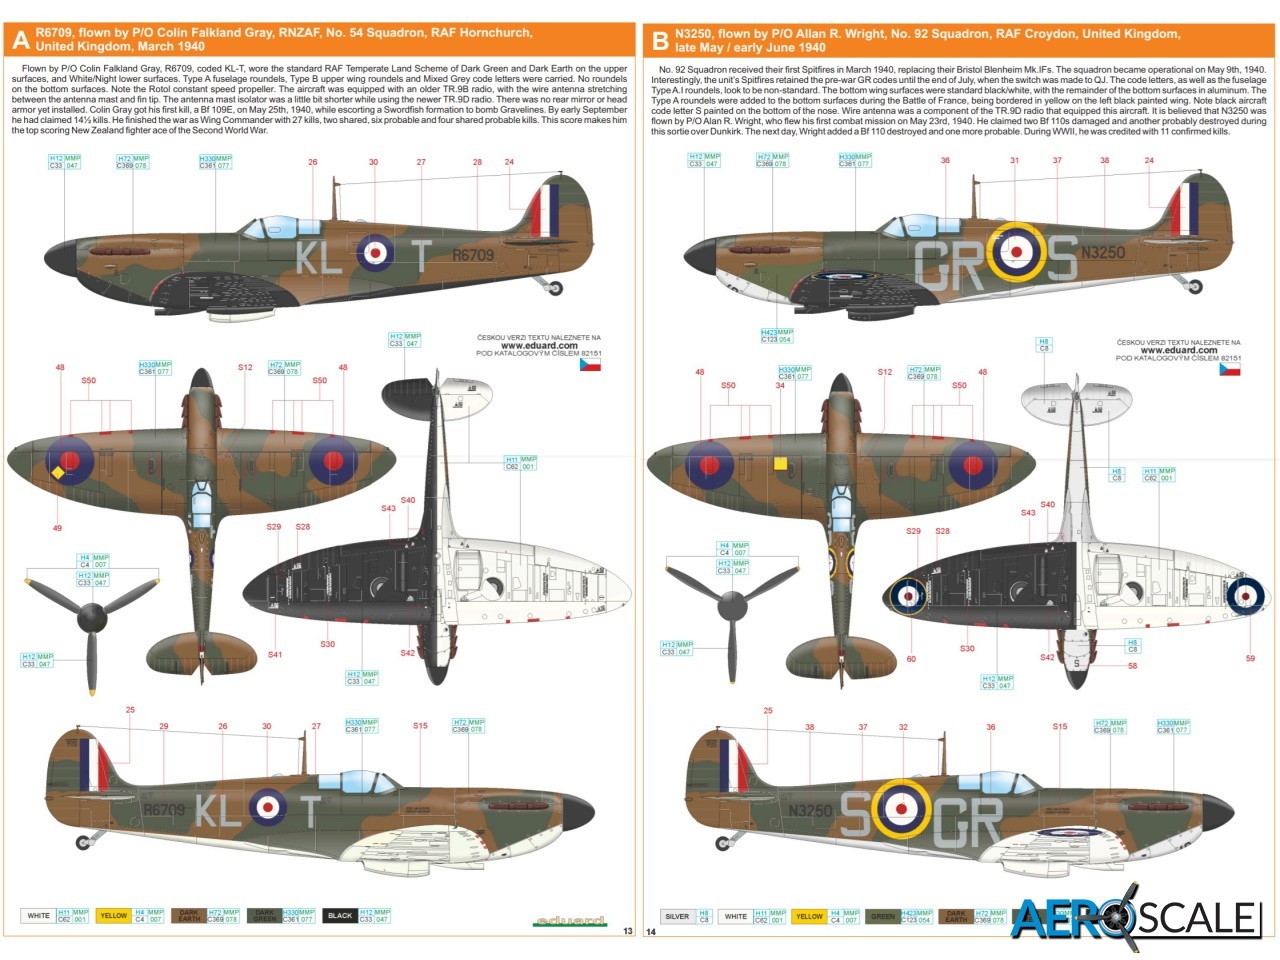
[A] R6709, flown by P/O Colin Falkland Gray, RNZAF, No.54 Squadron, RAF Hornchurch, United Kingdom, March 1940
[B] N3250, flown by P/O Allan R. Wright, No. 92 Squadron,RAF Croydon, United Kingdom, late May / early June 1940
[C] R6690, flown by P/O John C. Dundas, No. 609 Squadron,RAF Middle Wallop / RAF Warmwell,
United Kingdom, August 13th, 1940
[D]R6835, flown by F/O Brian J. Carbury, No. 603 Squadron, RAF Hornchurch, United Kingdom, late August 1940
[E] P9386, flown by S/Ldr Brian J. Lane, No. 19 Squadron,RAF Fowlmere, United Kingdom, September 1940
[F] X4253, flown by P/O Wilfrid G. Duncan Smith, No. 611 Squadron, RAF Hornchurch, United Kingdom, February 1941
[G] X4828, flown by F/Lt Wojciech Kolaczkowski, No. 303 Squadron, RAF Speke, United Kingdom,
September 1941
The latter option has dark sea grey and dark green upper surfaces, whereas the rest are all dark earth dark green. Frankly I used to find the colours of the early Spits pretty boring. With the ease you can weather models now you can really create an interesting looking model even in dark earth and dark green. Eduard has found some interesting variation on the painted lower surfaces. The second option has the rear lower surfaces aft of the wing trailing edge as silver, option ‘C’ has a distinctive white painted panel under the nose. Option ‘F’ has a black/sky combination and the last one has medium sea grey.
The decals for the insignia and codes are on the larger sheet. The stencils and wing walkway lines are on the smaller sheet. The red canvas covers for the guns are included. The decals themselves look superbly printed. Good definition particularly on the stencils, all are legible.
Instruction comprise of a twenty-page A4 booklet. Instruction couldn’t be clearer. As Eduard generally include lots of surplus parts in their releases its wise just to make doubly sure you are using the correct parts for the particular marking option. You will find a four view full colour painting and marking guide included. There is additional information on each of the marking options.One page is devoted to applying the stencils.
Conclusion
There have been already numerous builds of the Eduard Spitfire Mk.1 and all seems to have had a positive experience. Straight out the box this is a beautiful looking kit. The detail on the plastic is superb and bodes well for when this is released as a Weekend Edition. The additional PE parts included are the cream on the cake. Eduard has really nailed the subtle differences in the shape. Rowan is currently building the Spitfire Mk 1 and you can find his build log on the old site here.
Likes: So much attention to detail, there’s even a dark sea grey and dark green marking option amid the dark earth and dark green camouflage schemes
Dislikes: Confused about the wing strengthing plates, but I’m going to ignore the illustration except for the arrangement of the aerial wiring
Well, if this build is anything like the last few releases from Eduard that I have built, then the modeller is in for a treat, a well detailed treat.


