Background
Although the Fiat BR.20 may appear somewhat antiquated in comparison with other WWII bombers, this isn't really a fair criticism of the design, but is instead testament to the rapid developments in aircraft design in the second half of the 1930s. When the Cicogna (stork) first flew in 1936 it was among the most advanced bombers in the world - remember, Britain was still using the biplane Handley-Page Heyford and France had only recently introduced the clumsy monoplane Bloch MB.200.
Boasting a top speed around 100mph faster than even the Bloch, the Fiat BR.20 entered squadron service less than a year after its first flight, giving the Regia Aeronautica a truly world-class bomber force. The following year, Italy sent a flight of BR.20s to fight alongside the right-wing Nationalists in the Spanish Civil War, gaining much useful combat experience in the process. The Cicogna proved to be a tough and efficient bomber, and its top speed of around 270mph was sufficient to outrun many of the Republican fighters.
Encouraged by its good performance in the Spanish Civil War, Japan purchased around eighty BR.20s in 1937 for service in its war against China while it waited for development of its own bombers. Here the reputation of the Cicogna suffered somewhat and the aircraft proved unpopular with Japanese crews, meaning the type was replaced by the Ki-21 after only two years.
Following Mussolini's ill-fated opportunistic entry into WWII, the BR.20 operated on every front on which Italy fought, from Europe, through North Africa and the Mediterranean, to the Balkans and Russia. While the Cicogna remained a capable aircraft, it was increasingly at a disadvantage compared with more modern types, principally due to its limited defensive armament and payload. Furthermore, the Italian aircraft industry was incapable of meeting the demands placed on it by the war and, without further development, the BR.20 steadily dwindled in importance until less than 70 were left by the time of the Italian Armistice in 1943. The remaining aircraft soldiered on, mostly as trainers and transport aircraft, and the Co-Belligerent Air Force used one in the liaison role. The BR.20 was finally retired in 1946 and sadly none were preserved for museum display.
The Kit
Special Hobby's BR.20 arrives in a tough and attractive top-opening box, with the main parts and accessories bagged separately for protection in transit. It comprises:
117 x grey styrene parts (plus 27 not used)
19 x clear parts
55 x grey resin parts
8 x etched brass parts
Decals for 3 x colour schemes


It's important to make clear from the outset that Special Hobby's Cigogna dates back some 15 years to the time when the company was still using short-run technology to produce their kits. It first appeared under the Classic Airframes banner and, while it was a lot more advanced than short run kits from previous decades, it still shouldn't be viewed in the same light as modern mainstream releases.
That said, the mouldings have held up well over the intervening years and there's very little flash evident. Where you will have to spend time on preparation is removing raised ejector pin marks - some of which prevent parts fitting together. I didn't find any sink marks on the review sample, but there is an area behind the starboard wing root that feels slightly bulged, so I'll quickly sand that smooth.
The surface finish is generally good, but it does show a few light scuffs in places, so an overall polish will do no harm. Detailing comprises lightly engraved panel lines and neatly depicted fabric areas. As I've noted elsewhere, I actually prefer Special Hobby's quite restrained "old school" way of handling fabric surfaces to what some of the mainstream manufacturers do nowadays. On the downside, a few of the panel lines have filled in here and there on the sample kit, so be prepared use a scriber to reinstate them. I also think some of the details will inevitably be lost sanding the fuselage seams, so you'll need to restore that.


Test Fit
Mention of fuselage seams brings us neatly to a dry assembly, and it's clear immediately that the kit will be pretty challenging to build. It's definitely not suitable for newcomers to our hobby, and I'd recommend anyone tackling to have at least a few short-run models safely under their belt.
Starting with the fuselage, it's constructed from 8 parts because Special Hobby designed it to accept alternative nose, tail and top decking sections. That would be inviting fit issues in a mainstream kit, and doubly so with a short run model. So, while the main fuselage halves match up very neatly, it will require time and care to blend in the other sections seamlessly. There aren't any locating pins, so I'll add supporting tabs on the inside and work in small areas with fast-drying cement to make sure the added parts match the fuselage contours and so reduce the amount of filler needed.


If the fuselage is a bit of a handful, by contrast the wings are remarkably straightforward. Everything lines up neatly and the trailing edges are commendably thin. The kit includes aerofoil-shaped inserts for the wing-roots, and the fit is very good with them in place. Shot plugs hold everything together which should be adequate to take the weight of the wings if cemented firmly, but I'll be tempted replace them with dowl or styrene "spars" running through the fuselage.
Once the raised ejection pin marks are removed, the vertical fins and stabilisers fit together with a minimum of fuss. How well the stabilisers attach to the fuselage will depend on the job you do lining up the separate tail section.
Overall, the test fit is reasonably encouraging - provided you're confident in your abilities and you approach it in the knowledge that you'll have to be prepared to do a fair amount of preparation and adjustment to get good results.

A Few Details
The interior of the fuselage has a moulded-on impression of the internal structure, plus flooring and bulkheads for a compartmented multi-tiered layout. Beyond that, though, it's a bit spartan. What I guess was the radio operator's compartment is empty except for a seat, and the cockpit is pretty basic, with not much more than seats, flying controls and a moulded instrument panel. Oddly for Special Hobby kits of this period, there aren't any photoetched details provided for the "office". This is particularly noticeable with the lack of seat harnesses, so you'll have to source some in the distinctive Italian style elsewhere or do some nifty scratch-building.
The instructions show a decal for the instrument panel, but none is actually provided, so perhaps it's a hang-over from a previous boxing of the kit. The centre console is included as a resin part that can be detailed with throttle levers etc.
Looking at photos of the full-sized aircraft's cockpit, you can see that the solid sides of the kit seats were actually supporting struts, and that a few instruments were placed centrally in the canopy roof.
The gun turrets have seats slung beneath them and simple gun mounts. The 7.7mm machine guns are very basic and won't stand close scrutiny. Luckily, the Breda-SAFAT machine gun was based on the M1919 Browning, so it should be possible to adapt some aftermarket guns to look the part.
All in all, Special Hobby have provided the basics for the interior, but there's masses more that you can add if you're prepared to do some scratch-building. (Note: Eduard produced a couple of photoetched details sets for the kit which have sadly been discontinued, but perhaps its re-release will see them back in the catalogue.)


In contrast to the cockpit, the resin engines are beautifully detailed, comprising 19 pieces each, plus 3-part exhausts. They should look excellent with the addition of pushrods and ignition wiring (not provided). The propellers are made up from styrene blades and very nice resin hubs, so it'll be worth making a simple jig to ensure the correct position and equal pitch for the blades.


The mainwheels are unweighted and have separate crisply detailed resin hubs. The undercarriage legs are quite sturdy, but the way they butt-join to their mounts looks a bit flimsy, so it could be wise to add metal pins to add some strength. The tailwheel is nicely moulded with some decent detail on the hub.
The open wheel wells themselves are completely empty, really inviting some scratch-building to add the internal structure.


The transparencies are good quality and are very clear and distortion-fee with crisply defined framing.

Instructions & Decals
Special Hobby provide a nicely printed 12-page assembly guide that breaks construction down into 13 stages. The overall sequence looks pretty logical, but I'll try to leave the turrets' glazing off until near the end. The construction diagrams are clear and colour matches are included for Gunze Sangyo paints. (Note: A small errata sheet is included for the captions of the first two colour schemes that have been swapped accidentally. This has been corrected in the online instructions that can be downloaded from Special Hobby's website.)


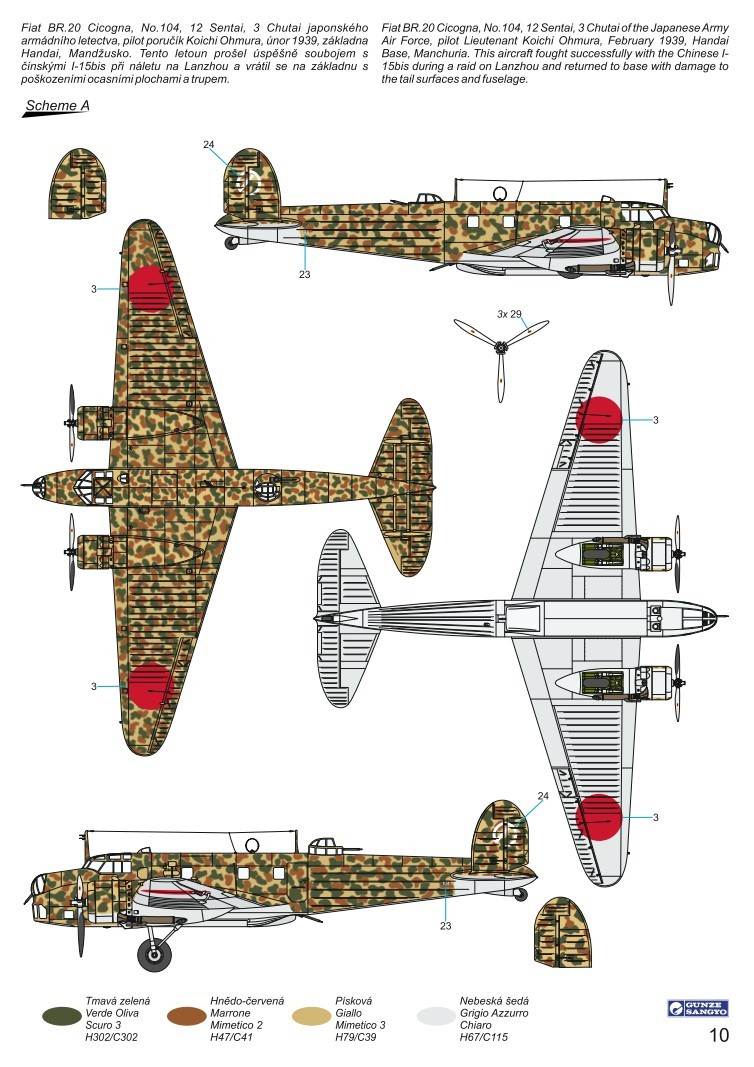
This boxing of the kit includes decals for a very interesting trio of colour schemes - Japanese, Spanish Nationalist and Italian:
Fiat BR.20, No. 104, 12 Sentai, 3 Chutai, Japanese Army Air Force, Manchuria, 1939
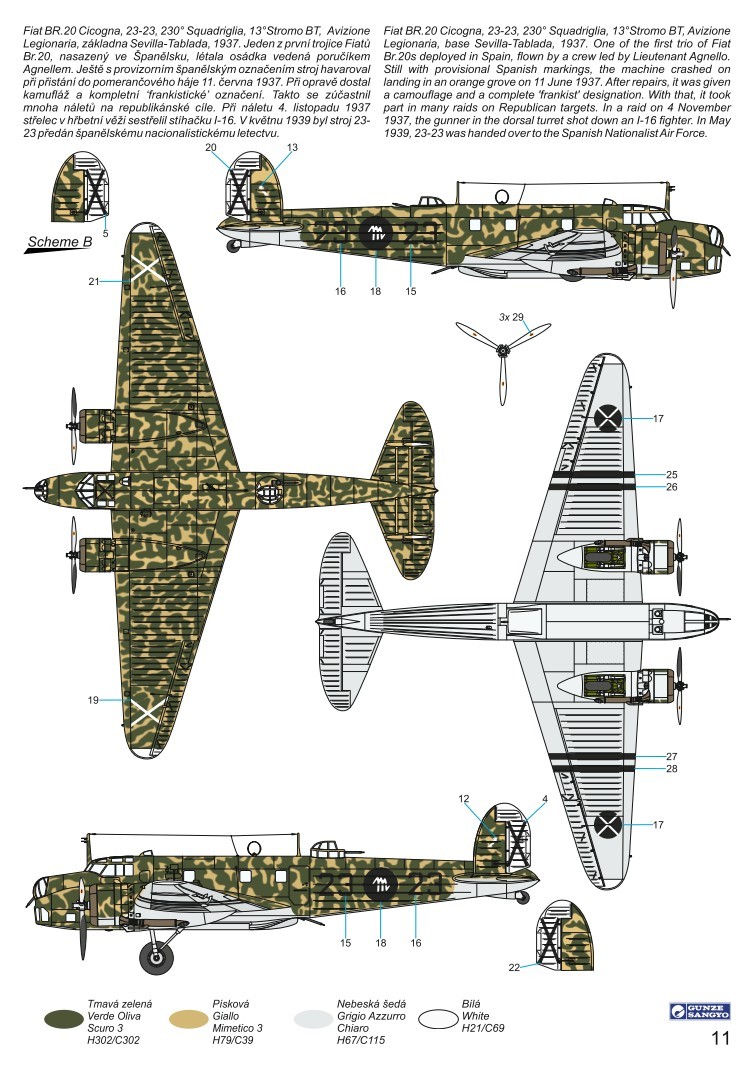
Fiat BR.20, 23-23, 230° Squadriglia, 13° Stormo BT, Avizione Legionaria, Spain, 1937
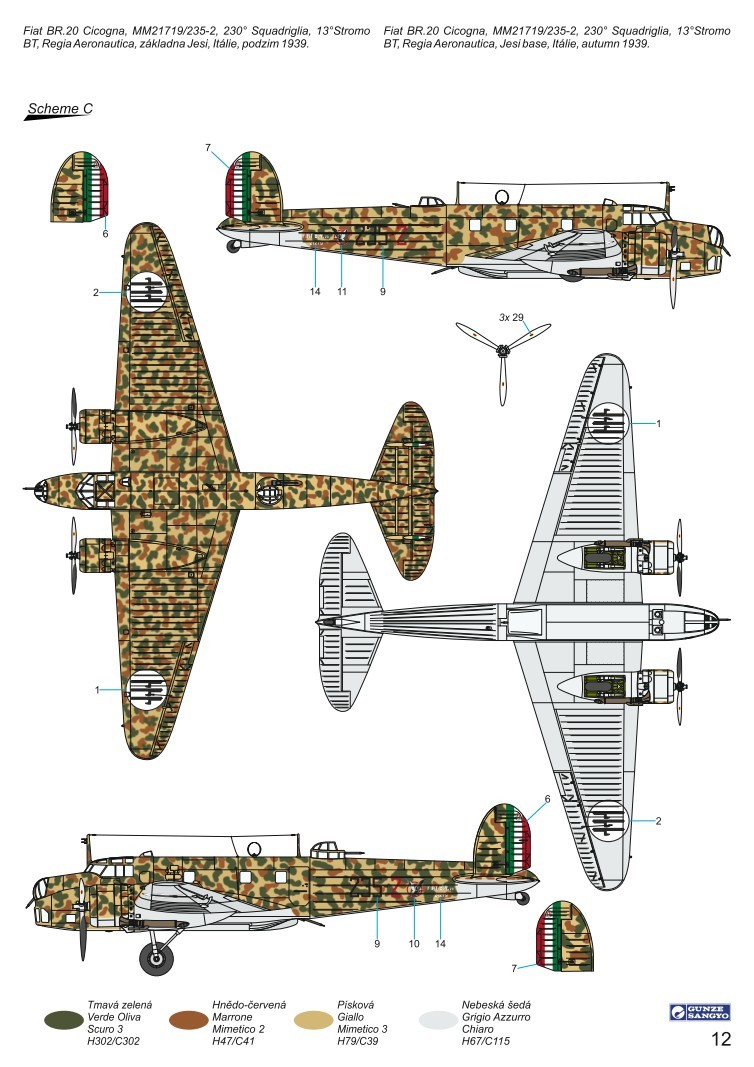
Fiat BR.20, MM21719/235-2, 230° Squadriglia, 13° Stormo BT, Regia Aeronautica, Italy, 1939
The decals look to be excellent quality, being thin and glossy with pin-sharp registration. I think the colours may be printed as ultra-fine dots but, if so, they are so tiny that they are almost impossible to discern even with my strongest magnifier. A nice touch is the inclusion of the Regia Aeronautica coat of arms separately for the rudders if you choose to paint the stripes.


Conclusion
Special Hobby's BR.20 will build into a very impressive model, so long as you've got the skills to handle it. I can't recommend beginners tackling it, because I think that would only end in frustration and disappointment. But experienced modellers should find it a very enjoyable challenge. As a long-term product, rather like a vacuform kit, the end result will very much reflect what you're prepared to put into it.
I really enjoy building kits like this, as I find there's a real sense of satisfaction to be had where there's a lot of your own work in the finished model, and you've also got something a bit unusual that will stand out in a display of more commonly modelled subjects. And the BR.20 certainly will be eye-catching, being basically the size of a Heinkel He 111 or Martin B-26 Marauder.
A bit of inspiration as to just how good the kit can look in skilled hands can be found here in a master-level build by Paolo Carli on the Stormo! website - an essential resource for WWII-era Italian aircraft modelling:
https://www.stormomagazine.com/ModelArticles/FIATBR20/PaoloCarli/FIATBR20_CP_1a.html
The Italian modelling site C.M.P.R. has two sets of references that provide a mass of photos that will be indispensable to help detail the model:
https://www.cmpr.it/MN%20-%20Manuale%20fiat%20BR.20/man.fiat%20br%2020.htm
https://www.cmpr.it/MN%20-%20Nomenclatore%20Fiat%20BR.20/nom.fiat%20br%2020.htm
Kit #SH48229 is available now from Special Hobby - Price: 67.30 Euros
Many thanks to Special Hobby for the review sample.
Please remember, when contacting retailers or manufacturers, to mention that you saw their products highlighted here - on AEROSCALE