

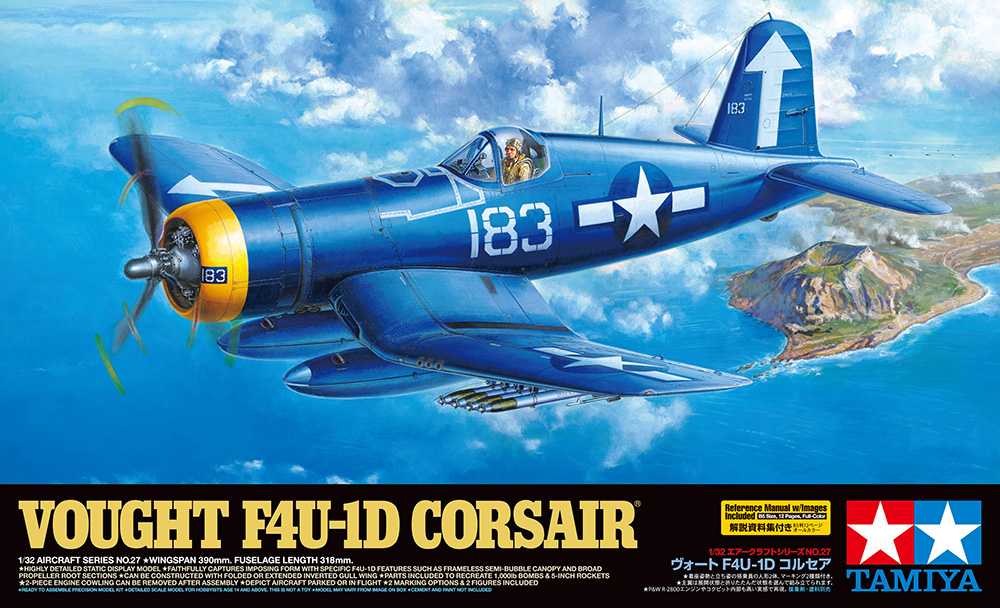
1⁄32Build Review: F4U-1D Corsair
4
Comments
Introduction
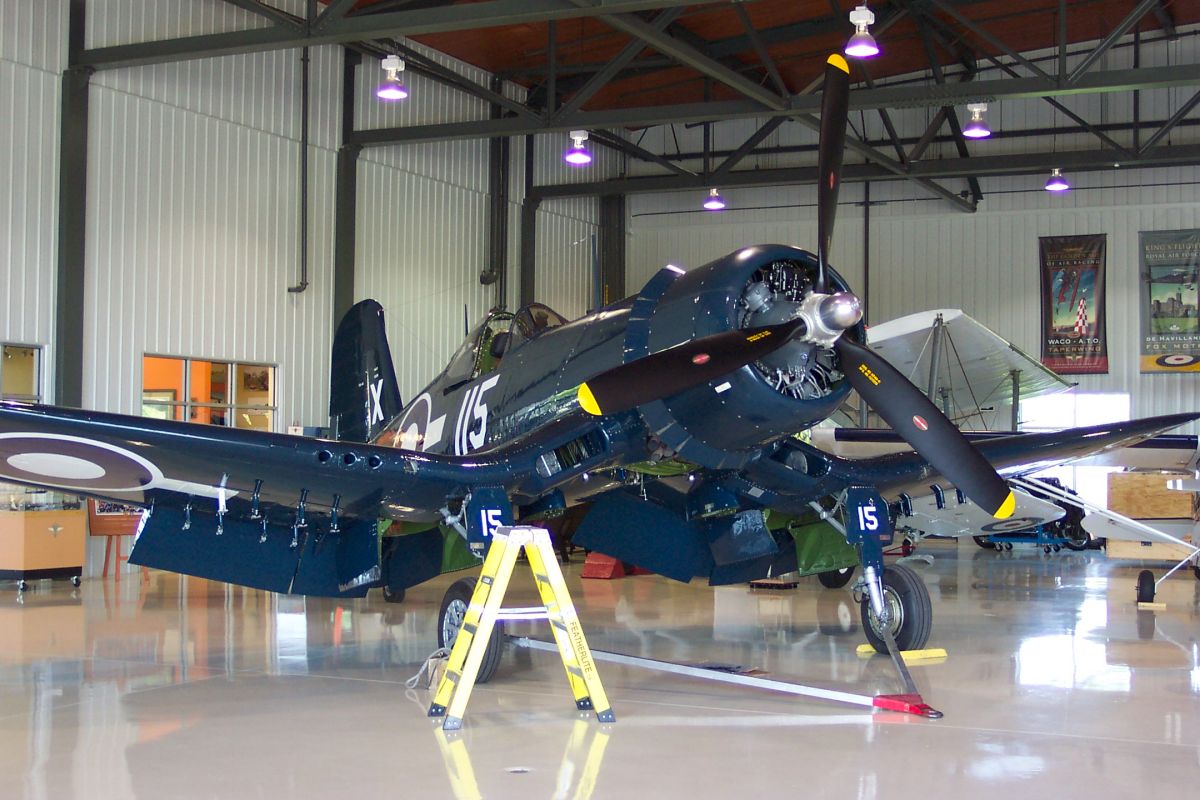
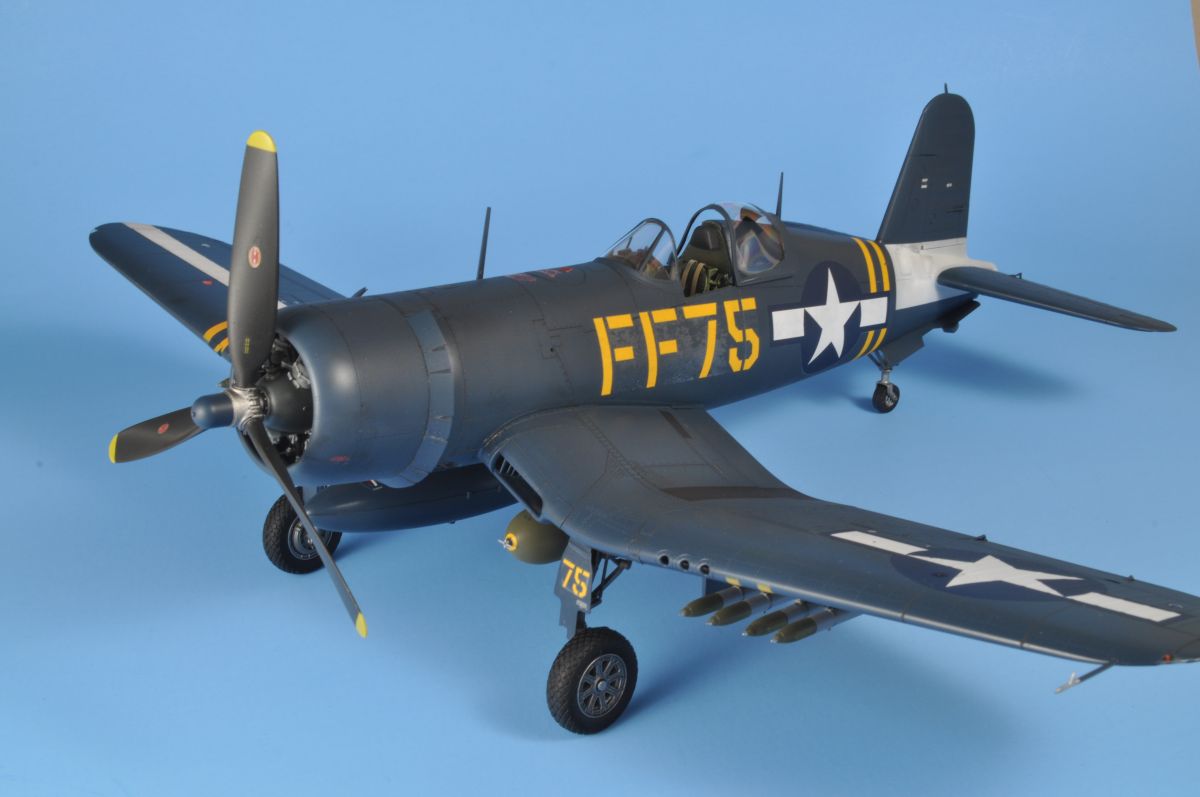
The Chance Vought F4U-1D Corsair is a fighter-bomber developed from the earlier F4U-1 Corsair. Some have said that the -1D was the high point of the Corsair's development as a true fighter bomber. It certainly perfected the Corsair design as it was used in World War 2. It enjoyed a storied career in the US Navy, US Marines, Royal Navy, NZAF and eventually was used much later in several South American air forces. Introduced in April 1944, the -1D version of the Corsair was the most widely produced Corsair variant in the Pacific War.The -1D design added a lot more punch to the improvements incorporated into the -1 and -1A Corsairs. Two hard points were added under the centre of the wing and each could carry a 1000 pound bomb or a 150 gallon fuel tank. The -1D also introduced the 5 inch rocket to the Corsair's arsenal. 8 of these could be carried under the outer wings . Lastly, and most associated with the -1D was the "frameless" canopy which was introduced at some point into the -1D production run.
This is the third variant of Tamiya's 1/32 Corsairs and probably the one that modelers were most looking forward to. The first big Corsair was the "Birdcage" variant and that one was followed with release of the F4U -1A fighter bomber. Having compared the box contents of this latest release with the previous two, modelers will be happy to know that the contents appear to be almost identical with the obvious exception being the decals, painting/decal instructions and obviously the bits that would make the -1D.
This kit looks good in the box, with an excellent instruction sheet, perfectly engraved surface detail, two sets of photo etch, canopy masks and a separate painting and marking sheet. The decal options are familiar to anyone who has an interest in the Corsair - Tamiya has one of these markings in its 1/48th F4U-1D).
I decided to build this model out-of-box in order to give everyone a good look at what they get right away. I also wanted to show how the kit fell together while I was building it; What issues were encountered (very few) and how they could be addressed (very easily). Given the popularity of the Corsair in the modeling world, I am very sure the market will soon be flooded with every possible aftermarket accessory to try to improve this model. After making this model, I am pretty convinced that aside from some different decals, there is not much need to invest in aftermarket.
Cockpit
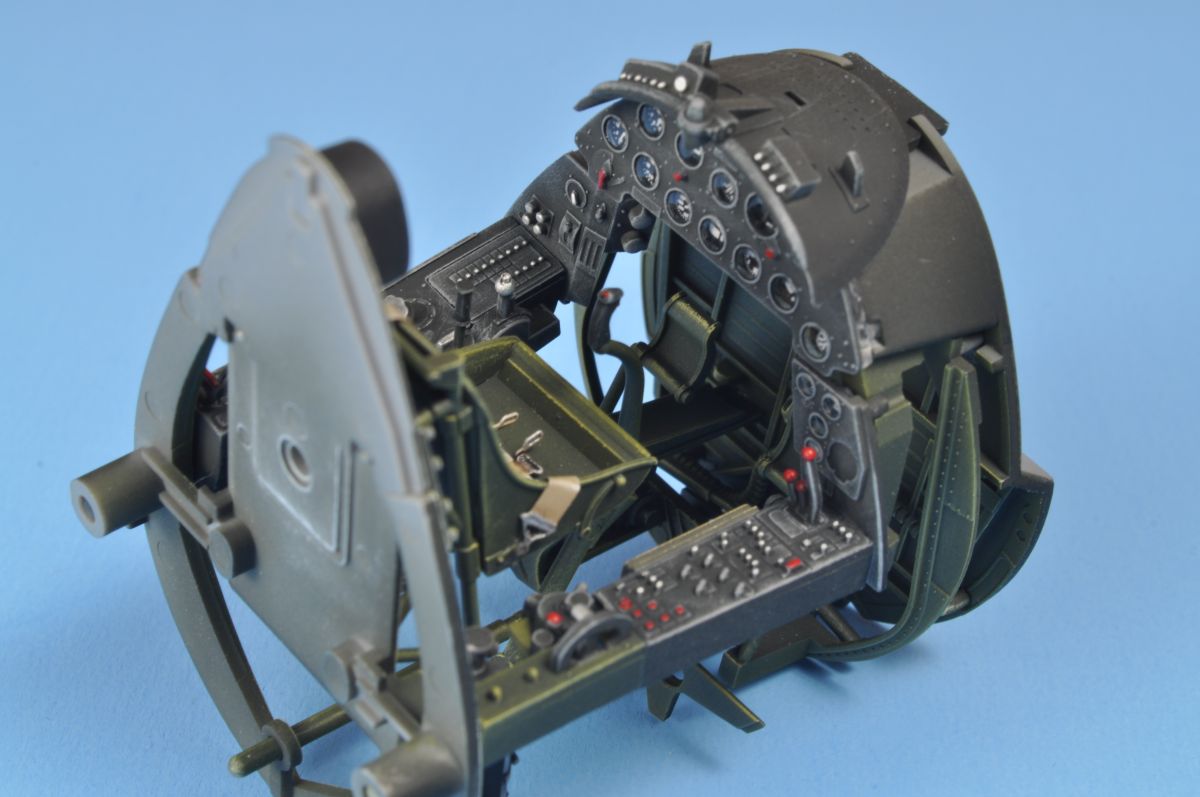
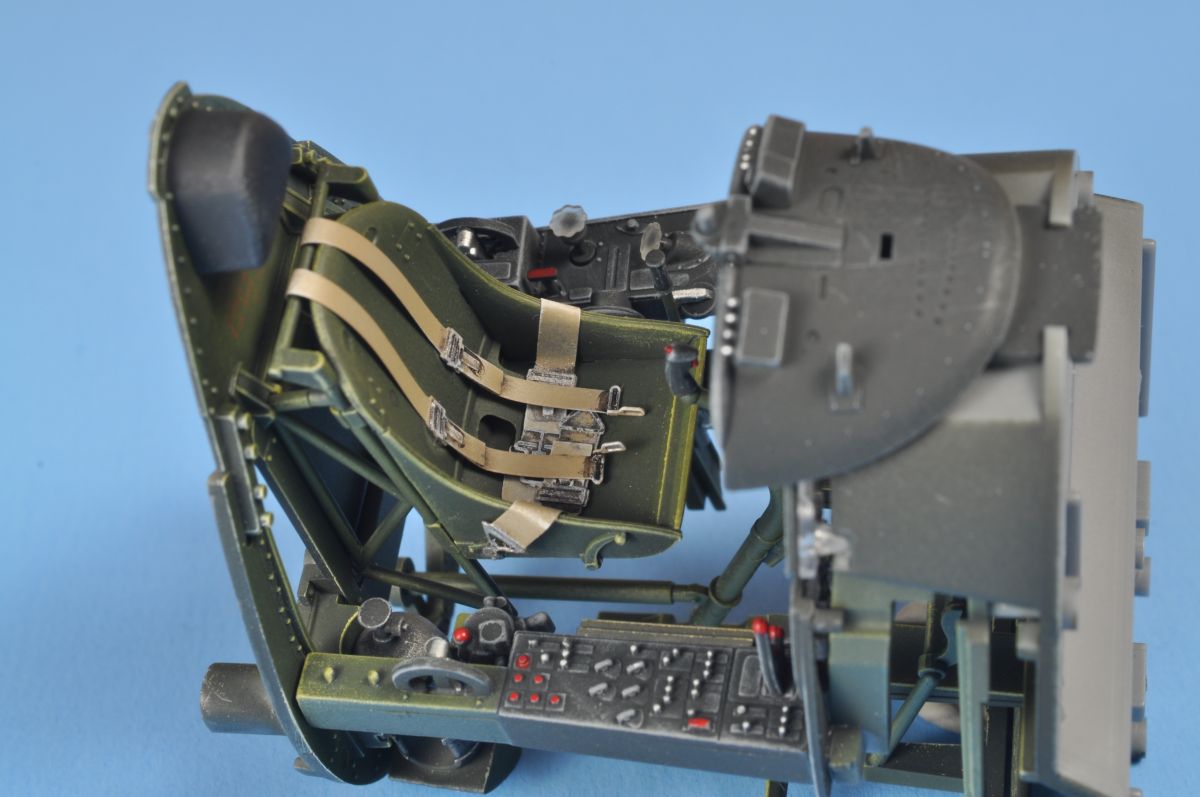
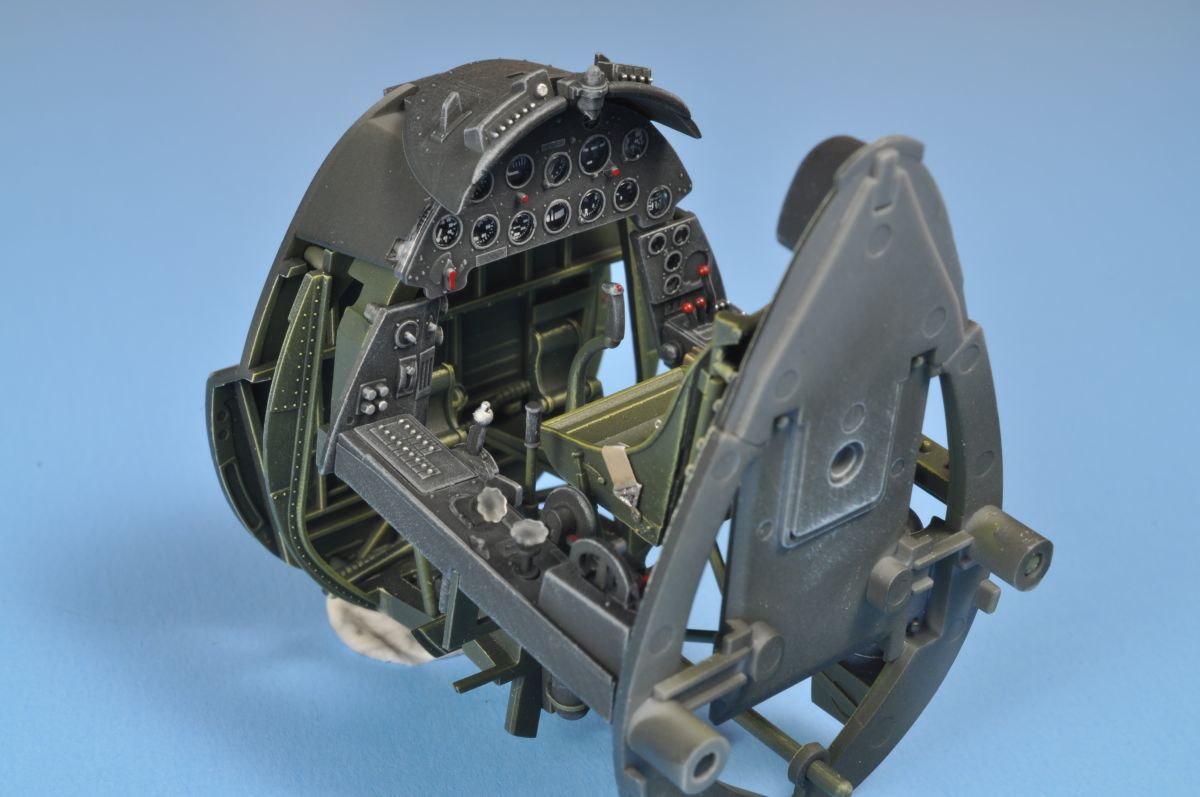
Step 1 (shock of all shocks) starts with one of the most detailed cockpits that can be found in a model. Tamiya has designed this cockpit so well that it can stay together without glue. Its true there are a good number of parts but the advantage here is ease of painting. I prepainted and highlighted every part prior to assembly. I generally follow Tamiya's paint callouts except this time I used my Gunze interior green where applicable. I love that colour in the Gunze paint line. Again, what I wanted to do here is show how detailed this cockpit is. I used Nato Black as the base colour followed by drybrushing with Citadel WHITE. Then I applied thinned Gunze interior green until I got the level of highlighing that I wanted. To some this may look a bit exaggerated but once its closed up in the cockpit, I find this method still allows everyone to see the detail inside. The only issue I ran into with the interior is with the photo etch seatbelts. They are thick and I ran them through a flame several times to get them to soften up. Eventually they cooperated and allowed me to form them to the contours of the seat. I am not 100% keen on the colouration and weathering I put on the belts but I think they are as convincing as I can make them.The fully cockpit definitely looks the part. I was particularly impressed with the sidewalls and the instrument panel with the tried and true decals behind the clear lenses! The detail on the side consoles and side walls is impressive as well. Tamiya produced two of the knobs in clear - just like on the real thing.
The sidewalls are also very well detailed and went together very easily with an assortment of raised detail and some photo etch.
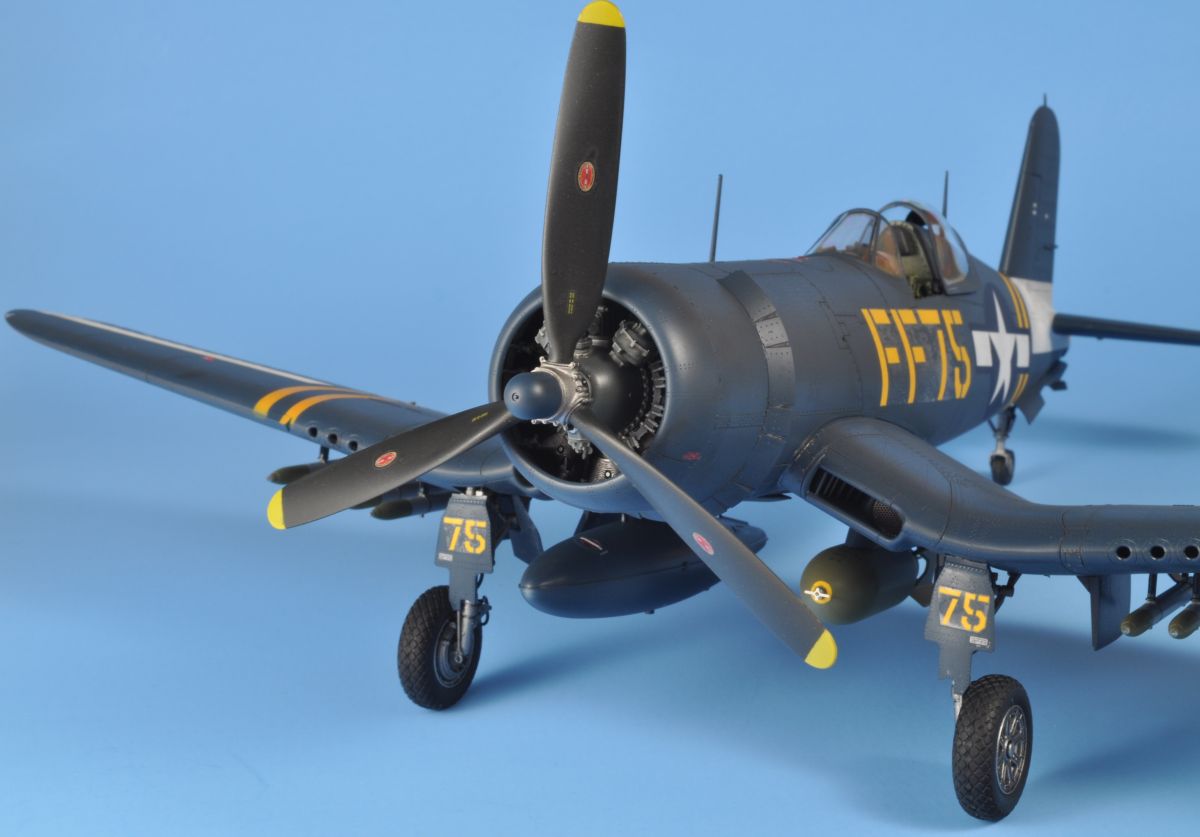
Engine
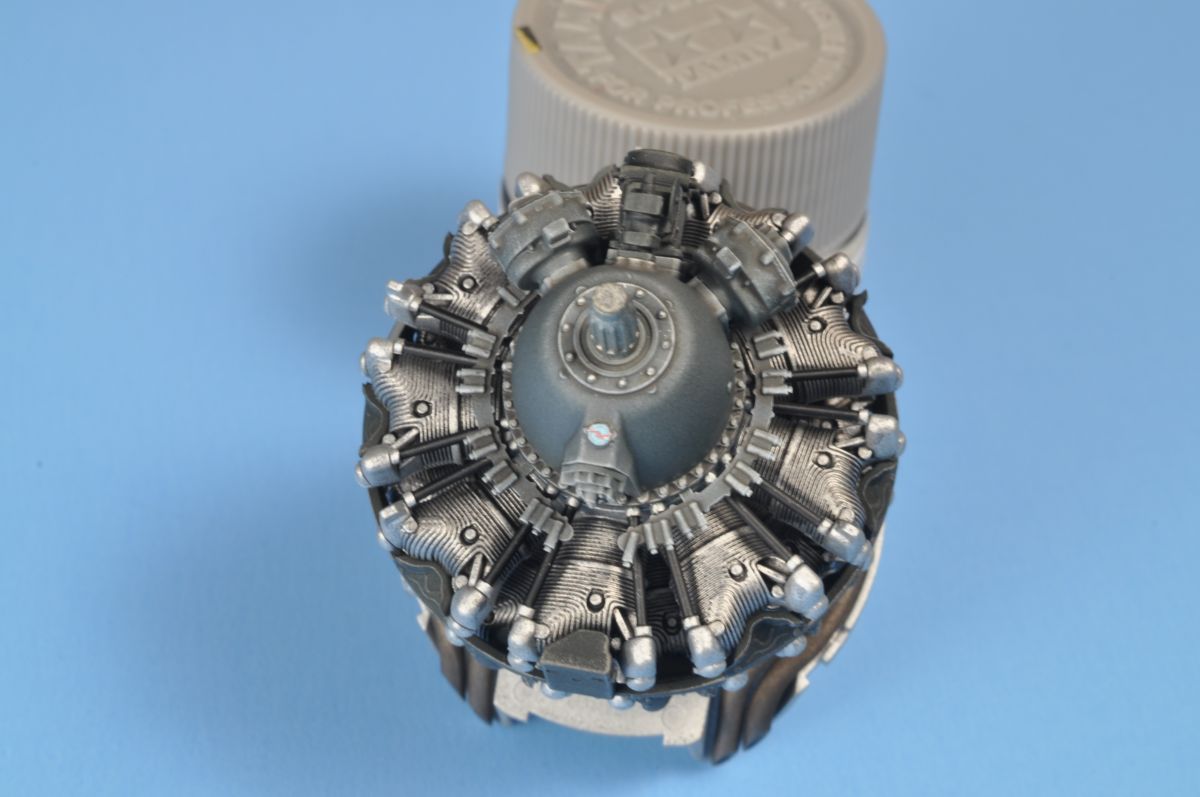
Before I closed up the fuselage (there are a lot of bits that go in there!) I decided to construct the engine. Following on from the wonderful engines in Tamiya's 1/32 Zero kits, this R-2800 is a beauty. There are a healthy amount of parts to make the detail pop but not so much that its difficult to fit together (read: this fits perfectly and it not an over-engineered at all). The parts breakdown allows for very easy painting. My approach was simple - the cylinders got a chrome finish that was weathered with Tamiya's black panel liner. The other engine parts got "primed" in black, drybrushed in white and then a thin mix of a light grey was misted on until I had the detail I was looking for. Normally I wire engines but in this case I kept the build simple. I am sure there will be dozens of after market engine sets released in the coming months but in all honesty - save your money. This is an excellent engine out of the box - add your own ignition wiring (the harness is very well represented) and you have an excellent powerplant. In fact, I believe Tamiya should release a kit of the engine on its own.Closing up the Fuselage
Alright, back to the fuselage. There are a few internal structures that need to be built, painted and installed on the interior of the fuselage halves. I did paint and weather these parts but it should have been time spent somewhere else as very little of these detailed structures will be seen once the fuselage is buttoned up. Take care to use glue sparingly at this step. Tamiya has engineered a wonderful way to seal the fuselage with little work to do once the glue is dried. I only had one small seem on the top and one on the bottom that was quickly fixed with a bit of surfacer.The next step involves placing the completed engine onto the front of the fuselage. The directions have you attach the cowl flaps to the back and the rounded cowling to the front of the engine. The idea being that you can take advantage of the detachable cowl covers to show off the engine - but these are set out much later in the build. I wanted to see how tight the entire cowl would be with all the pieces.
I am very glad I did this test fit because to my surprise, there were trench like gaps in front and behind the detachable cowl parts. These were so prominent that I immediately thought I had messed up a construction step. After an evening revisiting the instructions and thoroughly dissecting my engine build - I simply could not see where I had gone wrong and the engine was assembled tight. The only solution that worked for me was shaving down the mounting pins on part G5 so that the front of the cowling was mounted closer to the fuselage. The gaps disappeared. I still suspect that somehow I messed up but its definitely worth checking out when you build your F4U-1D Corsair.
After this step, builders must choose to do an 'extended wings' or 'folded wings' Corsair. The instruction book makes it very clear and once you choose, you turn to the indicated page and simply follow the instructions from that point onwards. I much prefer this to the alternate of showing 2 different build steps in the same instruction sequence. So thanks for that, Tamiya.
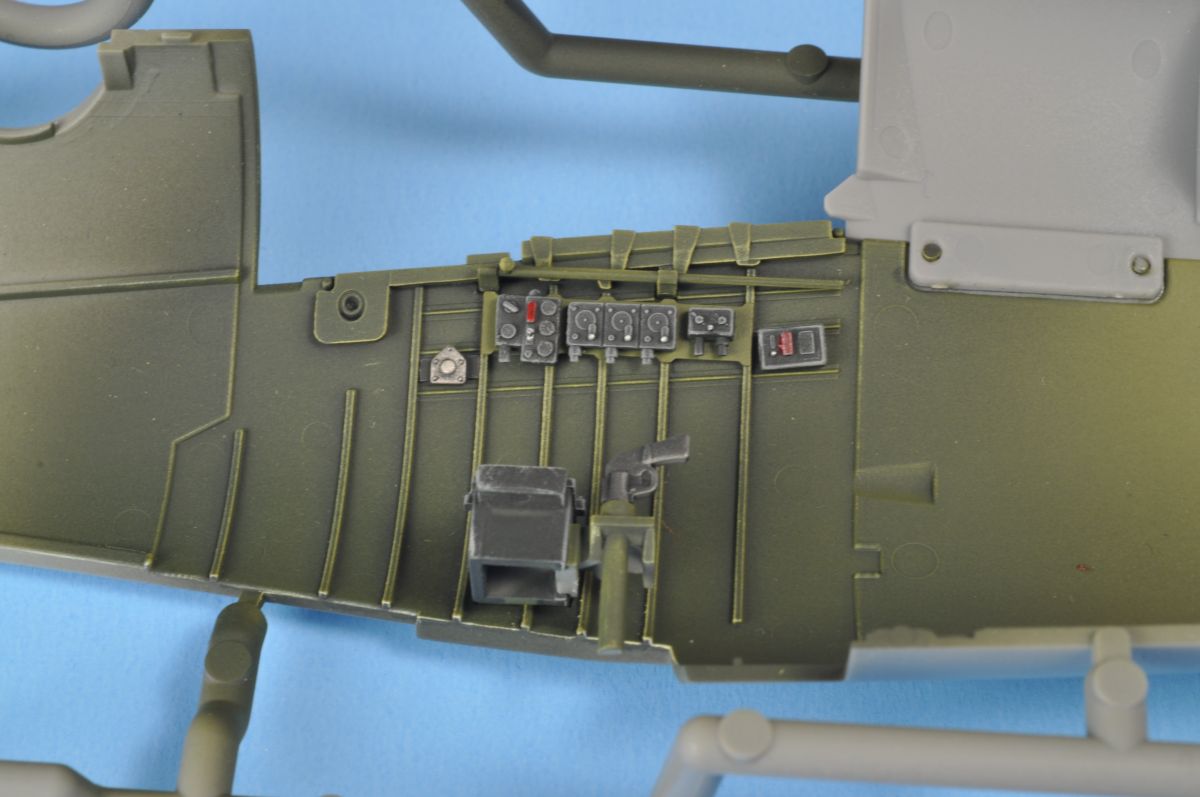
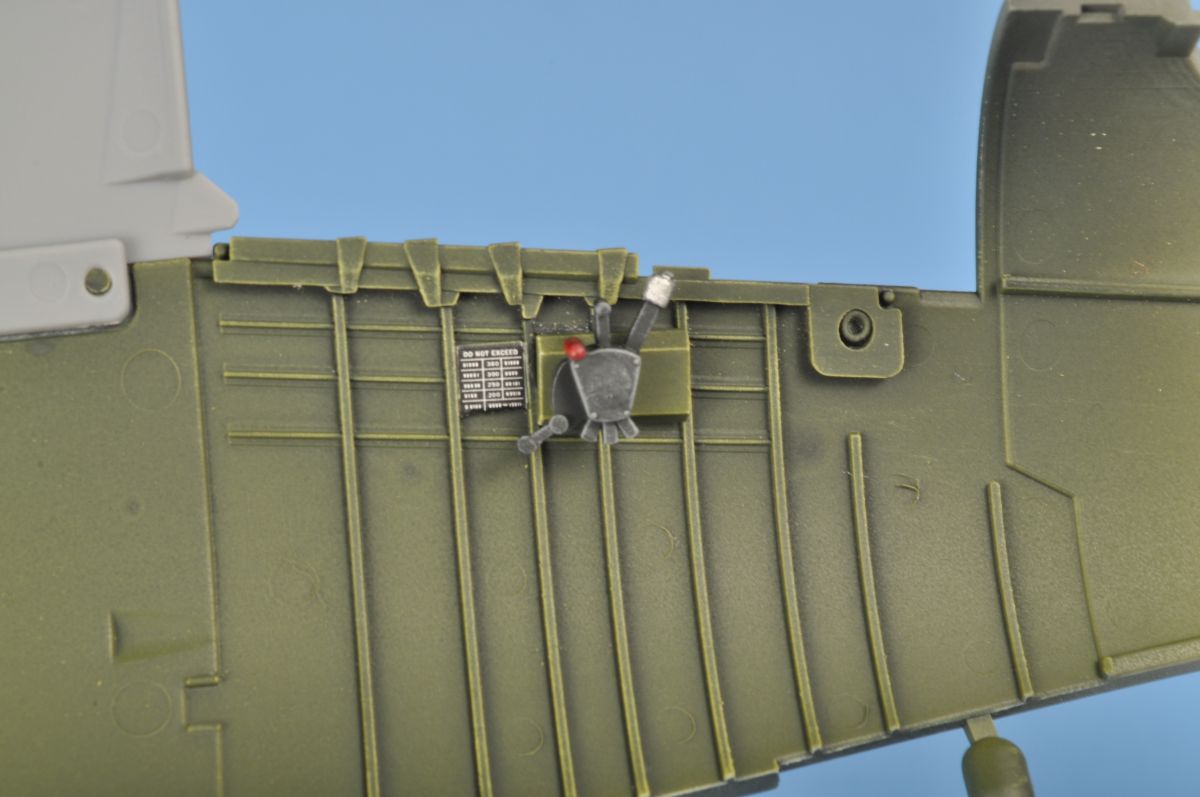
Again - there are a lot of internal structures that need to be assembled and painted - some parts even require multiple paints. As usual, I did them all as indicated as I did not know what would be seen at the end of the build. Most of it will not but there are still some fuselage/wing openings that will allow for internal views. So it pays to do at least the proper basecoat in these internal sections. The only other issue I ran into was the placement of the wing spar in step 45. I think out of all of the parts or subassemblies on this model, this is the one that did not feel positive and I had to check it several times to ensure I had installed it correctly. The wheel wells went together beautifully and the wing made a very solid join to the fuselage.
The landing gear builds up incredibly nicely - and these are well detailed beauties. There are metal rods that fit into the mains and the "open hub" that is very noticeable on the real Corsair is reproduced perfectly. Unfortunately the treads on the tires have a mold line but I was able to get most of it off using nail clippers and patience.
To give you all a nice review of the ordnance, I decided to give this bird the rockets as well as one bomb and one drop tank. The rockets went together very well and were very easily painted. The bomb has wonderful detail as does the drop tank.
Painting
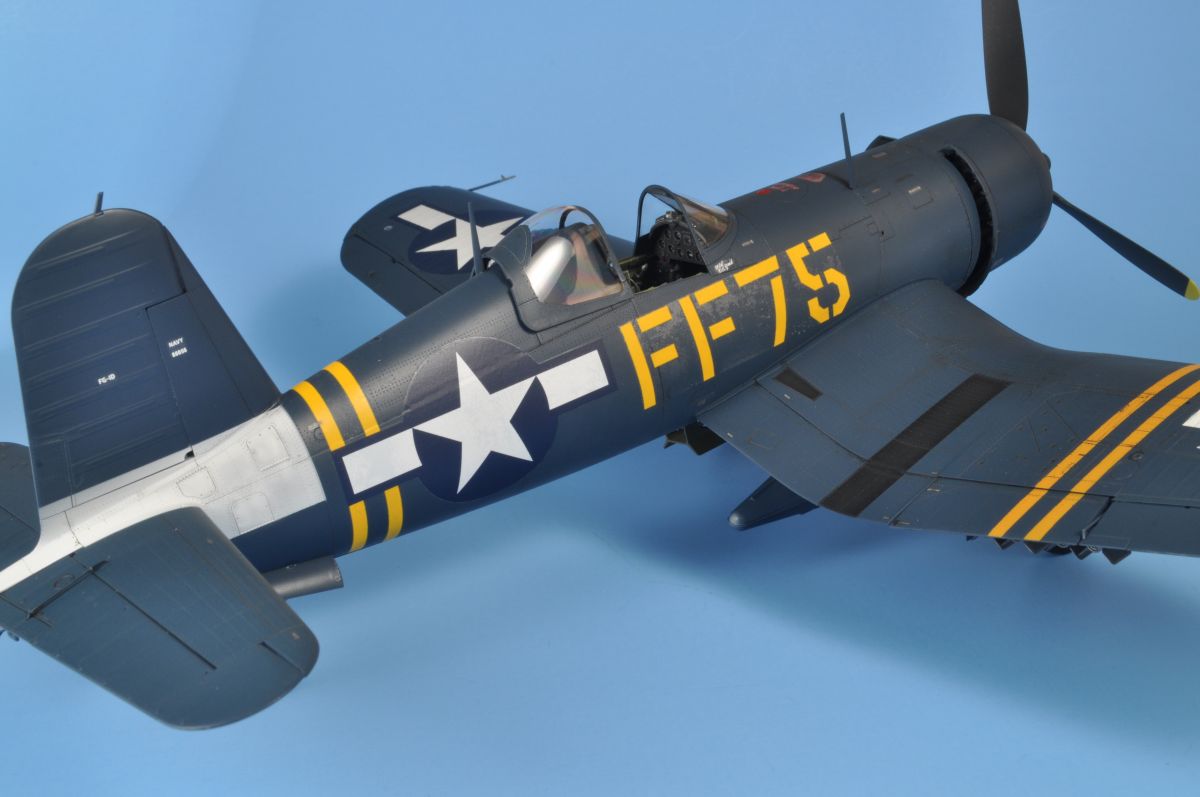
The one knock on the -1D Corsairs is that for those who are not obsessed with the type, they do not offer a lot of variety in their finishes. Its basically gloss sea blue, stars and bars and some form of white stripe or shape. There are some exceptions to that general rule.I base coated the model with Tamiya's AS-8 decanted and sprayed through my airbrush. Its a very good interpretation of gloss sea blue and it sprays wonderfully when thinned with a little Tamiya lacquer thinner.
I really tried to do something different with the paint scheme and spent a considerable amount of time masking for the markings as well as the insignia. Generally I spray markings on very well but this time it was like the tape simply refused to cooperate. Once the intricate masks were removed, all I could see were paint leaks. ... everywhere. I decided it would be far faster to strip and start over with the kit decals.
For anyone who has used Tamiya decals, this will not come as a surprise, but there are better decals to be had out there. To be fair, most of the small decals (and there are a LOT) went on without any issue. The big ones (insignia and striping) took a considerable amount of Micro Sol to settle and they never fully settled. Unfortunately, despite an entire week of brushing sol onto the large decals, they started to silver on me. This was very unfortunate as I had even decided to shoot a couple coats of gloss onto the model.
Conclusion
Well, aside from the let down at the very end with the decals, this model was a very fine build. Much like the Tamiya Zero, anyone can build this kit and end up with an excellent model. Even with the price difference factored in, this -1D from Tamiya is miles ahead of the Trumpeter and Revell Corsairs. I also think that outside of wiring the engine and antennae, there really is no need for after market with this Corsair. I highly recommend it (along with the purchase of some paint masks or after market decals).AeroScale would like to thank Tamiya for providing this review sample.
For a more indepth inbox review, you can read it here


About the Author


Comments

Hi Chris
Great build! The cockpit and engine look superb!
It's so sad to see it trip up at the finishing stage. Talk about a real double-whammy to first have the masks go wrong, and then the decals let you down!
I've also had very mixed experiences with Tamiya decals. Sometimes they've silvered and refused to settle down properly on a surface that's polished like a mirror. Other times, they've been absolutely fine and looked pretty much painted-on...
All the best
Rowan
DEC 09, 2017 - 02:31 PM
Hi, Rowan, I second your experiences. For such a fine model company, Tamiya puts out some piss-poor decals at times. On my Birdcage Corsair build, I used masks for the national insignia for that very reason: the large roundels just wouldn't sit down.

DEC 09, 2017 - 08:45 PM

I have always found that smaller Tamiya decals are not bad, I get them down with SolvaSet (Walther's product), some of the bigger ones seem to not want to react to at all.
DEC 10, 2017 - 06:33 PM
Copyright ©2021 by Chris Wallace. Images also by copyright holder unless otherwise noted. The views and opinions expressed herein are solely the views and opinions of the authors and/or contributors to this Web site and do not necessarily represent the views and/or opinions of AeroScale, KitMaker Network, or Silver Star Enterrpises. Images also by copyright holder unless otherwise noted. Opinions expressed are those of the author(s) and not necessarily those of AeroScale. All rights reserved. Originally published on: 2017-12-08 00:00:00. Unique Reads: 11334

WEB HOSTING BY


Copyright ©2021 AeroScale and Kitmaker Network, a subsidiary of Silver Star Enterprises
All Rights Reserved. Please read our Conditions of Use and Privacy Policy.
All Rights Reserved. Please read our Conditions of Use and Privacy Policy.