

1⁄48Ventura Mk.II
15
Comments
History
The Lockheed PV-1 Ventura was originally conceived as a bomber, then converted to a patrol aircraft, that was primarily used by United States and British Commonwealth during WWII.The Ventura was developed from the Lockheed Model 18 Lodestar transport as a replacement for the Lockheed Hudson, which was also used as a bomber with the Royal Air Force. Originally used as a daylight bomber in Europe, they proved to be less then effective in that role, and were then transferred to both countries' Coastal Commands for use as maritime patrol aircraft .
The Ventura was very similar to the Lockheed Hudson. The primary difference was that the Ventura was larger and heavier, with upgraded engines. The RAF ordered 188 Venturas in February 1940 which were delivered from 1942 onwards.
The PV-1 Ventura was primarily built by the Vega Aircraft Company division of Lockheed for the U.S. Navy. The main differences between the PV-1 and earlier models were the inclusion of special equipment in the PV-1, better adapting it to its patrol/bombing role. The maximum fuel capacity of the PV-1 was also increased to extend its range. The forward defensive armament was reduced for this reason as well. The most important addition was of an ASD-1 search radar.
Early production PV-1s still carried a bombardier's station behind the clear nose bowl, with four side windows and a flat bomb-aiming clear panel on the bottom side of the nose.
The Model
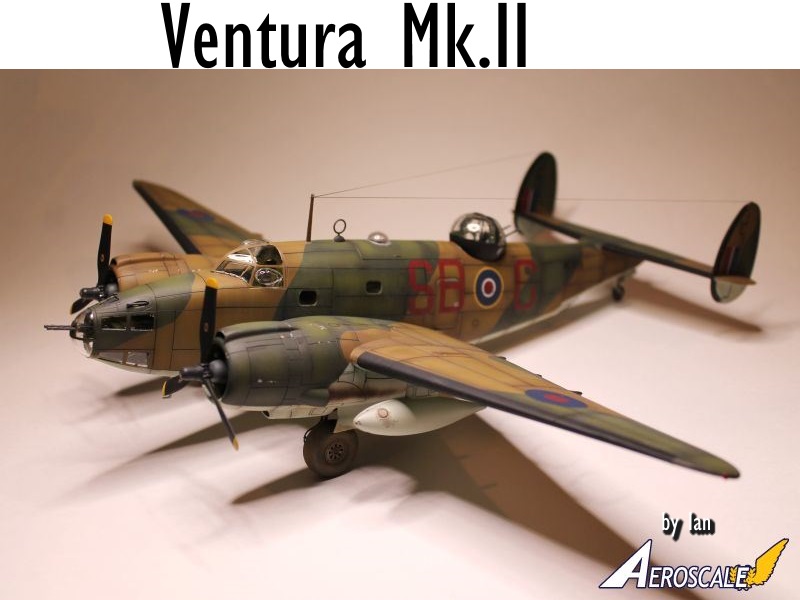
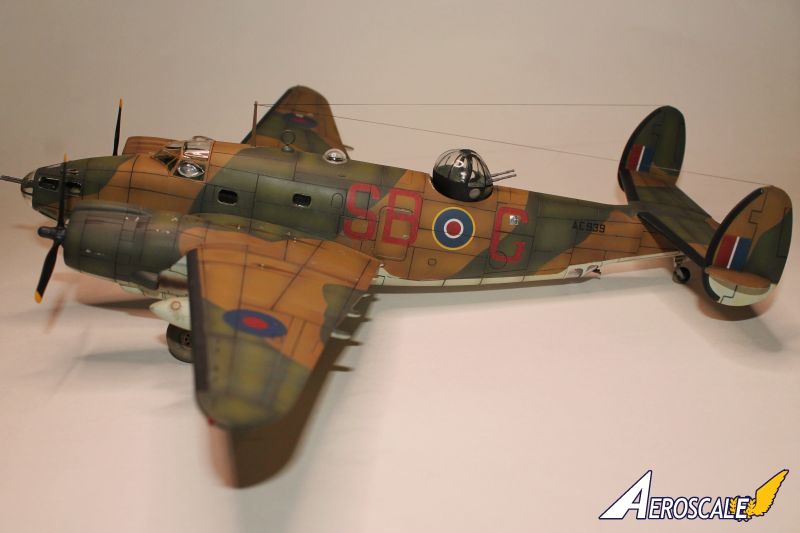
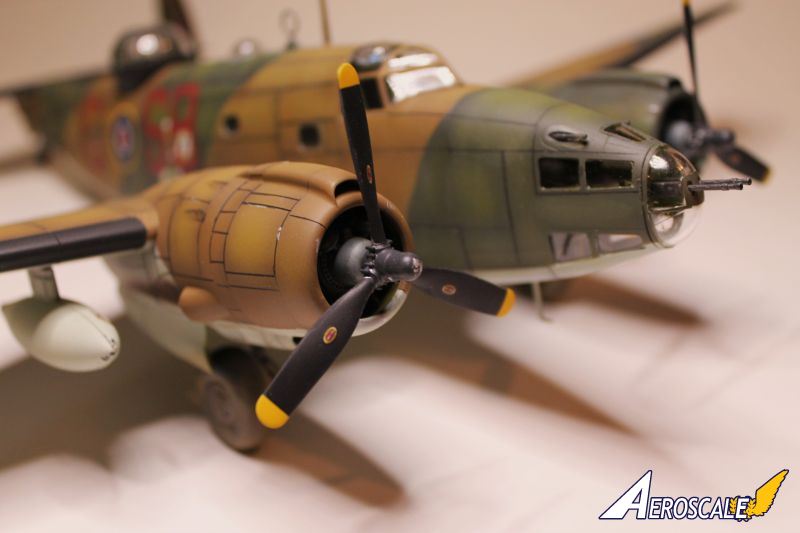
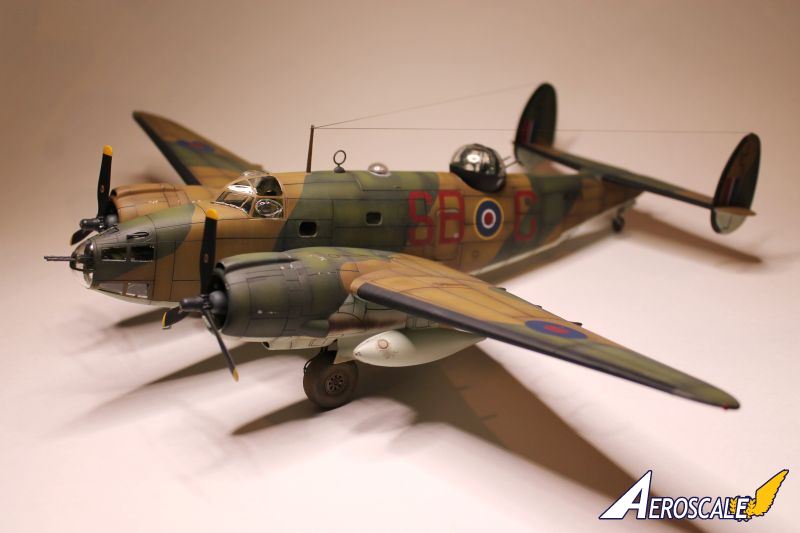
This is my recently completed Revell 1/48th scale Lockheed Ventura II. This kit was a reissue of the excellent Revell PV-1 Ventura kit but kit parts were supplied to depict the RAF variant along with new decals. I had been wanting to add this variant to my collection for some time and I have always loved the classic lines of this Lockheed aircraft. I watched Joel Willsteins superb Ventura build log and feature on Aeroscale and got some good insight and motivation from that to finally complete this project.Revell supplies a clear nose with the reissued kit and a complete bombardier compartment is provided as well. The interior of the model was painted Interior Green and post shaded with a lightened shade of that. I added some maps to the chart table in the nose of the airplane for extra detail. I also added belts and straps to the seats. Since the nose piece is entirely clear, I painted strips of Scotch 3M 2090 tape Interior Green and cut them to shape. Once that was done, I placed the tape inlays over the top and bottom seams in the nose interior to cover it up. This way, any glue-crazing and sanding marks on the clear plastic seam would be covered up. After all the interior work was done, the plane was closed up. The fuselage fit very well and minimal sanding was required.
The Revell kit comes with a beautiful set of yellow-tape masks so I began applying these to the nose windows and the fuselage windows. I then began work on the wings and these fit together well also. I then spray painted the clear nose exterior with Interior Green before the camo was applied. I did notice there was significant warpage on the right wing so I ended up correcting that with a vise and a hair dryer to straighten it. I then attached the wings and horizontal stabilizers to the model. Once again, I encountered a warpage on the left side of the horizontal stabiliser causing it to be canted upwards. To correct that, I made a cut on the natural panel line and brought the stab down a few degrees. The panel line was then partially filled and rescribed.
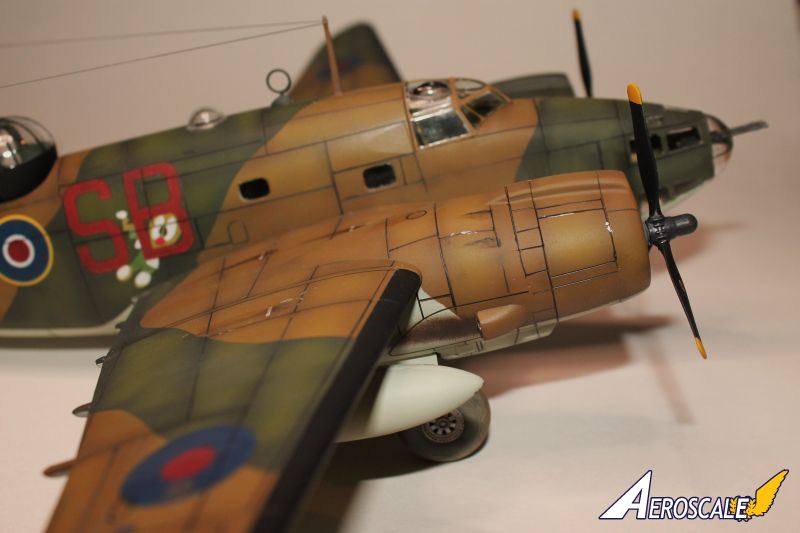
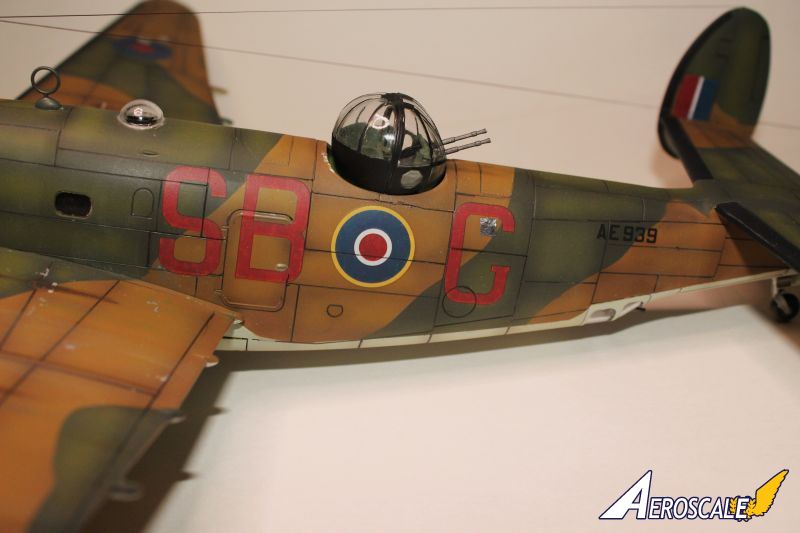
At this point all the seams and blemishes were filled and the model was primed with Testors Enamel Primer. Any remaining blemishes were sanded and the plane was primed again. I then began work on the camo scheme. The bottom of the aircraft was painted with Model Master Sky Type S and post shaded with a lightened shade of that. I then worked on the camo for the top part of the airplane. Photos indicated a very tight demarcation line on the green and brown so I masked the top part of the plane with 3M 2090 tape. I then applied the RAF Dark Green and the Earth Brown using Model Master enamels. Both colors were post shaded because photos showed a reasonable amount of fading on the real aircraft. At this point the tape was removed. I encountered my first significant problem at this point. Revell apparently uses a hefty mold release agent and the tape pulled patches of the camo colors off. It should be noted the plane had been washed with soap and water and primed with an enamel primer. Also low-tack tape had been used but nonetheless some patches of paint did come off. I would recommend an additional step of using fine steel wool to thoroughly sand the model to make sure the surface is properly prepped, if you intend to do any masking. The de-icer boots were painted on the leading edges of the wings. Revell was kind enough to provide decal de-icer boots for the vertical stabs so no masking was required there.
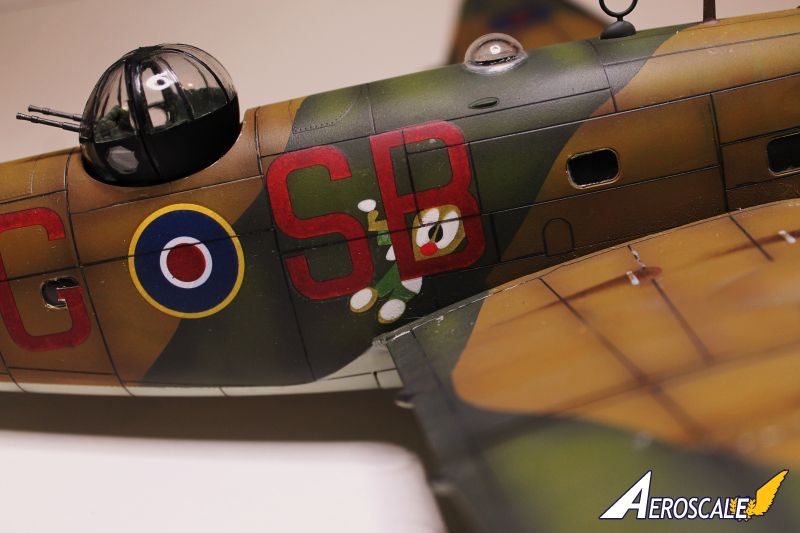
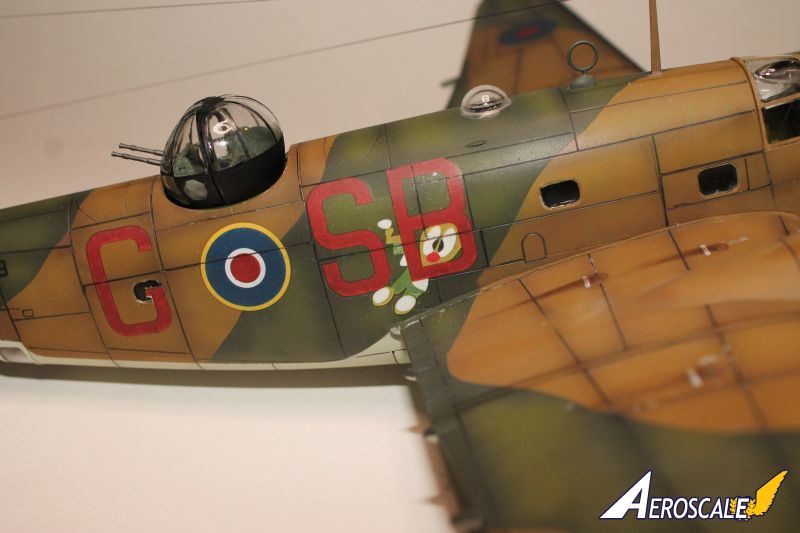
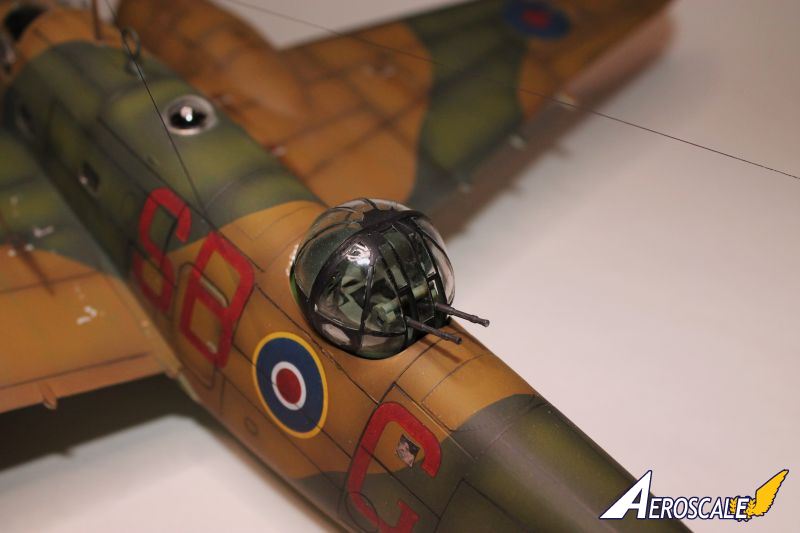
I then drew all the panel lines with a Micron .005 ink-pen. Following that, I shaded all the panel lines with Tamiya Smoke which was applied at low pressure through my airbrush. I then encountered my second problem. I had intended to display the bomb bay doors open with a full load-out in the bomb bay. However, the mounting brackets for the doors did not fit well in the mounting slots because the pins were over sized. In addition, one of the bomb bay doors was warped. By the time I got the doors installed in an open position there were severe alignment issues due to the warpage and the issues with the brackets. I then decided to position the bomb bay doors in a closed position and they fit just fine. I then worked on the dorsal turret. It was molded in two halves and complete masks are provided. I painted the turret RAF Interior Green and then painted the turret exterior black as they were on the actual aircraft. I then added a gloss coat of Pledge to the model. To give it a more streaked appearance I did the oil paint dot method on the upper surfaces. Fluid leaks were applied using oil paint as well. The plane was then given its decals. Revell provides decal options for Group Captain Leonard Trents aircraft from 487 Sdn. (New Zealand) in which he and his crew flew a mission which resulted in a Victoria Cross. The second option is an airframe from 464 Squadron, an Australian unit. I opted for this version since it has nice fuselage art of a mouse peering through the fuselage codes. Since the decals were somewhat translucent, I hand painted the mouse motif with Vallejo paint to brighten it up somewhat. The plane was then given a flat coat of Dullcote thinned with Metalizer thinner. Some spots of chipped metal were then added to the airframe. It was then time to add the turret and the canopy. Unfortunately, Revell did not depict the canopy with the two blisters common on the RAF Venturas. To remedy this, I took a Mosquito canopy from the spares box and cut the two blisters from that. I then applied the blisters to the Ventura canopy with white glue and then brushed on a coat of Pledge over that. The blisters blended perfectly. I then added the turret and the remaining sub assemblies to the plane. It should be noted it looks like Revell remedied the problem of the prop blade size in the PV-1 kit and molded these to the correct size. The last step was to add the rigging wire and various antennas.
In summary, this was a fun build and the Revell Ventura is a welcome addition to the stable of multi-engine WW2 aircraft kits already on the market.


About the Author


FROM: , UNITED STATES
I have been modeling for about forty years and enjoy building 1/32 scale and 1/48th scale aircraft as well as an occasional piece of 1/35th scale armor. I love building modern USN/USMC subjects as well as RAF/RCAF/RAAF/FAA prop driven and jet subjects.
Comments

Thanks for the kind words. Hope you are well, Burt.
Best wishes,
Ian
FEB 27, 2016 - 07:56 AM

Damian, thanks for looking and commenting. Glad you liked it.
Best wishes,
Ian
FEB 27, 2016 - 06:52 PM

Ian,
What an absolutely fantastic build of a rather difficult and complex kit. I've been thinking of one day sooner then later to build this variant as well, but keeping the kit basically stock as you've found that Revell has corrected most of the major issues.
I'm particularly impressed with how you corrected the missing two greenhouse glass blisters. One would never know that you made those corrections, as they look molded on.
Your British paint camo scheme matches up quite well with my references. Very nicely done. Weathering isn't overly done, leaving one with the impression of a rather well maintained operational aircraft.
I do feel your frustration with those 4 piece bomb bay doors, brackets, and mounting brackets. They nearly drove me nuts. Quite fiddly to say the least. But having them closed really adds to the overall sleekness of the aircraft's lines.
And Ian, I certainly do want to thank you for your most kind and sincere words about my PV-1 and build blog. It means quite a lot to me that fellow members would even consider taking the time to mention it.
Joel
FEB 28, 2016 - 07:28 AM
Thanks for the kind words, Joel! I must say, seeing your Ventura did certainly inspire me to get this one done because my project was drifting into "hangar queen" territory. As luck would have it, I think a company in the UK just released an aftermarket canopy with the blisters molded on. Hopefully that will save some modellers from the "cutting and blending" method.
Best wishes,
Ian
FEB 28, 2016 - 07:53 AM


Your paint scheme is top notch; i'm impressed by the variation in colour especially the mottled green. Is this the effect you achieved with the Tamiya smoke post shade? It certainly breaks up the monotony of large areas of flat colour.
FEB 28, 2016 - 06:02 PM
Diego---Thank you!
Paul----The finish is essentially layered post shading. As I apply each layer of the camo, I post shade with a lightened shade of the base color. The Sky Type S post shade was created by lightening it with white. The brown and green post shade tint was created by lightening both colors with yellow. I like to use yellow rather than white because the white makes things more greyish. The Tamiya Smoke was used to shade the panel lines after they had been drawn with the Micron Pen. Thanks for looking and commenting.
Best wishes,
Ian
FEB 28, 2016 - 09:02 PM
Copyright ©2021 by Ian. Images also by copyright holder unless otherwise noted. The views and opinions expressed herein are solely the views and opinions of the authors and/or contributors to this Web site and do not necessarily represent the views and/or opinions of AeroScale, KitMaker Network, or Silver Star Enterrpises. Images also by copyright holder unless otherwise noted. Opinions expressed are those of the author(s) and not necessarily those of AeroScale. All rights reserved. Originally published on: 2016-02-27 11:57:00. Unique Reads: 8341

WEB HOSTING BY


Copyright ©2021 AeroScale and Kitmaker Network, a subsidiary of Silver Star Enterprises
All Rights Reserved. Please read our Conditions of Use and Privacy Policy.
All Rights Reserved. Please read our Conditions of Use and Privacy Policy.