

How To: An Easy Photo Booth
7
Comments
Making the Booth
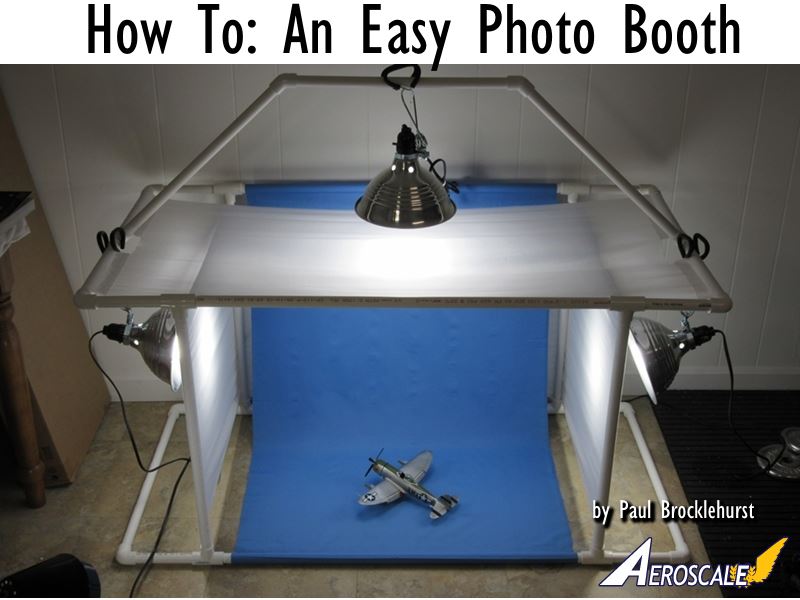
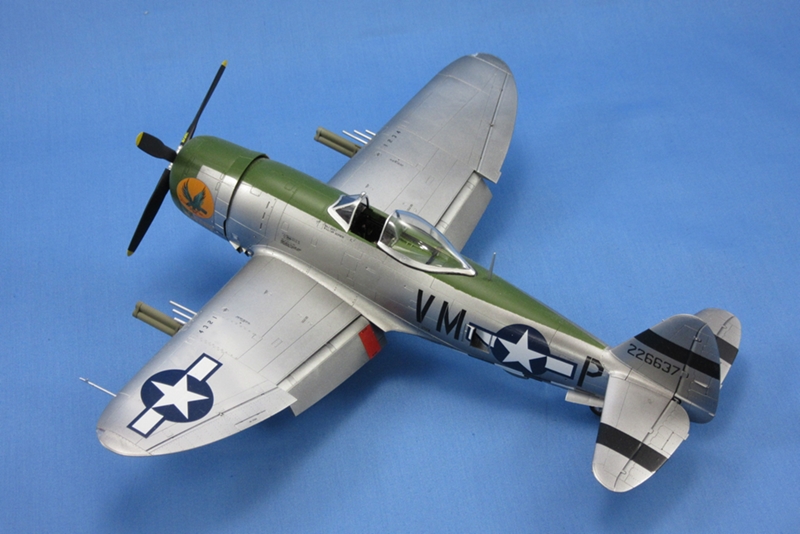
This feature explains how to make a simple, lightweight, inexpensive photo booth to improve the quality of your model photographs. I wanted to build something large enough to photograph some of my bigger 1:48th scale kits. This booth has a photography area measuring 81.5cm L X 61cm W X 61cm H (32" L x 24" W x 24" H),* large enough for Revell's B-17G, and is lit by 3 x 100 watt daylight bulbs mounted in 20.4cm (8") reflectors. If you wish to build something larger or smaller, you will have to adjust all of the calculations I provide. I advise you to work out all of the math if you stray from my instructions to make sure you buy enough material. In the end you will have a solid photo booth that should aid you in producing better pictures of your models, and shouldn't cost you more than about US$50.- provided you do not need to purchase tools.*Editor's note: Paul's Imperial measurements were converted directly into Metric and rounded to read easily. Those modellers who use metric routinely may wish to adjust these measurements to your taste.
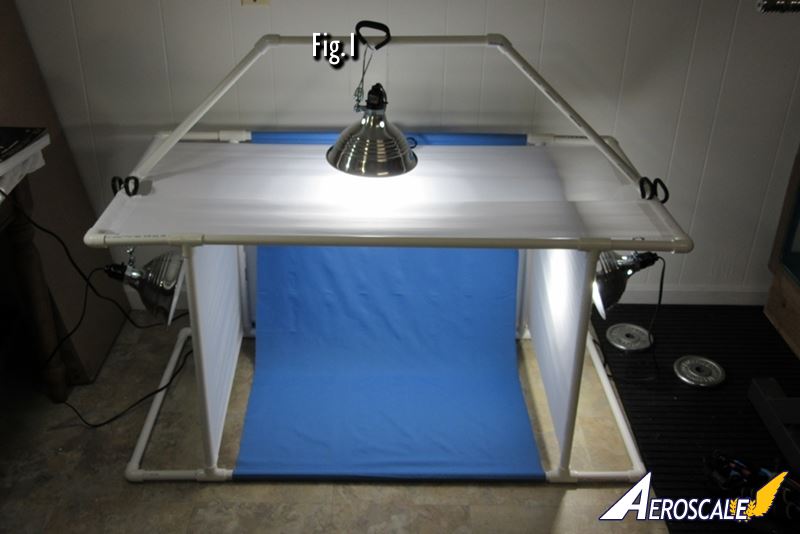
Fig.1
Materials Required
So, let's get started with a supply run.Material List You will need to go to a fabric or craft store such as Jo-Ann Fabric and purchase cloth. Typically, it is sold in bolts 1.12m (44") wide and you pay by the yard. Get 4m (4 yards) of white muslin fabric. This is a plain cotton fabric that is extremely cheap, I paid US$1.19 per yard. Pick out a suitable background color as well and get 2m (2 yards) of that. I recommend you pick a tighter weave in some shade of blue, expect to pay about US$5.00 a yard for this to get decent quality. You can also pick up any additional colours you want to work with as the background can be easily swapped out. I picked up a black cloth as well to experiment with photographing NMF aircraft. Lastly, be sure to grab hemming tape such as "Stitch Witchery" or another brand.
- 4m (4yds) white muslin cloth
- 2m (2yds) blue cloth (or any color you like)
- hemming tape 25mm (1") width
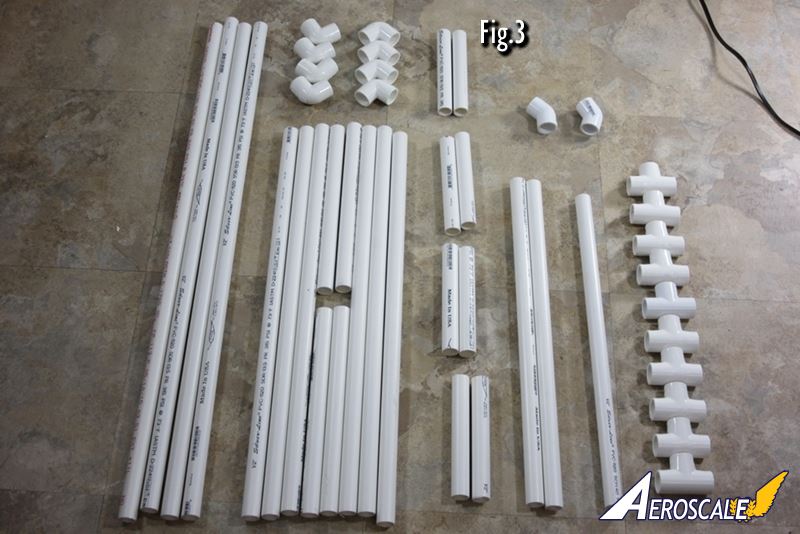
- 4 x 3m (10') sections of 13mm (1/2") schedule 40 PVC pipe
- 10 x tee joint slip fittings
- 8 x 90 degree elbow slip fittings
- 2 x 45 degree elbow slip fittings
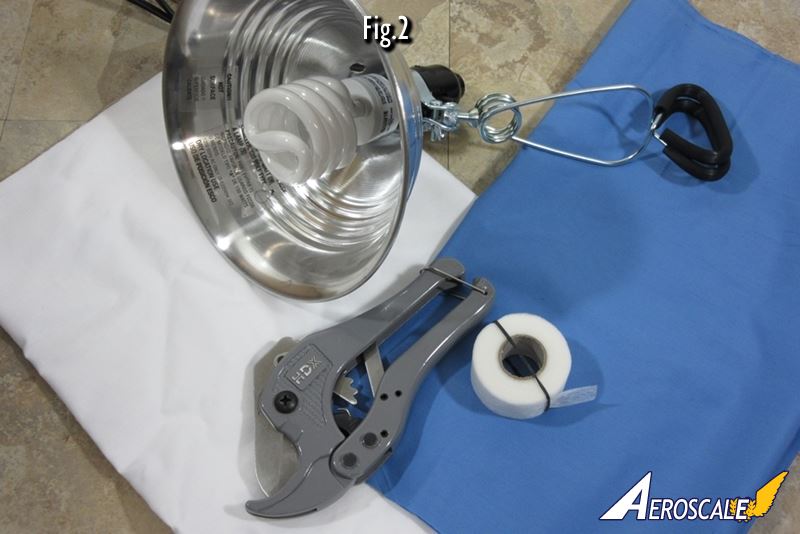
- 3 x 150wt rated aluminum shop light reflectors w/ clamps
Fig.2
Other things you will need and may have to purchase:
- pipe cutter
- good scissors
- PVC cement if you wish to make it a permanent build
- light bulbs (100 watt, daylight or similar type)
- an iron!
- measuring tape
- a t-square or metre stick (yardstick) to mark lines on the fabric.
Step 1: Making the sub-assemblies
Let's start with the PVC pipe to get it into more manageable lengths. Using your pipe cutter and a measuring tape, cut it into pieces:- 4 x 76.3cm (30")
- 8 x 15.3cm (6")
- 6 x 56cm (22")
- 4 x 26.7cm (10.5")
- 2 x 45.8cm (18")
These lengths might seem confusing since we want a box 81.5 X 61 X 61 (32 x 24 x 24), but each slip fitting will add approximately 25mm (one inch) to the overall length of the pipe to which it is attached. Set these aside for now, and move on to the cloth. Cut the cloth to:
- background - blue fabric 1.32m X 71.2cm (52" x 28")
- sides - white fabric 2.04m X 53.5cm (80" x 21")
- top - white fabric 1.32m X 53.5cm (52" x 21")
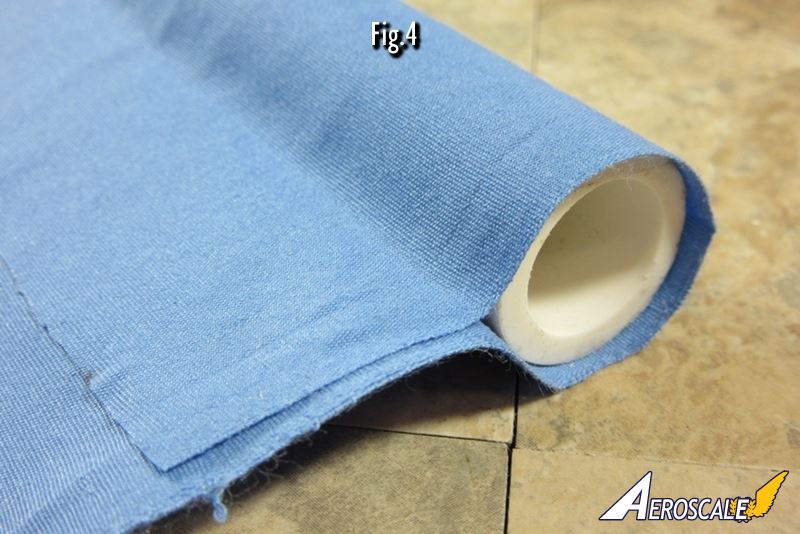
Starting with the blue fabric, measure in from each end and mark the fabric at 10.2cm (4") and 12.7cm (5"). Do this as well for both sections of white fabric. This is the marker for you to place hem tape. Lay a section of tape along the entire width of the fabric between the two marks and then fold the end over to form a loop. Press this with a hot iron, following the instructions on the tape packaging. You will end up with a strong loop at each end of your fabric which should easily fit a section of pipe.
Fig.4 & 5
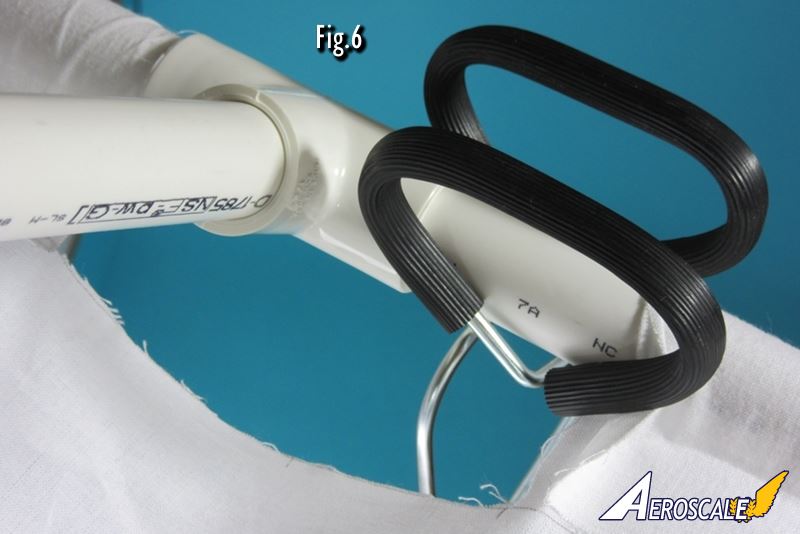
Repeat this procedure for the section to form the sides, and then again for the top. You will need to perform minor surgery on the top section in order to accommodate the tee joint that supports the overhead light as well as the clamp that hold the side light in place. I did this by removing a section 64mm (2.5") wide from the center of each end, and then an additional 50mm (2") towards the front to make room for the clamps.
Fig.6
Once you have the three sections of fabric made I strongly advise you to take a moment and iron them to remove and creases or wrinkles, especially the background. The fabric for the background needs to be perfectly smooth; imperfections will show up under a zoom lens.
If you intend to build a different sized box and want to know how I arrived at these dimensions:
When determining the length, we need to add enough fabric to form a loop on the end which we will slide the PVC through. Here is where math comes into play. 13mm (1/2") schedule 40 PVC has a diameter of 22mm (7/8" or 0.875). Using pi, that gives a circumference of about 70mm (2.75"). I rounded it off to 76mm (3") to make it easier to slide the pipe through. If you use any other size of pipe or change the dimensions of the box, you will need to adjust all of your calculations accordingly for the change in diameter, circumference, and length.
You will want to have a slight curve in your background to prevent the fabric from forming any sharp corners and creating shadows. The width plus height of our box is 1.22m (48") total, so I removed 10cm (4") and made a background 1.12m (44") long. You also need to add 10cm (4") at each end to account for the 76mm (3") pipe loop and the 25mm (1") hem tape to secure it.
Step 2: Assemble the framework
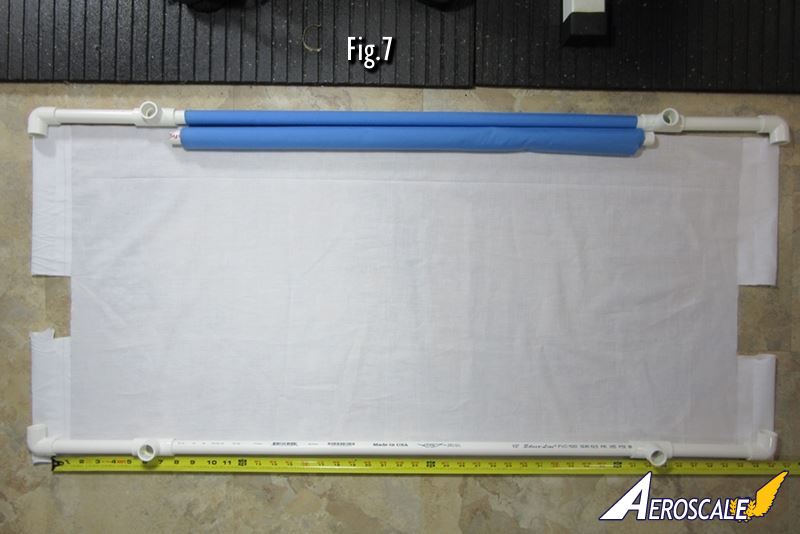
From here things should go very quickly for you. Take a 76.3cm (30") section and place a tee joint on each end, then add a 15.3cm (6") section of pipe to each end and cap them off with 90 degree elbows. You should now have a bar approximately 1.17m (46") long consisting of three sections of pipe connected together. Now slide a 76.3cm (30") section through each end of the background and then roll this up. Choose which side will be at the top of your box and repeat connecting that section with the fittings and 15.3cm (6") sections to form a second bar 1.17m (46") long. These will form the front and back brace respectively, with the background looped around the back brace. Now is a good time to check your work. Lay the top fabric out flat and place these braces alongside it to compare fit. If you need to adjust things, I recommend adjusting the 15.3cm (6") arms.Fig.7
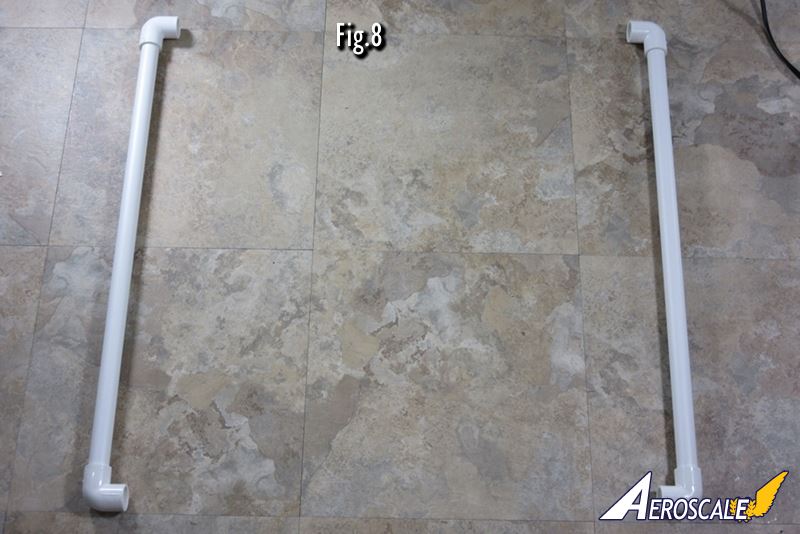
Next take two of the 56cm (22") sections of pipe and cap both ends with 90 degree elbows, facing in towards each other. These will form the "feet" of your base.
Fig.8
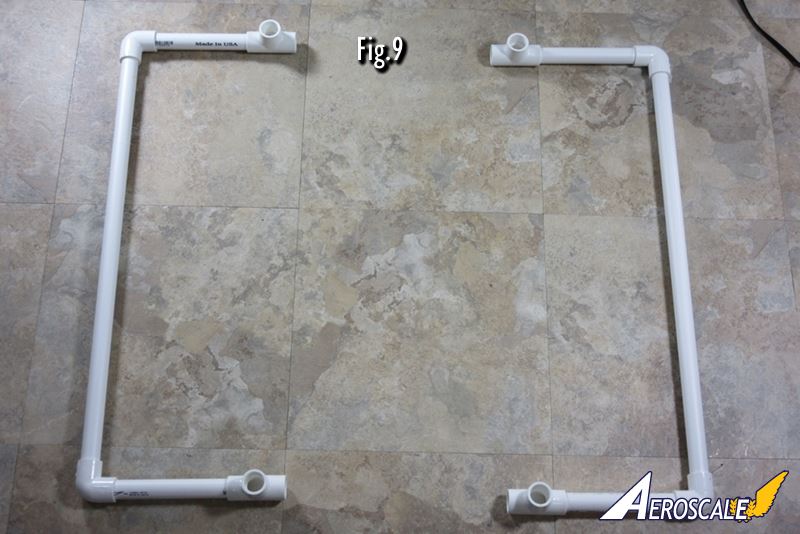
Add a 15.3cm (6") section of pipe to each elbow and cap all four of these with tee joints pointed up. Make adjustments and square everything so all four fittings are sitting flat on the floor. These will be bearing the weight of the framework so you want them all to be flush.
Fig.9
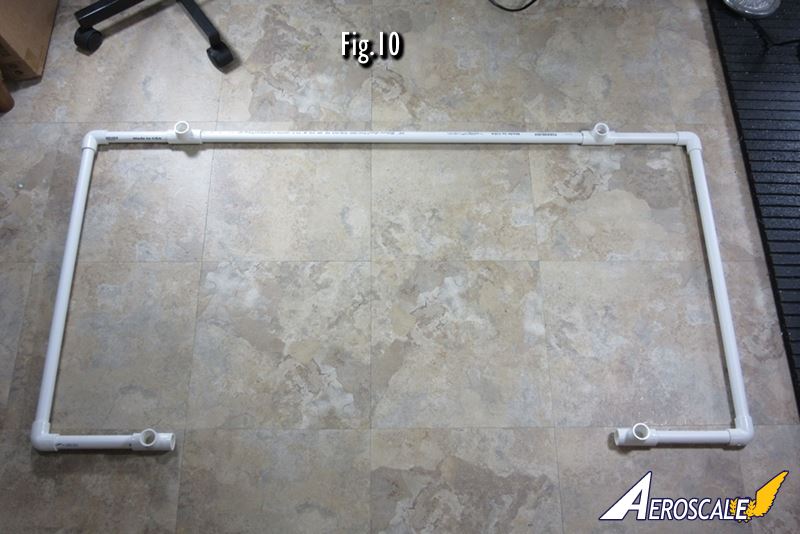
Take your remaining 76.3cm (30") section and connect the two sides together along the back.
Fig.10
Place the four remaining 56cm (22") sections of pipe vertically in the tee joints, you don't need to worry about having them straight yet.
Fig.11
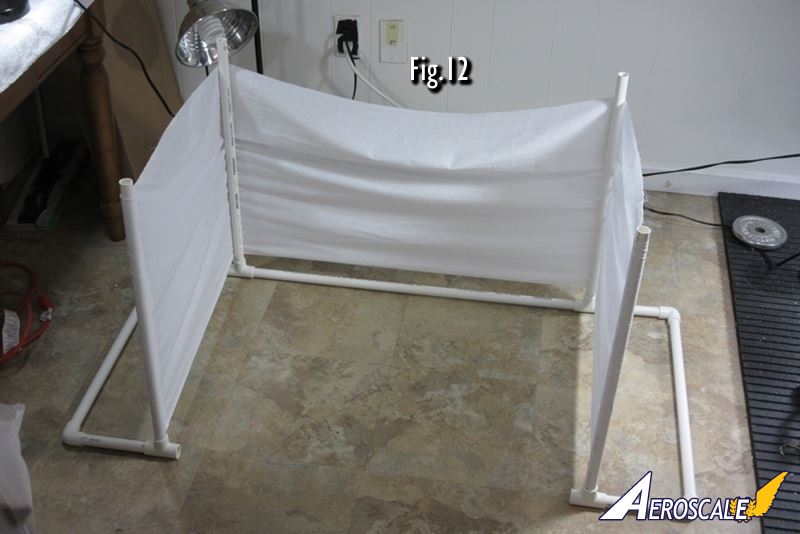
Now take your 2.03m X 53.5cm (80" x 21") section of fabric and slide one looped end down either of the two front pipes. Wrap the fabric around the outside of the back, across, and then back to the opposite section of pipe in the front. Adjust the vertical sections to release tension and slide the remaining looped end of the fabric over the other pipe. You should now have three sides of your box with the fabric anchored at both front pipes and wrapped around the outside of the two rear pipes. Adjust the vertical sections of pipe to square them up and straighten out the fabric. It should be under light tension and not crumpled up.
Fig.12
Retrieve the front top brace you made earlier and place it on the front pipes.
Fig.13
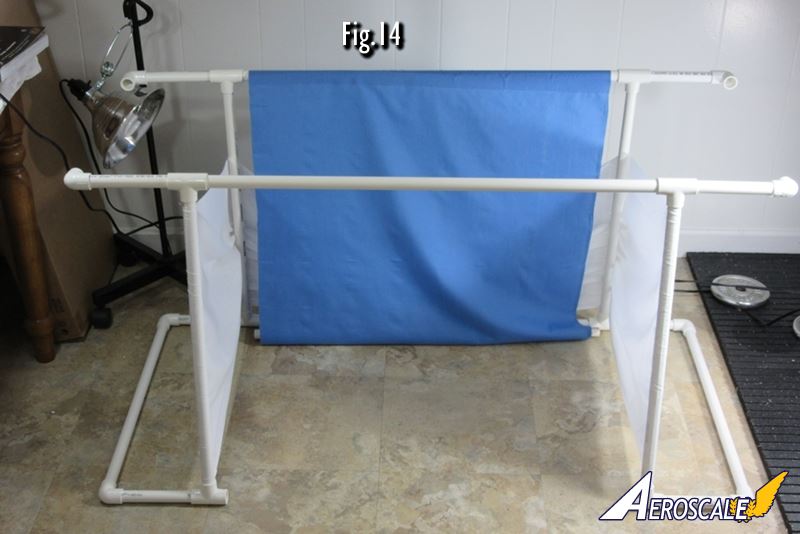
Place the rear top brace on and straighten out the background if necessary. Make adjustments to the side fabric now to remove and creases or wrinkles, it should be easier to keep it smooth at this point. Make sure the 90 degree elbows at the ends of the top braces are facing in towards each other.
Fig.14
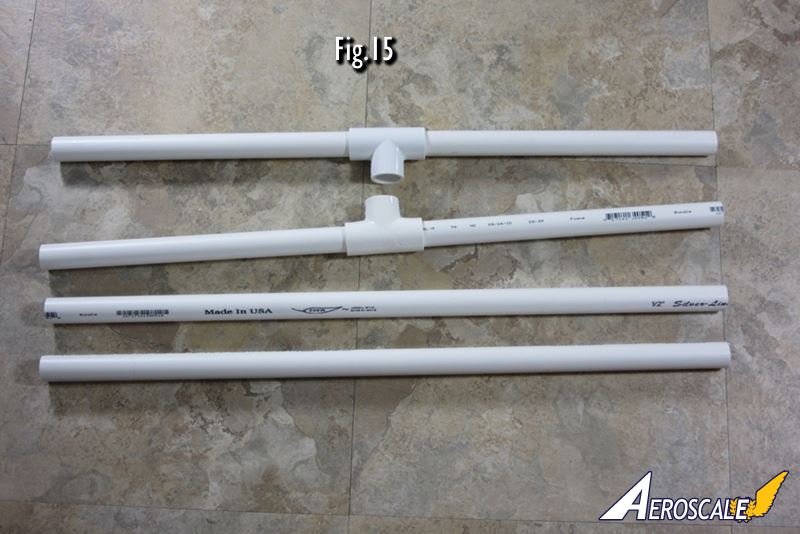
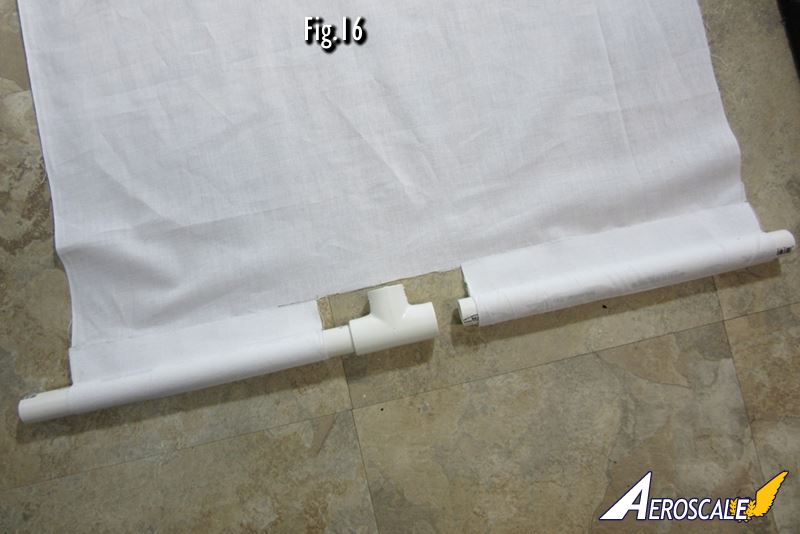
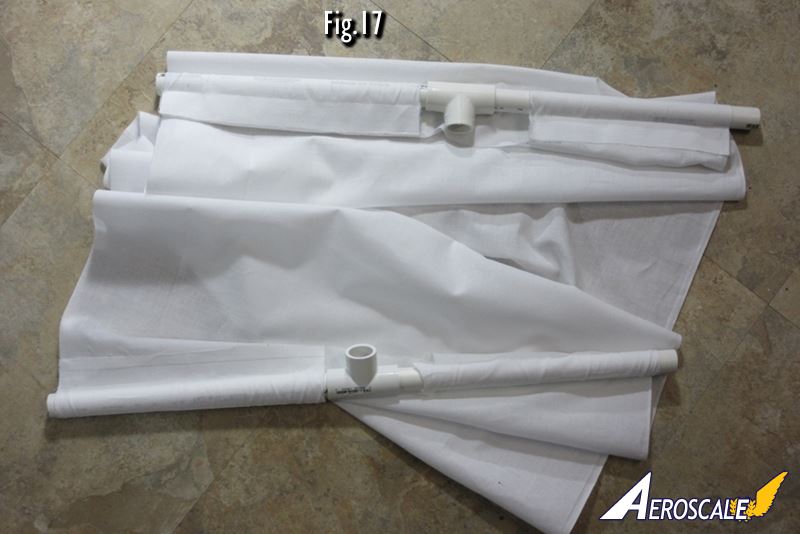
Take the four 26.7cm (10.5") sections of pipe and the two remaining tee joints and slide each pipe through the loops on the top fabric. Place the tee joint in the gap you cut out earlier and then connect the pipes together to form the "arms" at the top of the frame.
Fig.15 - 17
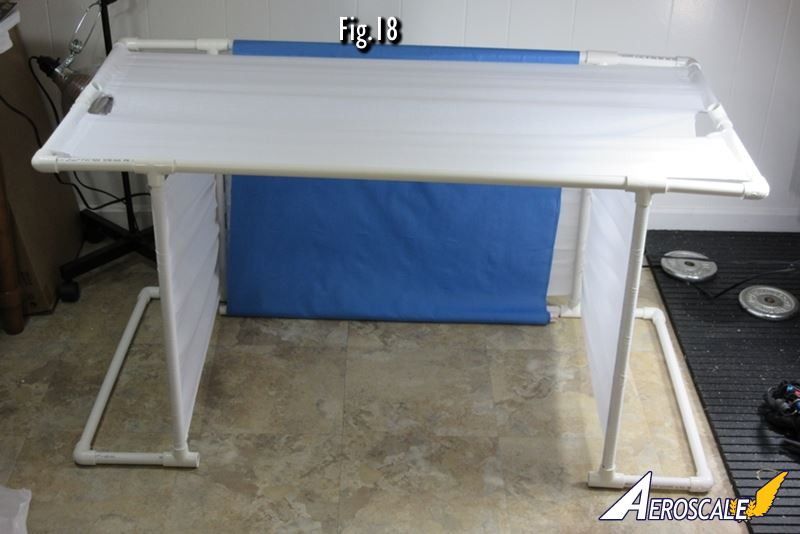
Connect these arms with the 90 degree elbows on the top braces to form the roof of the box.
Fig.18
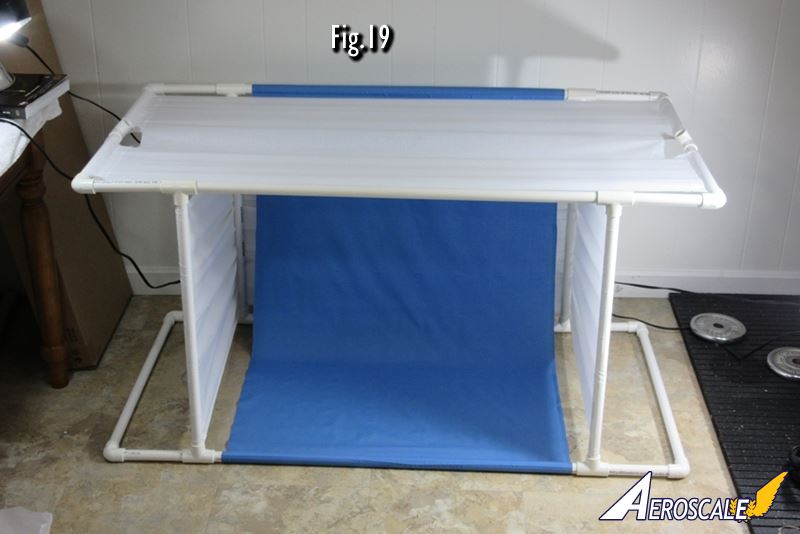
Anchor the bottom of the background by connecting the final 76.3cm (30") section of pipe to the front of the frame and you should now have a booth measuring 81.5cm X 61cm X 61cm (32" x 24" x 24") with arms and feet extending about 15.3cm (6") out to each side to brace it. Take a moment and adjust anything that isn't squared up well. You want the frame to form a perfect box not a lopsided mess. Once this is done all you have left to do is rig the lighting.
Fig.19
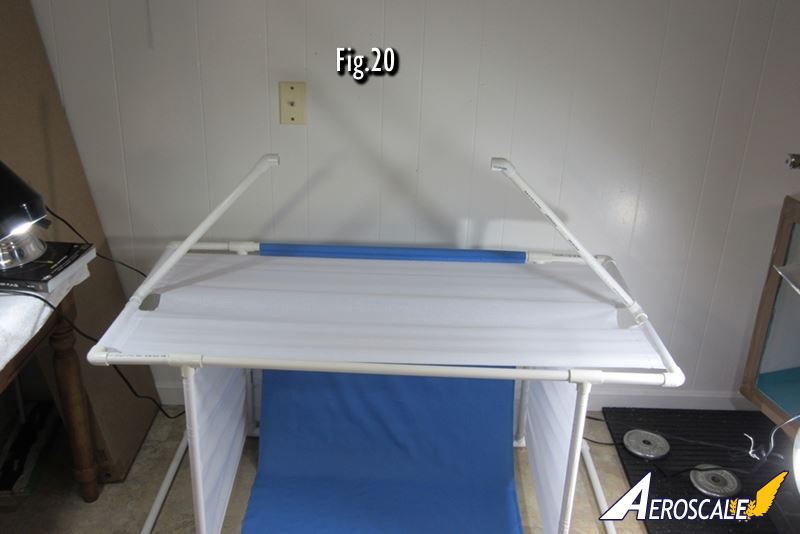
For the overhead, take the two 45.8cm (18") sections of pipe and cap one end on each with a 45 degree elbow. Connect the other end into the tee joint on the "arms". You will need to spin the tee joints around until they are at 45 degrees relative to the top of the frame. Close enough will work, it doesn't need to be perfect.
Fig.20
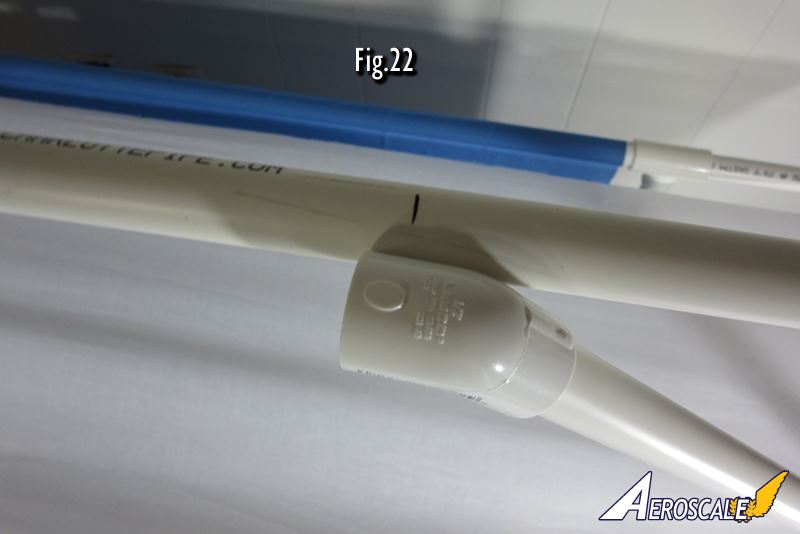
The lengths of the extensions i used for the "arms" and "feet", as well as the overhead light, were all based around the dimensions of an 20.4cm (8") reflector. I didn't want them touching the fabric due to heat issues and made sure I had some breathing room for clearances. If you use a smaller or larger reflector you will need to adjust accordingly. The final section of pipe needed will connect the two supports for the overhead light. There are two ways to go about this. You can do the math to determine how much length remains based on fittings and the length of the sides of an isosceles triangle with the 45 degree leg 45.8cm (18") long...
Or you can do what I did and take some remaining pipe, a marker, and "wing it"!
Fig.21 & 22
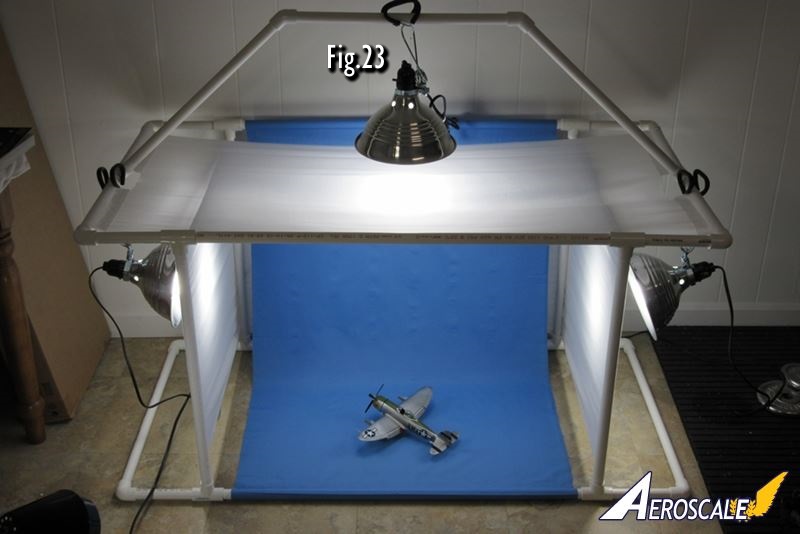
Cut this final piece and you are done. Rig one reflector from the top bar, and one on each side feeding the clamps through the gaps you cut in the top fabric section. I wired them all together into a surge strip so I can turn the power on or off to the whole box at once.
All you need to do now is find something to photograph.
Fig.23
Conclusion
All in all I am very pleased with this photo booth. It is very light and sturdy, wasn't expensive at all, and offers some flexibility in the options to easily change out the backgrounds or to collapse the whole thing for storage if I need to move it. If the fabric gets dirty you should be able to wash it. I may look into cementing certain joints to increase the rigidity, and may alter the arms with some additional anchor points to allow me to raise and lower the side lighting. If you have sewing skills you might want to consider actually sewing in the hems to make it even more sturdy.Prior to this I was using a cardboard box that I turned into a DIY photo booth, so this is a far better effort. I am looking forward to getting some use out of it.
Happy Modelling.


About the Author


FROM: PENNSYLVANIA, UNITED STATES
I have recently returned to the hobby after a 20 year break. I build aircraft in 1/48th scale, focused on US WWII props. I am learning new skills, doing conversions and messing with AMS.
Comments

Hi Paul
Brilliant! Thanks for taking the time to share your design. This is better than the bought one I use - the overhead lamp mount is particularly neat.
All the best
Rowan
OCT 16, 2015 - 12:16 PM


Paul,
I was waiting for your feature to build my photo booth. As I said before your design and execution is just brilliant. Anyone who doesn't avail themselves of building a better mouse trap, which is not only inexpensive but portable, is missing out on a great opportunity. Thanks so much for sharing this with us.
Joel
OCT 17, 2015 - 05:26 AM

Thanks for the kind words, I'm glad to see people find it helpful. It didn't occur to me I needed to convert to metric for everyone out there, thanks to Jessica for fixing that oversight.
OCT 17, 2015 - 06:43 PM

This is absolutely great! Thanks for sharing!
I was wondering if taking the next larger diameter T-joints (and larger diameter perpendicular pieces) could enable these to slide along the bottom and top frame hence making the side walls movable so you can get your lights in closer for smaller models? Although, I'm not sure how stable this would then be.
OCT 23, 2015 - 02:28 PM
Armored76, I think you could do that provided you changed the fabric on the sides. Instead of wrapping around all three sides you would need to have two separate pieces for the left and right, and then leave the back off I guess.
OCT 25, 2015 - 03:05 AM
Copyright ©2021 by Paul Brocklehurst. Images also by copyright holder unless otherwise noted. The views and opinions expressed herein are solely the views and opinions of the authors and/or contributors to this Web site and do not necessarily represent the views and/or opinions of AeroScale, KitMaker Network, or Silver Star Enterrpises. Images also by copyright holder unless otherwise noted. Opinions expressed are those of the author(s) and not necessarily those of AeroScale. All rights reserved. Originally published on: 2015-10-16 21:54:27. Unique Reads: 18964

WEB HOSTING BY


Copyright ©2021 AeroScale and Kitmaker Network, a subsidiary of Silver Star Enterprises
All Rights Reserved. Please read our Conditions of Use and Privacy Policy.
All Rights Reserved. Please read our Conditions of Use and Privacy Policy.