

Simulating a wood finish
...
Post a Comment
Faking it.
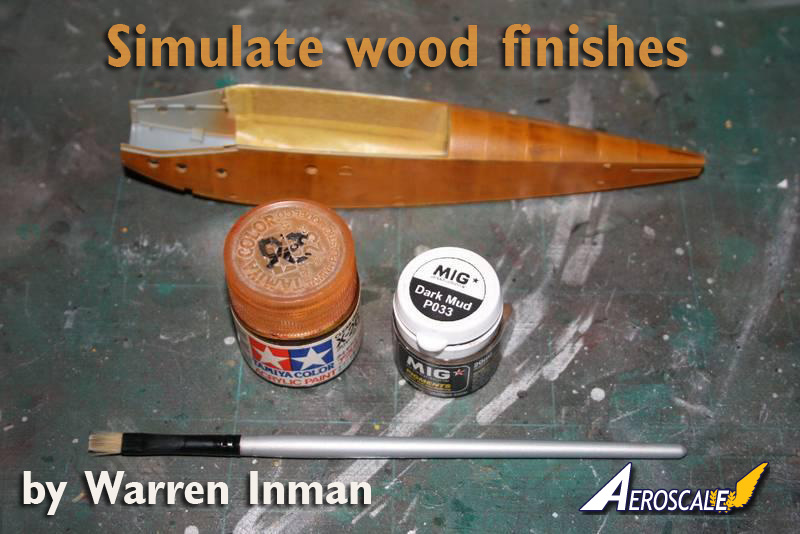
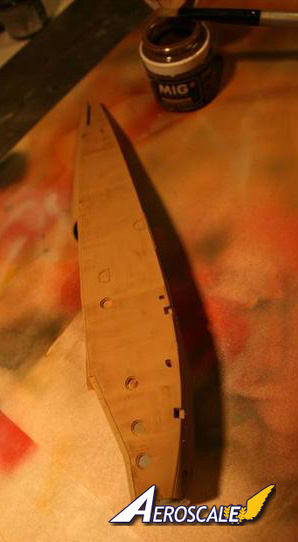
Simulate wood finishes for World War One aircraft.One thing that has really deterred me from WW1 projects, besides the rigging, has been simulating the grain pattern in wood used to construct an aircraft used in World War One. A typical example is the 1/32 LVG C.VI released by Wingnut Wings last year. Every one of the paint schemes for the aircraft has large areas only covered in clear varnish and if you want a realistic looking model in 1/32 scale you need a way to simulate the wood grain.
I recently started my Wingnut Wings LVG C.VI for the WNW Group Build and knew I had to learn a way to make my grey plastic look like wood. WNW kindly provides a guide showing one method of doing this in their instructions, and also on their marvellous website. Only problem for me is that the WNW method uses oil paint and bits of sponge to simulate the grain. The sponge is not too much of an problem to get, but there are no artist supply shops near my cave. I also think that cleaning up oil paint may be a pain in the behind, and they take a long time to dry.
I have used powdered pigments previously to dirty up tanks etc I have built and got at times have noticed that they can sometimes produce streaks on surface when used dry. I have found that you can use the pigments dry on matt surfaces very effectively without the mess and muss of washes.
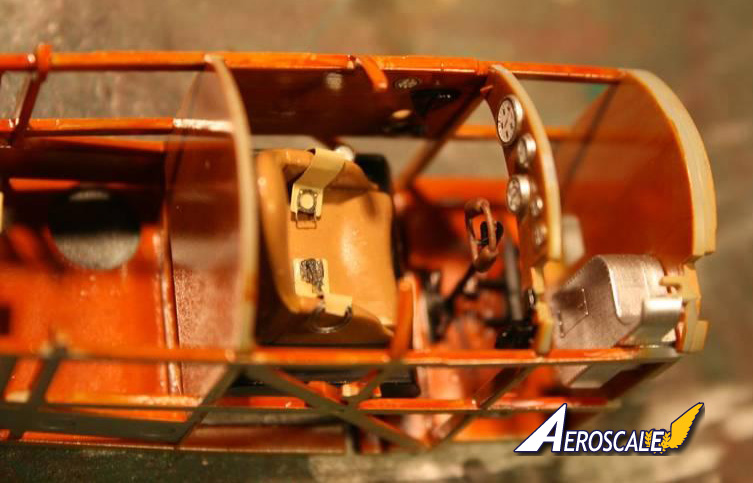
This got me thinking and I did a little experiment using the interior pieces of the LVG, some Tamiya paints and Mig pigments. The experiment on the interior pieces and the interior of the fuselage looked like wood to me. My Wife agreed when I asked her so I thought I would generate a short tutorial on how I did it.
The idea for the base colour came from the WNW website, but any colour could be used to simulate different types of wood and grains.
Here is a list of the items I used to produce the wood-look:
- Tamiya XF-59 for the base colour.
- Tamiya X-26 Clear Orange for the varnish colour.
- Mig Productions Dark Mud pigment for the grain.
- Flat, stiff brush around 5 8mm wide.
Quick word of warning here. Be careful with the pigments as they can stain any surface if you get them on it and you dont clean them up immediately. They stain carpet particularly well. I dropped a few grains of a rust colour on our beige carpet and now there is a small, very permanent stain there. Oh well, just be careful where you blow the excess pigment to.
Step One.
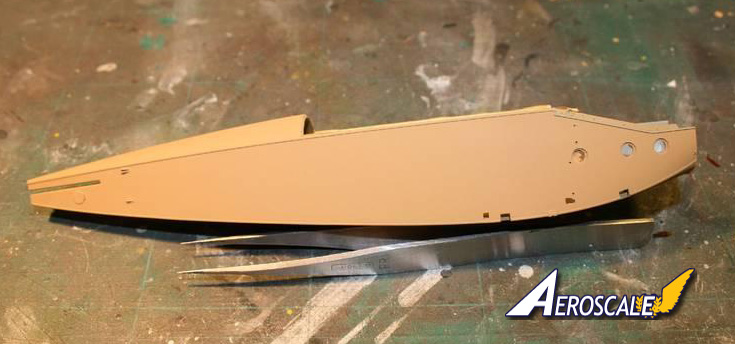
Assemble the parts of the kit you want to look like wood. Or you can paint them on the sprue if you want.
Step Two.
I used to wash the parts in soapy water before I started painting, then have to wait quite a while for it to dry. I always seemed to find some water somewhere that had not dried properly and that is not good when you are using acrylic paint which water thins quite well. Can someone say spider-webbing? One of the reasons to wash the model, as well as remove any finger prints, oils etc, is to remove the dust that has dropped on the model while you are building it. If you leave it long enough to ensure that the water has definitely dried the dust is back again.. doh!! So now I just wipe down the parts with Methylated spirits/alcohol. Dries almost instantly and removes all oily residue and dust.
Step Three.
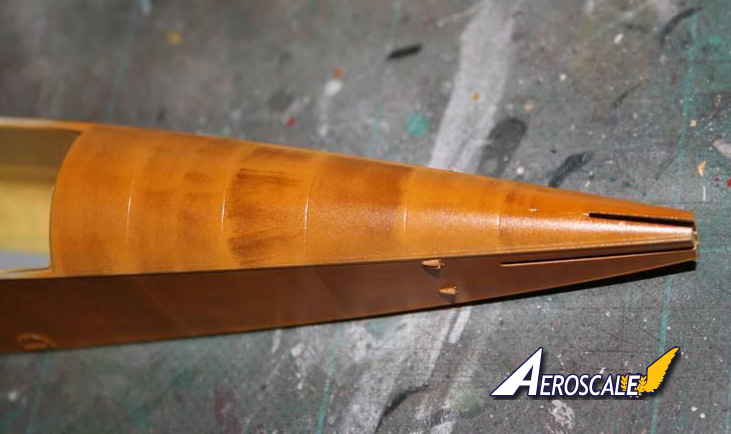
Mix up your base colour. For a rich wood colour I use Tamiya XF-59 as a base coat, but you can use darker and lighter colours as required. I use my Sparmax airbrush for all my painting at the moment. I mix the paint and thinner in a syringe by first drawing the thinner into the syringe then the amount of paint required to make a mixture about the consistency of milk. Some paints are thinker than others and it varies all the time. You can paint the base coat if you want, but I find I get a much better matt finish if I spray the paint. Tamiya Flat paints are about the flattest drying paints I have found and really allow the pigment to work well. Make sure you have a good covering as once you start wood graining you wont want to come back to touch up the base coat.
Step Four.
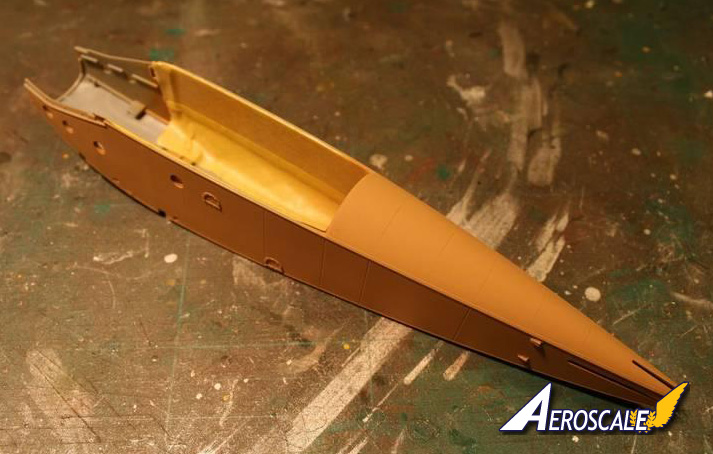
After the base coat has had a chance to dry thoroughly grab your dry pigment powder. The colour pigment you use will depend on how dark you want the grain to appear. Make sure your brush is totally dry before you start graining or this method will not work and you will end up with smudges instead of grain. Grab your flat, stiff brush and dip the tip of the brush in the pigment. Just the tip. Then tap the brush on the side of the pigment container to remove excess pigment back into the container. Draw the brush across the surface in the direction you want the grain of the wood to run. Remember that grain is totally random and can be almost straight to very wavy. Mix things up and keep in mind the grain of the wood you are trying to simulate. Remove excess pigment by blowing it off, dont brush it off with a brush as it will add extra grain. Careful where that excess goes!
Step Five.
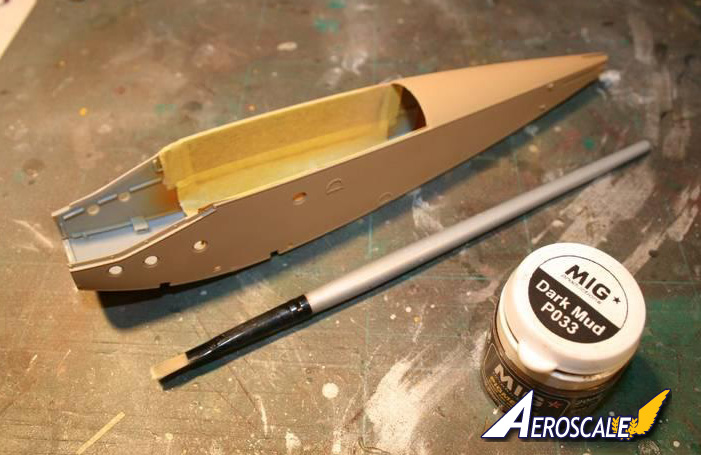
When you are happy with your graining grab the colour you want to use as your top coat, I use Tamiya Clear Orange or Clear Yellow, and mix up as you would any other paint, and spray or brush straight on the grained plastic. I painted it with the Clear Orange immediately. I used my airbrush on the fuselage, but I used a soft brush on the interior pieces and it did not seem to affect the graining at all. Limit the amount of handling of the grained parts until you have painted the parts with Clear colour. If you are brushing the colour use a soft brush or you could damage your graining. Build up the colour gradually until you get the colour you want. Some finishes may require clear instead of orange, yellow or red.
Thats it. No Future, sponges or oil paints and hopefully your plastic will now look something like wood. You can vary the finish of the wood by using a brush to apply the top coat. If the real stuff had the varnish applied with a brush it will have a wavy surface, whereas if the varnish was sprayed on it would be fairly smooth, depending on how rough the wood was in the first place of course.
Another thing to consider was that the varnish would have weathered rather quickly. It would have looked pretty crappy after a few weeks sitting outside, if the aircraft lasted that long.
Go on, give it a try!

About the Author


FROM: SOUTH AUSTRALIA, AUSTRALIA
Greetings! I have been modeling for about 45 years on and off and have just started learning about weathering my AFVs etc. Started when I was about 3 or 4 and got to a peak of production in the late seventies with a Airfix or Matchbox kit every day or so at times. Most of those have gone but when I ...
Comments
Copyright ©2021 by Warren Inman. Images also by copyright holder unless otherwise noted. The views and opinions expressed herein are solely the views and opinions of the authors and/or contributors to this Web site and do not necessarily represent the views and/or opinions of AeroScale, KitMaker Network, or Silver Star Enterrpises. Images also by copyright holder unless otherwise noted. Opinions expressed are those of the author(s) and not necessarily those of AeroScale. All rights reserved. Originally published on: 2010-08-11 00:00:00. Unique Reads: 30154

WEB HOSTING BY


Copyright ©2021 AeroScale and Kitmaker Network, a subsidiary of Silver Star Enterprises
All Rights Reserved. Please read our Conditions of Use and Privacy Policy.
All Rights Reserved. Please read our Conditions of Use and Privacy Policy.