

Air Campaigns
Want to start or join a group build? This is where to start.
Want to start or join a group build? This is where to start.
Hosted by Frederick Boucher, Michael Satin
OFFICIAL: Jolly Rogers Campaign
archaicguy70

Joined: December 28, 2008
KitMaker: 85 posts
AeroScale: 18 posts

Posted: Wednesday, April 24, 2019 - 05:22 AM UTC
It's crunch time..... Nice work guys.

Antilles

Joined: March 22, 2015
KitMaker: 671 posts
AeroScale: 614 posts
Posted: Thursday, April 25, 2019 - 03:51 AM UTC
Jeff, Peter and Pasi: Wow that is a triple of outstanding nicely built Phantoms. Congratulation and cheers to You!
Oliver
Oliver
Removed by original poster on 04/26/19 - 18:56:17 (GMT).

Tank178
Joined: December 30, 2009
KitMaker: 92 posts
AeroScale: 6 posts
Posted: Friday, April 26, 2019 - 06:56 AM UTC
Quick question, I just saw this and have been working on a Jolly F-14 for about 2 month. Needless to say its more than 25% started, but I do have several pictures of it in the beginning stages. Can I still join this campaign?
MichaelSatin

Joined: January 19, 2008
KitMaker: 3,909 posts
AeroScale: 2,904 posts
Posted: Saturday, April 27, 2019 - 01:38 AM UTC
Art,
If you've only been working on it for 2 months then it was started during the campaign period and I would allow it. However, the campaign ends on 1 May, this coming Wednesday.
Michael
If you've only been working on it for 2 months then it was started during the campaign period and I would allow it. However, the campaign ends on 1 May, this coming Wednesday.
Michael
Tank178
Joined: December 30, 2009
KitMaker: 92 posts
AeroScale: 6 posts
Posted: Saturday, April 27, 2019 - 12:03 PM UTC
Quoted Text
Art,
If you've only been working on it for 2 months then it was started during the campaign period and I would allow it. However, the campaign ends on 1 May, this coming Wednesday.
Michael
Thanks for pointing that out. In my excitement I must have missed it. Oh well, maybe the next one!

bomber14
Joined: February 02, 2015
KitMaker: 330 posts
AeroScale: 286 posts
Posted: Sunday, April 28, 2019 - 03:38 AM UTC
my birdcage is almost done. got the paint work done, just have to glosscote and decal. then add the little bits. i may weather it more later on some time so i will hold off on the dullcote for now.
the insignia white is tamiya rattlecan and the rest is model master enamels non specular sea blue and intermediate blue.

 " BORDER="0">
 " BORDER="0">
the insignia white is tamiya rattlecan and the rest is model master enamels non specular sea blue and intermediate blue.
" BORDER="0"> " BORDER="0"> bomber14
Joined: February 02, 2015
KitMaker: 330 posts
AeroScale: 286 posts
Posted: Monday, April 29, 2019 - 04:26 PM UTC
FINISHED!!! my birdcage corsair is done. these down to the wire finished are becoming a too often occurrence for me.
i will post in the gallery shortly.
joe
 " BORDER="0">
 " BORDER="0">
 " BORDER="0">
[img] [img]
[img]
i will post in the gallery shortly.
joe
" BORDER="0"> " BORDER="0"> " BORDER="0">[img]
[img]
b17-peter

#392
Joined: January 09, 2013
KitMaker: 696 posts
AeroScale: 608 posts

Posted: Monday, April 29, 2019 - 08:48 PM UTC
Looks phantastic, Joe! 

whitewolf_mk67

Joined: September 20, 2018
KitMaker: 26 posts
AeroScale: 9 posts
Posted: Tuesday, April 30, 2019 - 08:17 AM UTC
well done .very beautiful joe ,nice work
and thank you for your advice . i repaint them in white.
and thank you for your advice . i repaint them in white.
Antilles
Joined: March 22, 2015
KitMaker: 671 posts
AeroScale: 614 posts
Posted: Tuesday, April 30, 2019 - 09:22 AM UTC
Joe: Lovely built Corsair. I like the subtle chipping very much! Congrats  .
.
Oliver
. Oliver
bomber14
Joined: February 02, 2015
KitMaker: 330 posts
AeroScale: 286 posts
Posted: Tuesday, April 30, 2019 - 03:33 PM UTC
Quoted Text
well done .very beautiful joe ,nice work
and thank you for your advice . i repaint them in white.
cool,glad i could help, and thanks. i see though i forgot to install the pitot tube though. i will go back and do that and add a booster seat for my pilot-lol
joe
bomber14
Joined: February 02, 2015
KitMaker: 330 posts
AeroScale: 286 posts
Posted: Tuesday, April 30, 2019 - 03:40 PM UTC
thanks peter and oliver. getting a little better at my skill with each model. i would like to achieve the degree of wash you do though oliver. my build is still in need of a wash but i will do that at a later date.
joe
joe

md72
#439
Joined: November 05, 2005
KitMaker: 4,950 posts
AeroScale: 3,192 posts

Posted: Tuesday, April 30, 2019 - 06:13 PM UTC
So close and yet so far. 

Sorry guys just couldn't get it done.
Sorry guys just couldn't get it done.


john41492
#442

Joined: July 20, 2015
KitMaker: 363 posts
AeroScale: 335 posts
Posted: Wednesday, May 01, 2019 - 04:29 PM UTC
Hi All,
So I've been modeling along, and looked to see where I left off to do an update. Much to my surprise, I haven't really done one! Fortunately, I was able to load a couple of shots into the gallery, whew!
So without further ado, here's how my build of the 1/48 Tamiya F4U-1A went.
This is a great kit! After doing some research and seeing the F4U-1A recently pulled from Lake Michigan, I opted to use the red primer. Additionally, I got it into my head to try the "hairspray" chipping technique for the first time.
All the interior was painted, and the cockpit assembled. All fit perfect, and the instrument panel fit like a glove.

Assembly, was very fast and straight forward, I simply followed the instructions! I recall building the F4U-1D back in the late 90's and had fits getting the wings to behave at the wing-fold. This was where I really learned how to use superglue as a filler.
This kit had the same issue for me. Fortunately, I now had Mr. Surfacer in the arsenal, so what took days before, now took me a few hours. Yay for progress!
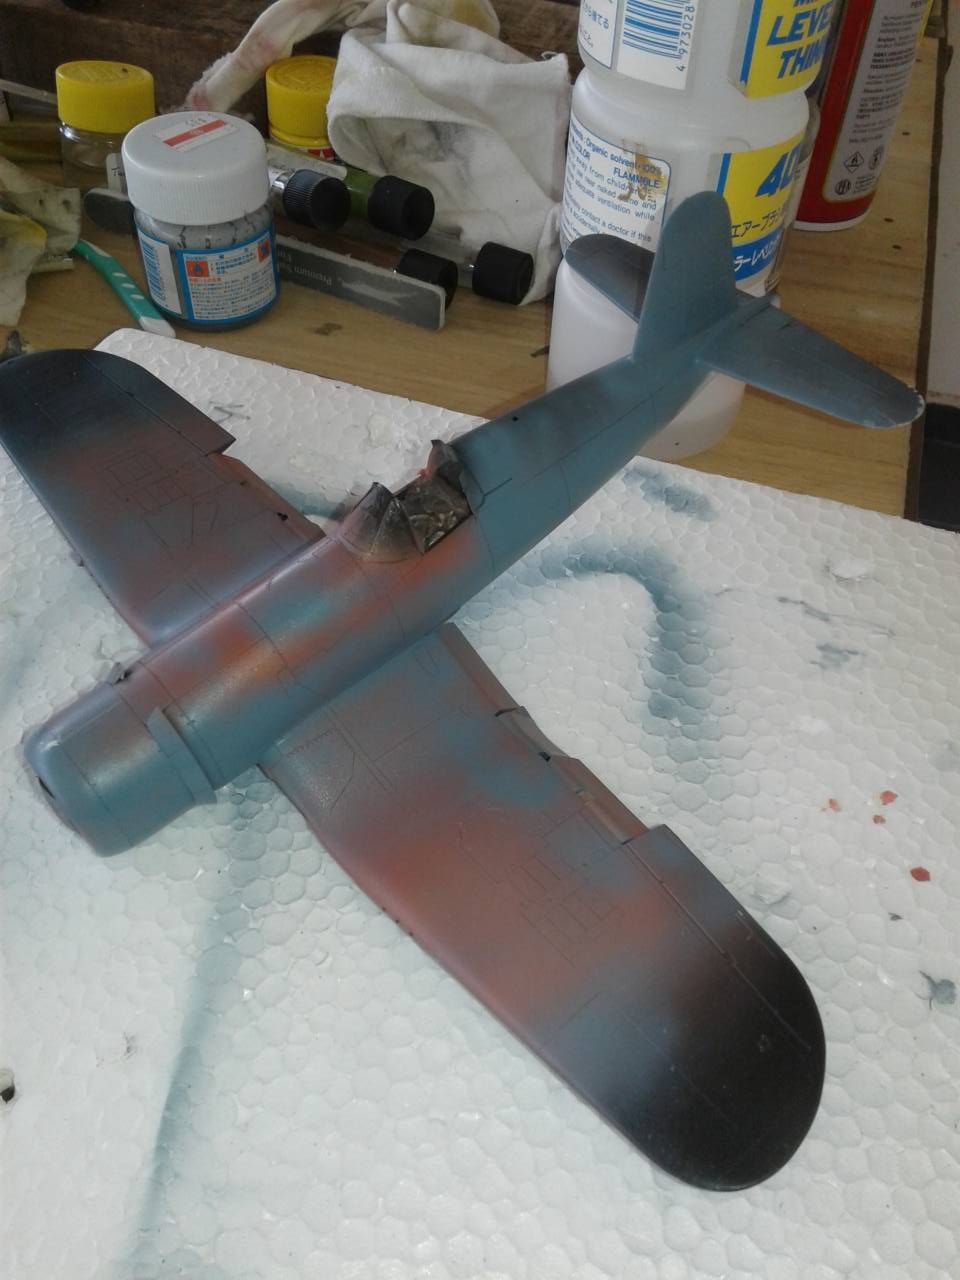
With the airframe built, it was time to try the "Hairspray" method! First I primed the bird with Mr. Leveler 1500 black, diluted 1:4 with Mr. Leveler thinner. I really like how this performs and is great if you're going to use the black base method for painting.
I followed the primer with a coat of Alclad II aluminum on the areas that I thought I'd be chipping on.

I then gave it a nice shot of cheap hairspray and let it dry for a spell. Next I painted the red primer seen on a recovered F4U-1A from Lake Michigan. It should be noted that IPMS Stockholm's paint Guru calls this a salmon color, which I suppose it is, though to my eyes it really looks like the red based primer that I used when painting restored rust spots on my old car.
This was then covered with a shot of hairspray and left to dry.
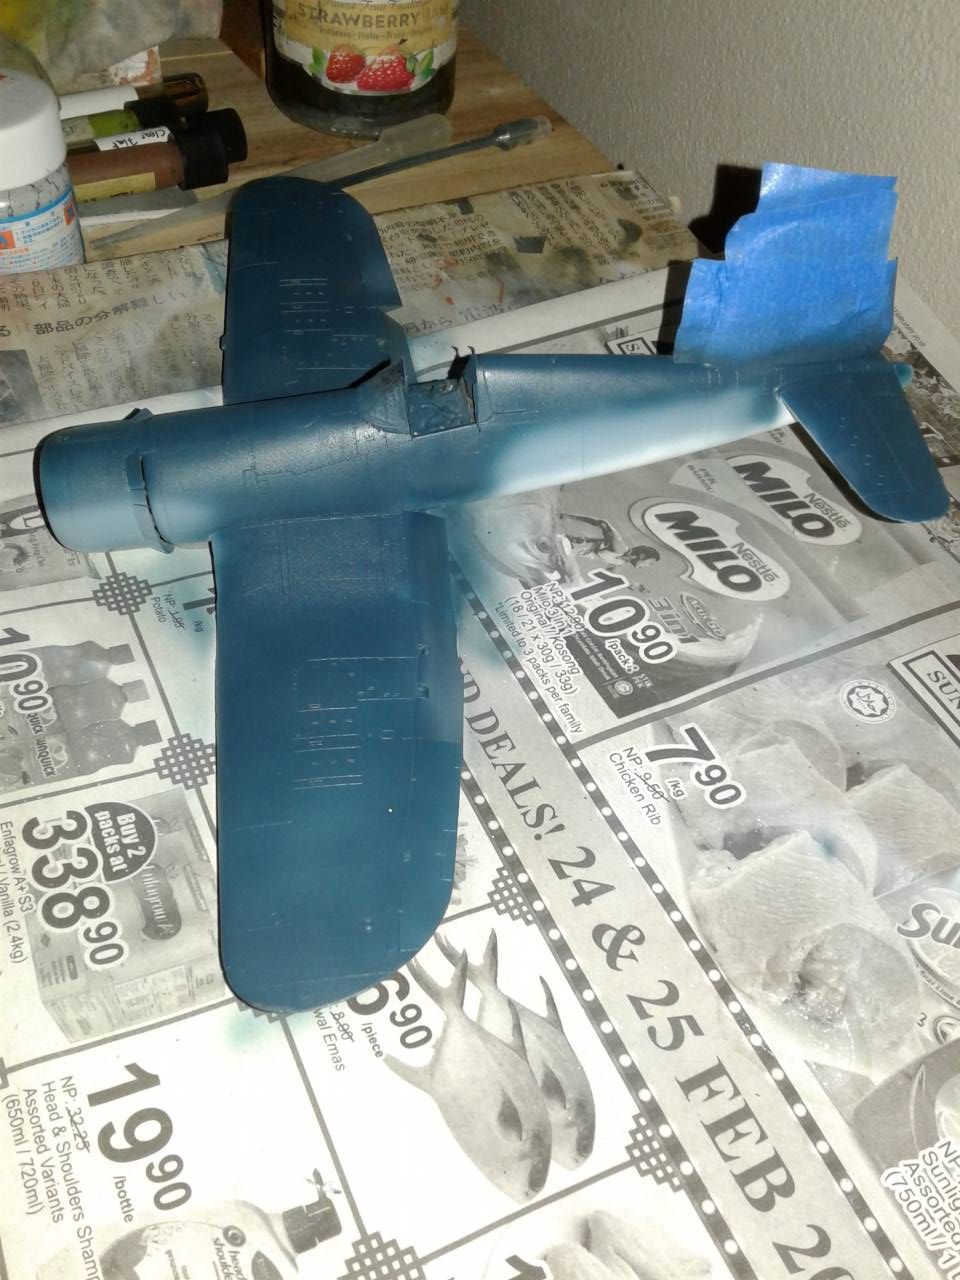
Feeling pretty good about the whole affair I proceeded to lay the colors on, starting with Insignia white on the bottom. Where I'm at, my paint variety is limited pretty much to Tamiya and Mr. Color. So, for insignia white I mixed Tamiya X-2:10 Plus Tamiya Deck Tan XF-55:1, diluted 1:4 with ML thinner.
I liked how it turned out! I followed this with Intermediate blue, also a mix of Tamiya colors. This made by making a 1:1 mix of Medium blue XF-18 and White X-2, then diluted 1:4 with ML thinner.
The final color of Non-spec Blue was added, again a Tamiya mix of Sea Blue XF-17:5, Blue X-4:3, and White X-2:3, all diluted 1:4 with ML thinner. To me, this seemed too blue for a bird hanging out in the sun and fun of the South Pacific, so I added more white, make the new ratio X-2:5. To my eyes this looked more correct, call it scale effect!
Next up was to be the fun part! Chipping away!
I started the process using some warm water and letting it sit on the area that was to be chipped, then using a toothbrush I started removing the top layer of blue. Once started the paint came off easily, revealing the red primer below.
Getting the aluminum to show through was a different story! I resorted to using a clean toothpick to break through the red primer. I believe this was caused by the double layer of hairspray, with the hairspray atop the aluminum having really cured well to the red primer. Needless to say, once through the aluminum came to light! In fact so much to light that Rosie asked me if they really were that worn and chipped. Back to my references, and sure enough, I'd gotten very carried away!
Back to the paint bench for some more blue, this time leaving only the areas that were really worn on. Specifically, the leading edge of the wing where the prop wash would be, the leading edge of the stabilizers, and the main walkways along the top of the wings. I did layer the non-spec blue in places so that a hint of the red primer would peek through.
Upon final review I think I still over did it, but, I does look different and pretty cool. For me, in the future I'll use this method in conjunction with the salt technique and various washes. And with a Japanese plane in the works, it would seem that will happen pretty soon!
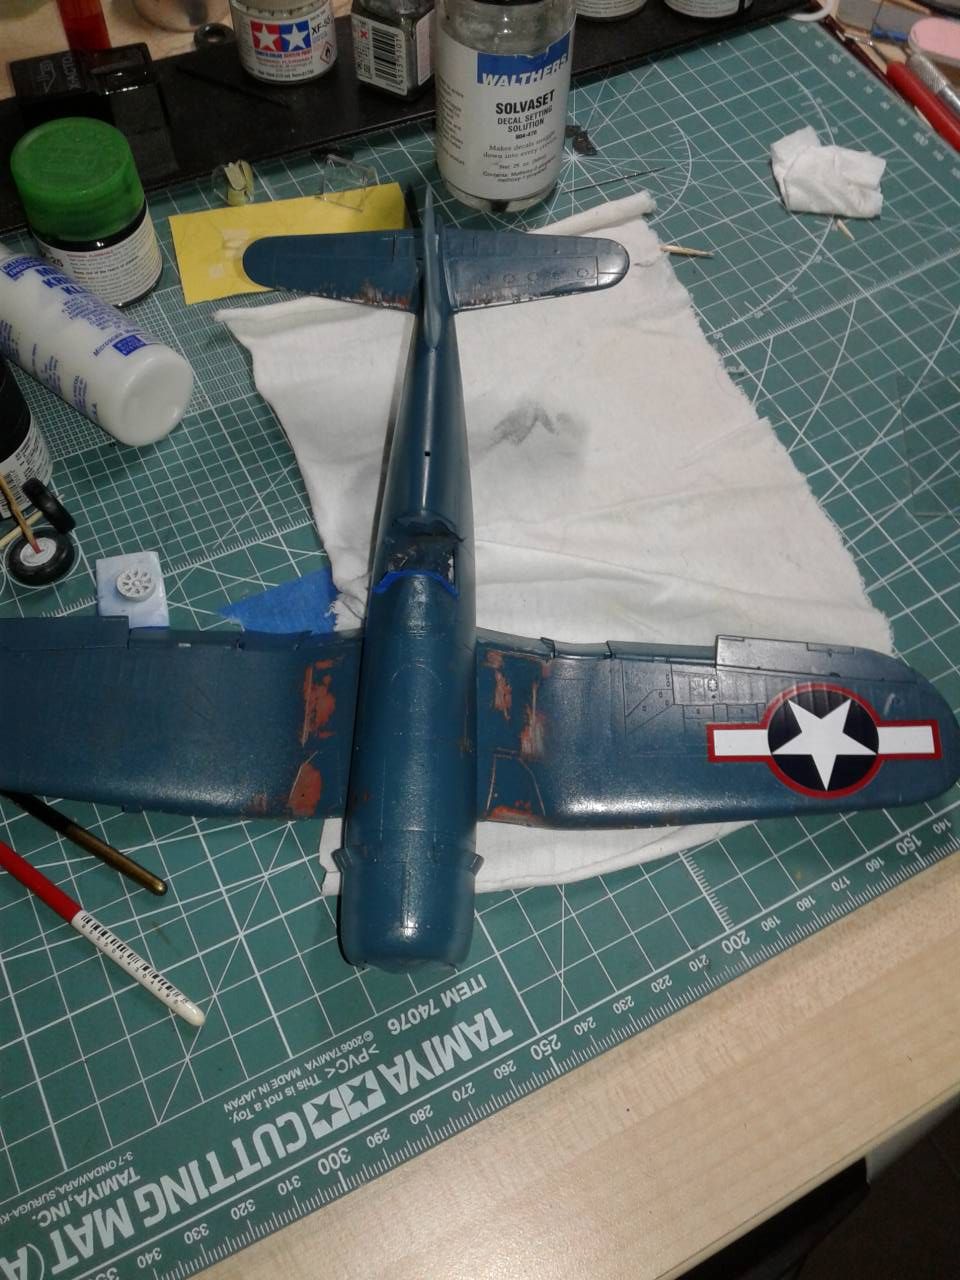
I then moved onto decaling!
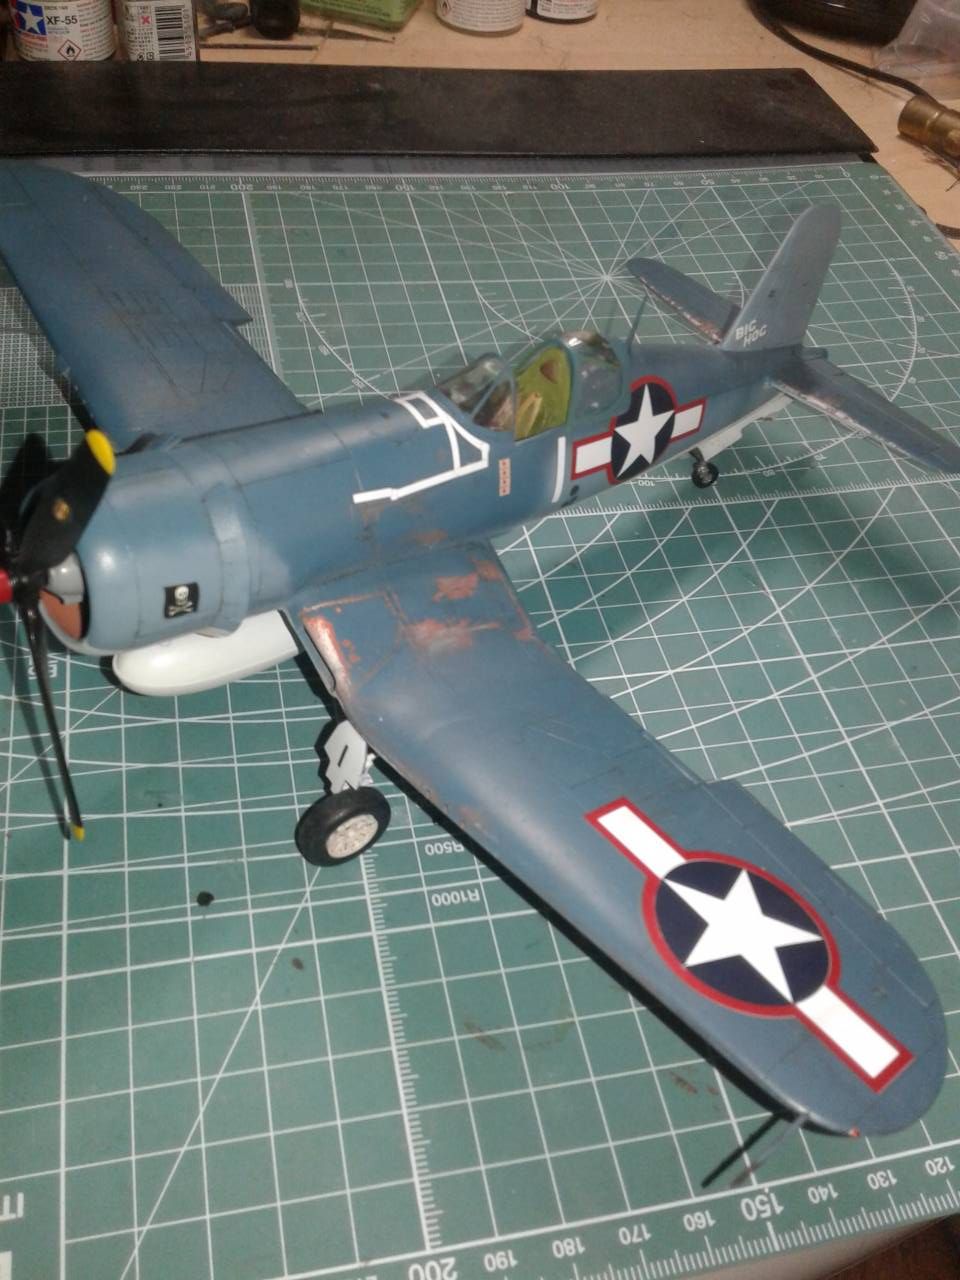
Tom Blackburn had what the US Navy would call, a fabulous career. Starting as a combat training instructor in Florida, then charged with forming and leading VF-17 during the pivotal time for the US in the war against Japan, to becoming the CAG (commander air group) on the USS Midway in 1947, ultimately becoming her Captain, and retiring in 1972. He passed away in 1994, a great run if you ask me!
Since this campaign was all about the Jolly Rogers, I felt it only fitting to do Blackburn's corsair while on Ondonga, in 1943. After all, he's the one who started the whole Jolly Roger's legacy.
Tamiya's F4U-1A's kit comes with marking for "Big Hog" Blackburn's mount. These were printed in 2000, so one can see that Tamiya after years of complaints finally got their decals more in line with mainstream decals (thinner and opaque). Unfortunately, while applying then I discovered too late that the national insignias were slightly out of register. I believe this is due to having the modeler adding the star with blue background to the bar/red outline decal. So, be warned! If you're going to go the path of red surround US insignia get after market decals instead of piecing together two decals. Aside from that they all went down nicely, and I have found the best decal setting solution to use on Tamiya decals is Solvaset. Though I would cation one to use it sparingly, it will eat at the acrylic clear coat. In my case I use Future (Pledge Floor Care) mixed 75% Future, 25% IPA (isopropyl alcohol 70%) and drop of liquid soap. For me, as a clear coat, it's wonderful. I believe because of the high heat and humidity of where I live to be the reason. Or it could be magic!
I finished the decals, sealed them with Future, and then gave everyone a final coat of clear flat (Mr. Color 182 diluted 1:3 with ML thinner).
Then came the fiddly bits, which really were only the tailwheel gear covers. I'd recommend putting them on before adding the tailwheel assembly.
Overall a great kit, and I highly recommend it!
Due to lighting issues, for this campaign I wasn't able to lay the bird out all pretty with a nice background. So here she is, Blackburn's "Big Hog" of VF-17 circa November 1943.

Thanks to all of you for making this a great and fun campaign! There's really some good models in the gallery. A big thanks to Michael for leading yet another fun campaign!
I'm now off to Learn to fly! Also, for those who didn't make it, don't forget that you can still complete your builds and showcase them in the Hanger Queen 9 campaign going until the end of the year!
Happy modeling, and have fun!
John
So I've been modeling along, and looked to see where I left off to do an update. Much to my surprise, I haven't really done one! Fortunately, I was able to load a couple of shots into the gallery, whew!
So without further ado, here's how my build of the 1/48 Tamiya F4U-1A went.
This is a great kit! After doing some research and seeing the F4U-1A recently pulled from Lake Michigan, I opted to use the red primer. Additionally, I got it into my head to try the "hairspray" chipping technique for the first time.
All the interior was painted, and the cockpit assembled. All fit perfect, and the instrument panel fit like a glove.
Assembly, was very fast and straight forward, I simply followed the instructions! I recall building the F4U-1D back in the late 90's and had fits getting the wings to behave at the wing-fold. This was where I really learned how to use superglue as a filler.
This kit had the same issue for me. Fortunately, I now had Mr. Surfacer in the arsenal, so what took days before, now took me a few hours. Yay for progress!
With the airframe built, it was time to try the "Hairspray" method! First I primed the bird with Mr. Leveler 1500 black, diluted 1:4 with Mr. Leveler thinner. I really like how this performs and is great if you're going to use the black base method for painting.
I followed the primer with a coat of Alclad II aluminum on the areas that I thought I'd be chipping on.
I then gave it a nice shot of cheap hairspray and let it dry for a spell. Next I painted the red primer seen on a recovered F4U-1A from Lake Michigan. It should be noted that IPMS Stockholm's paint Guru calls this a salmon color, which I suppose it is, though to my eyes it really looks like the red based primer that I used when painting restored rust spots on my old car.
This was then covered with a shot of hairspray and left to dry.
Feeling pretty good about the whole affair I proceeded to lay the colors on, starting with Insignia white on the bottom. Where I'm at, my paint variety is limited pretty much to Tamiya and Mr. Color. So, for insignia white I mixed Tamiya X-2:10 Plus Tamiya Deck Tan XF-55:1, diluted 1:4 with ML thinner.
I liked how it turned out! I followed this with Intermediate blue, also a mix of Tamiya colors. This made by making a 1:1 mix of Medium blue XF-18 and White X-2, then diluted 1:4 with ML thinner.
The final color of Non-spec Blue was added, again a Tamiya mix of Sea Blue XF-17:5, Blue X-4:3, and White X-2:3, all diluted 1:4 with ML thinner. To me, this seemed too blue for a bird hanging out in the sun and fun of the South Pacific, so I added more white, make the new ratio X-2:5. To my eyes this looked more correct, call it scale effect!
Next up was to be the fun part! Chipping away!
I started the process using some warm water and letting it sit on the area that was to be chipped, then using a toothbrush I started removing the top layer of blue. Once started the paint came off easily, revealing the red primer below.
Getting the aluminum to show through was a different story! I resorted to using a clean toothpick to break through the red primer. I believe this was caused by the double layer of hairspray, with the hairspray atop the aluminum having really cured well to the red primer. Needless to say, once through the aluminum came to light! In fact so much to light that Rosie asked me if they really were that worn and chipped. Back to my references, and sure enough, I'd gotten very carried away!
Back to the paint bench for some more blue, this time leaving only the areas that were really worn on. Specifically, the leading edge of the wing where the prop wash would be, the leading edge of the stabilizers, and the main walkways along the top of the wings. I did layer the non-spec blue in places so that a hint of the red primer would peek through.
Upon final review I think I still over did it, but, I does look different and pretty cool. For me, in the future I'll use this method in conjunction with the salt technique and various washes. And with a Japanese plane in the works, it would seem that will happen pretty soon!
I then moved onto decaling!
Tom Blackburn had what the US Navy would call, a fabulous career. Starting as a combat training instructor in Florida, then charged with forming and leading VF-17 during the pivotal time for the US in the war against Japan, to becoming the CAG (commander air group) on the USS Midway in 1947, ultimately becoming her Captain, and retiring in 1972. He passed away in 1994, a great run if you ask me!
Since this campaign was all about the Jolly Rogers, I felt it only fitting to do Blackburn's corsair while on Ondonga, in 1943. After all, he's the one who started the whole Jolly Roger's legacy.
Tamiya's F4U-1A's kit comes with marking for "Big Hog" Blackburn's mount. These were printed in 2000, so one can see that Tamiya after years of complaints finally got their decals more in line with mainstream decals (thinner and opaque). Unfortunately, while applying then I discovered too late that the national insignias were slightly out of register. I believe this is due to having the modeler adding the star with blue background to the bar/red outline decal. So, be warned! If you're going to go the path of red surround US insignia get after market decals instead of piecing together two decals. Aside from that they all went down nicely, and I have found the best decal setting solution to use on Tamiya decals is Solvaset. Though I would cation one to use it sparingly, it will eat at the acrylic clear coat. In my case I use Future (Pledge Floor Care) mixed 75% Future, 25% IPA (isopropyl alcohol 70%) and drop of liquid soap. For me, as a clear coat, it's wonderful. I believe because of the high heat and humidity of where I live to be the reason. Or it could be magic!
I finished the decals, sealed them with Future, and then gave everyone a final coat of clear flat (Mr. Color 182 diluted 1:3 with ML thinner).
Then came the fiddly bits, which really were only the tailwheel gear covers. I'd recommend putting them on before adding the tailwheel assembly.
Overall a great kit, and I highly recommend it!
Due to lighting issues, for this campaign I wasn't able to lay the bird out all pretty with a nice background. So here she is, Blackburn's "Big Hog" of VF-17 circa November 1943.
Thanks to all of you for making this a great and fun campaign! There's really some good models in the gallery. A big thanks to Michael for leading yet another fun campaign!
I'm now off to Learn to fly! Also, for those who didn't make it, don't forget that you can still complete your builds and showcase them in the Hanger Queen 9 campaign going until the end of the year!
Happy modeling, and have fun!
John
b17-peter
#392
Joined: January 09, 2013
KitMaker: 696 posts
AeroScale: 608 posts
Posted: Wednesday, May 01, 2019 - 11:33 PM UTC
Well done, John! Very interesting technique and impressive result
MichaelSatin
Joined: January 19, 2008
KitMaker: 3,909 posts
AeroScale: 2,904 posts
Posted: Thursday, May 02, 2019 - 01:15 AM UTC
Well, time to haul down the flag on this one. Well done to all who finished and thanks to all who participated! Ribbons have been awarded so let me know if you didn't get one and think you should have.
Garr, see you all next time!
Michael
Garr, see you all next time!
Michael
 |

WEB HOSTING BY


Copyright ©2021 AeroScale and Kitmaker Network, a subsidiary of Silver Star Enterprises
All Rights Reserved. Please read our Conditions of Use and Privacy Policy.
All Rights Reserved. Please read our Conditions of Use and Privacy Policy.