

Michael, I think the instrument panel looks great-- Matchbox makes an F3F? As far as I know, from what I've learned "Anthracite" color is a slightly metallic black-gray color. When I see this in instructions, I automatically think of the powder-treated heardened paint finish found on many racing car instrument panels. I mix it by adding small amounts of Testor's square botttle silver with either flat black or flat dark gray, it then gives a slightly metallic "sheen" to the finish.
VR, Russ
Hosted by Rowan Baylis
Monogram F3F-3 from many moons ago

Kevlar06

Joined: March 15, 2009
KitMaker: 3,670 posts
AeroScale: 833 posts
Posted: Friday, February 02, 2018 - 12:32 PM UTC

165thspc

#521
Joined: April 13, 2011
KitMaker: 9,465 posts
AeroScale: 375 posts
Posted: Friday, February 02, 2018 - 06:49 PM UTC
Russ I was not aware of the racing connection. I will do some more research in that direction. Thanks also for the paint mixing formula!

Kevlar06
Joined: March 15, 2009
KitMaker: 3,670 posts
AeroScale: 833 posts
Posted: Friday, February 02, 2018 - 11:39 PM UTC
Michael,
You'll find that adding the square bottle silver to black or gray paint makes the finish smoother when airbrushing too-- it looks pretty good and I use it for varying applications when painting in grey or black tones. Strangely enough, it gives medium gray paint a "silastic" rubber appearance-- like something slightly rubberize-- it reminds me exactly of the old inflatable air mattress we used to be issued in the Army, or the rubberized ponchos that had a dull but smooth appearance. for cockpit control panels in black, it looks like the hardened powder finishes. Try it-- you'll like it, but for some reason it works best with Testor's MM enamels and their square bottle silver.
VR, Russ
Joel_W
Joined: December 04, 2010
KitMaker: 11,666 posts
AeroScale: 7,410 posts
Posted: Saturday, February 03, 2018 - 12:37 AM UTC
Michael,
Both IPs really do look good. I had the similar issue with the IP on the Airfix Hurricane. While the decal will eventually settle down with a stronger solution like Solvaset, there still might be wrinkles do to the large scale. So after Torsten suggested the Yahu AM IP, I found them online locally, and ordered 4 different IP's so I have them for upcoming builds as well.
Joel

165thspc
#521
Joined: April 13, 2011
KitMaker: 9,465 posts
AeroScale: 375 posts
Posted: Saturday, February 03, 2018 - 12:51 PM UTC
You ever find that if you discover a particular subject (that is new to you) you end up reading about that same subject or seeing it in the media within the next 24 hours or less?
Just now I was watching the car show "Overhaulin" on the tube. Chip Foose was discussing a new car custom build and the customer said he wanted not a black color but a real dark gray and Chip comes right back saying "yeah, you want sort of an anthracite color?"
Imagine that!
Just now I was watching the car show "Overhaulin" on the tube. Chip Foose was discussing a new car custom build and the customer said he wanted not a black color but a real dark gray and Chip comes right back saying "yeah, you want sort of an anthracite color?"
Imagine that!
165thspc
#521
Joined: April 13, 2011
KitMaker: 9,465 posts
AeroScale: 375 posts
Posted: Sunday, February 04, 2018 - 03:23 AM UTC
Boy - all this "body work" on the F3F and the Arado is really getting me down. I am soooooooo ready to get back to painting and then on to the decals!
Kevlar06
Joined: March 15, 2009
KitMaker: 3,670 posts
AeroScale: 833 posts
Posted: Sunday, February 04, 2018 - 04:20 AM UTC
So-- to help you out-- I recommend the Yellow wings decal set for your F3F-- you wont be disappointed. It would be a shame to use the kit decals on such a great build. By the way--"the book "Wings of the Fleet USN & Marine Aviation 1919-1941" by Peter Freeman (pub. Aviation Workshop. It also has a few USCG aircraft too) is the guide I was thinking of for color markings. The last page of the book is especially handy in that it gives a full color profile chart of F3F (well the profiles are really F2Fs) section, chevron and carrier markings. Very useful for telling the story of your F3F.
VR, Russ
VR, Russ
165thspc
#521
Joined: April 13, 2011
KitMaker: 9,465 posts
AeroScale: 375 posts
Posted: Sunday, February 04, 2018 - 07:32 AM UTC
I have been checking the Yellow Wings website and up to a couple of days ago the F3F decals were marked "Out of Stock" but as of today they were available again.
In leu of that I had ordered a fresh set of kit decals coming from Revell Germany.
In leu of that I had ordered a fresh set of kit decals coming from Revell Germany.
Kevlar06
Joined: March 15, 2009
KitMaker: 3,670 posts
AeroScale: 833 posts
Posted: Sunday, February 04, 2018 - 08:45 AM UTC
Michael-- put the kit decals in a drawer and save them for something else-- get the Yellow wings decals--they come with stencils, prop tips, very nice color selection, accurate pre-war roundels, squadron insignia, etc. little to no decal film edges, and they go down beautifully without much (if any) decal solvent (and don't use a strong solvent). They also come with a pretty well researched positioning guide (which tells you to lengthen the wings of the kit by the way). If they're back in stock, grab em. You wont be disappointed.
VR, Russ
VR, Russ
165thspc
#521
Joined: April 13, 2011
KitMaker: 9,465 posts
AeroScale: 375 posts
Posted: Sunday, February 04, 2018 - 08:58 AM UTC
OK Russ, I will order them tomorrow! Sounds good! Did not like waiting the six weeks to get them from Germany anyway.
p.s. I use Future Floor Wax without any solvents with excellent results. (Hope my luck does not change on this model.
Thanks
p.s. I use Future Floor Wax without any solvents with excellent results. (Hope my luck does not change on this model.
Thanks
Kevlar06
Joined: March 15, 2009
KitMaker: 3,670 posts
AeroScale: 833 posts
Posted: Sunday, February 04, 2018 - 11:54 AM UTC
Michael, tell me how you use Future for the decals-- I use Solvaset, but have heard of several other modelers who use Future and swear by it, but nobody can explain it to me. I use Future for clearcoats and canopys (although I am leaning towards Alclad clear gloss more, because it dries much more quickly than Future, and is crystal clear) have never attempted it for decals.
VR, Russ
VR, Russ
Joel_W
Joined: December 04, 2010
KitMaker: 11,666 posts
AeroScale: 7,410 posts
Posted: Sunday, February 04, 2018 - 08:01 PM UTC
Quoted Text
OK Russ, I will order them tomorrow! Sounds good! Did not like waiting the six weeks to get them from Germany anyway.
p.s. I use Future Floor Wax without any solvents with excellent results. (Hope my luck does not change on this model.
Thanks
Michael,
I've used Yellow Wing decals on a few builds, and they're great. Thin, registration is dead on, and the colors matched my resources perfectly.
For normal decal application I use a modified version of Paul Budzik's procedures. But for yellow Wing decals I didn't use any Solvaset as it just wasn't needed. These days I'm not a big fan of Future/Pledge on way or the other. The stuff is a floor finish, as that's it's proper use.
Joel
Kevlar06
Joined: March 15, 2009
KitMaker: 3,670 posts
AeroScale: 833 posts
Posted: Sunday, February 04, 2018 - 11:34 PM UTC
Michael,
Some more info to help you out in the painting phase-- From "Wings of the Fleet":
In December 1930, the US Bureau of Aeronautics directed all aircraft to be marked in a standard scheme of squadron and section colors and numbers. An F3F Squadron assigned to an aircraft carrier had 18 aircraft, organized into 6 sections of three aircraft each. Each section was designated by a specific color and number from 1-18, along with the squadron number , with an "F" in between (for Fighter). By 1935, each aircraft carrier of assignment was also indicated by the color of the tail surfaces. Therefore, fighters from the FIRST section of the Yorktown would be marked from 1-3, (3-F-3, 3-F-2, or the section leaders aircraft-- 3-F-1 with a RED TAIL for Yorktown). The First section cowls were always painted red, and the section leaders aircraft (3-F-1) also sported a FUSELAGE BAND for the section leaders aircraft only-- OTHER SECTION AIRCRAFT DID NOT USE THE FUSELAGE BAND. The first aircraft (3-F-1) had a full red cowl, the second aircraft had the top half of the cowl painted, and the third aircraft in the section had the bottom half painted. Squadron aircraft #1, 4, 7, 10, 13, and 16 were always the section leaders aircraft, with fully painted cowlings and fuselage bands, all other aircraft would have either a top or bottom half painted with no fuselage bands.
Section colors:
1st Section--Red (aircraft 1-3)
2nd Section--White (aircraft 4-6)
3rd Section--Blue (aircraft 7-9)
4th Section--Black (aircraft 10-12)
5th Section--Green (aircraft 13-15)
6th Section--Lemon Yellow (aircraft 16-18, as opposed to the yellow chrome of the upper wing)
The section color was repeated on the chevron on the upper wing, with Yellow and white bordered with black accent lines to accentuate the chevron color. The aircraft number was always inside the point of the chevron.
As a side note, the first aircraft of the First and Fourth sections (numbers one and 10 with respective Red and Black cowlings) were usually flown by the Squadron Commander and the Squadron Executive Officer. These aircraft sometimes had white stripes fore and aft of the full cowling colors, designating their leadership roles (but it depended on the squadron assigned).
By 1935, all aircraft had their tail surfaces painted to represent their aircraft carrier assignments:
Carrier Colors (tail surfaces only):
USS Lexington CV1--Yellow
USS Saratoga CV2--White
USS Ranger CV4--Green
USS Yorktown CV5--Red
USS Enterprise CV6--Blue
USS Wasp CV7--Black
Squadrons (such as the Top Hatters, Felix the Cat, Fighting Chiefs, etc.) rotated through carrier assignments, so a specific squadron insignia might appear or be assigned with a carrier tail color for a time-- check your resources for accuracy for the specific squadron symbol, but the above section colors and numbering system were standard.
I know you didn't ask-- but I thought this info might be helpful to you if you wanted to accurately paint your F3F for a specific aircraft, carrier assignment or time period. I'm looking forward to your finished model-- it should be a great one! If you send me a PM with your email, I will attempt to scan and send you a much easier to understand guide from my copy of "Wings of the Fleet".
VR, Russ
165thspc
#521
Joined: April 13, 2011
KitMaker: 9,465 posts
AeroScale: 375 posts
Posted: Thursday, February 08, 2018 - 09:17 PM UTC
Question: Should I finish the F3F in matte clear or gloss?
Matte of course is easier (and I happen to think it looks better on a model) but which is more historically correct? Please know that my question does not refer to modern "perfect" museum vehicles but actual flightline, in-use, aircraft of the 1930's and 40's.
Matte of course is easier (and I happen to think it looks better on a model) but which is more historically correct? Please know that my question does not refer to modern "perfect" museum vehicles but actual flightline, in-use, aircraft of the 1930's and 40's.

Jessie_C


Joined: September 03, 2009
KitMaker: 6,965 posts
AeroScale: 6,247 posts

Posted: Thursday, February 08, 2018 - 10:38 PM UTC
USN 'tween wars aircraft were kept pretty glossy. Exposure to salt air made the paint fade somewhat, but rarely to anything dead flat. I'd say that a decent semi-gloss finish would look appropriately operational unless you're going for a parade-ground finish. Remember that the metal and fabric surfaces would look subtly different.
165thspc
#521
Joined: April 13, 2011
KitMaker: 9,465 posts
AeroScale: 375 posts
Posted: Thursday, February 08, 2018 - 11:21 PM UTC
Jessie thank you. Could you elaborate on the differences between the cloth and metal finishes? Are we just talking about the rough texture of the cloth vs. the metal or is there something more?
I had not thought about that before but painted cloth can still be fairly glossy.
I had not thought about that before but painted cloth can still be fairly glossy.
Jessie_C
Joined: September 03, 2009
KitMaker: 6,965 posts
AeroScale: 6,247 posts
Posted: Friday, February 09, 2018 - 12:51 AM UTC
Fabric surfaces reflect the light differently from painted metal surfaces. They're often much more glossy because of the way the dope dries. For your model, you can show this by using slightly different colours when you have fabric and metal surfaces which are ostensibly the same colour.
Kevlar06
Joined: March 15, 2009
KitMaker: 3,670 posts
AeroScale: 833 posts
Posted: Friday, February 09, 2018 - 05:48 AM UTC
USN standard for the 30s was a glossy surface for all metal and fabric parts. These aircraft were kept in top "show" condition for the most part-- and any weathering or damage was immediately cleaned or repaired. Not to disagree too much from what Jessie has said, the "sheen" of fabric parts (elevators, tail surfaces & ailerons--except for the F4B which had all metal tail surfaces) was slightly less than the metal purpose-painted fuselage parts. Wings were still doped in high gloss, but due to the nature of fabric, had a slightly less reflective surface, with corresponding slightly less sheen. The gloss dope enhanced water repellency and delayed "bleaching". I prefer Alclad II Gloss clear coat, or Model Master Metalizer sealer, thinned by adding 20% Testors enamel thinner for gloss coatings. The Sealer for Metalizer gives a nice scale shine,without being to "toylike". I love Gunze "Mr. Color" paints, as they go on perfectly with a satin like sheen- which is easy to gloss over. Short of that, any good flat paint can be glossed over with Alclad or Metalizer Sealer-- but you may need to apply a couple of coats. I was painting three Meng F-102s this last month, and discovered Testors "Aircraft Gray" when properly thinned, goes on a lot like Gunze, and has a nice sheen, but it's more like ADC (Air Defence Command) gray, and might be a little too dark for USN light gull gray-- you might be able to mix with Testors flat white with it to bring it closer to the USN color.
VR, Russ
VR, Russ
Jessie_C
Joined: September 03, 2009
KitMaker: 6,965 posts
AeroScale: 6,247 posts
Posted: Saturday, February 10, 2018 - 12:39 AM UTC
Quoted Text
USN standard for the 30s was a glossy surface for all metal and fabric parts. These aircraft were kept in top "show" condition for the most part-- and any weathering or damage was immediately cleaned or repaired. Not to disagree too much from what Jessie has said, the "sheen" of fabric parts (elevators, tail surfaces & ailerons--except for the F4B which had all metal tail surfaces) was slightly less than the metal purpose-painted fuselage parts. Wings were still doped in high gloss, but due to the nature of fabric, had a slightly less reflective surface, with corresponding slightly less sheen.
That entirely depends upon how many coats of dope and now much sanding you do between coats

And of course, as modellers, it gives us lots of freedom to finish our models the way we want to, and still be entirely accurate.
Robbd01

#323
Joined: February 13, 2013
KitMaker: 791 posts
AeroScale: 213 posts

Posted: Saturday, February 10, 2018 - 04:23 AM UTC
I dug deep to find this. I built it back in '71. Out of the box. Had no idea of the accuracy at the time. For me it was a challenging build. One of them high end fancy kits. Yes on my model you turn the propeller the landing gear did retract/extend. This was my modeling renaissance. I had just recently discovered the Squadron Shop and the Airbrush (among other things).
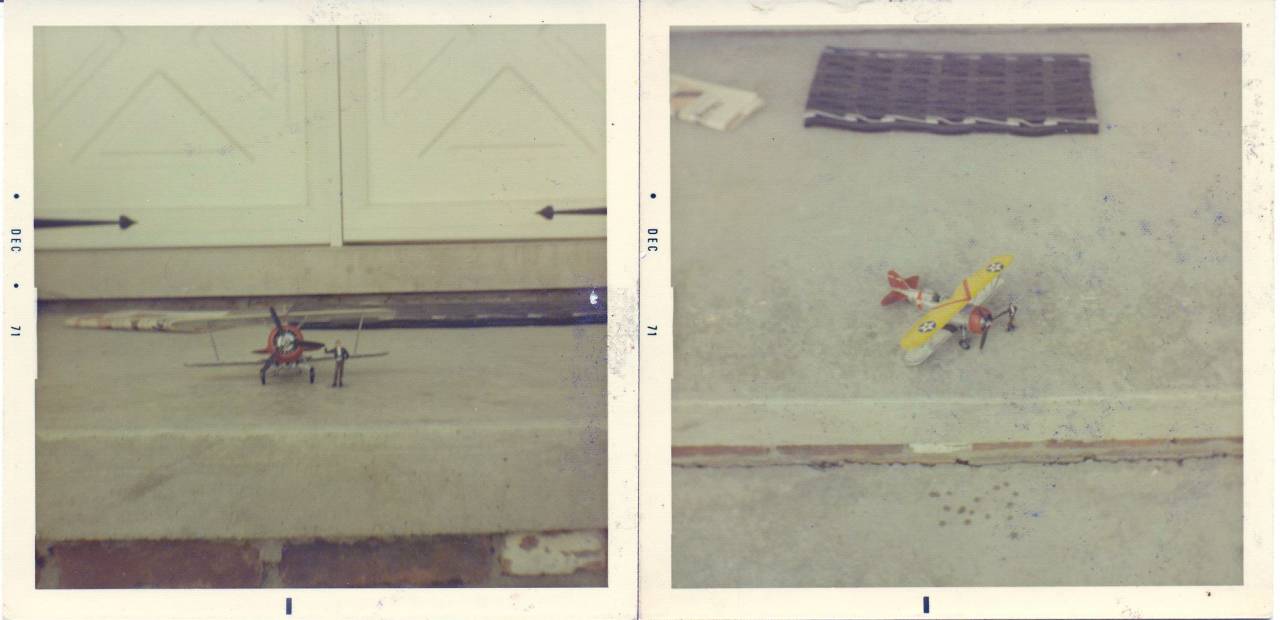
Cheers


Cheers

165thspc
#521
Joined: April 13, 2011
KitMaker: 9,465 posts
AeroScale: 375 posts
Posted: Saturday, February 10, 2018 - 07:38 AM UTC
Way Cool and a Blast From The Past.
Joel_W
Joined: December 04, 2010
KitMaker: 11,666 posts
AeroScale: 7,410 posts
Posted: Saturday, February 10, 2018 - 08:21 PM UTC
My 1st return to modeling was back in the early 70s when we discovered a little plastic only model shop in Syosset, New York: The Squadron Shop. Terry the manager, took the time with each of us that thought we were hot shot builders from our younger days, and helped us learn the basics. Good enough to display our builds on a rotating basis in one of the their display cabinets.
If it wasn't for Terry and the Squadron Shop, I highly doubt that I'd be building today. We just didn't know how special it was having the Squadron Shop in our backyard, till we didn't have it any longer.
Joel
If it wasn't for Terry and the Squadron Shop, I highly doubt that I'd be building today. We just didn't know how special it was having the Squadron Shop in our backyard, till we didn't have it any longer.
Joel
Robbd01
#323
Joined: February 13, 2013
KitMaker: 791 posts
AeroScale: 213 posts
Posted: Saturday, February 10, 2018 - 08:43 PM UTC
Quoted Text
My 1st return to modeling was back in the early 70s when we discovered a little plastic only model shop in Syosset, New York: The Squadron Shop. Terry, the manager, took the time with each of us that thought we were hot shot builders from our younger days, and helped us learn the basics. Good enough to display our builds on a rotating basis in one of the their display cabinets.
If it wasn't for Terry and the Squadron Shop, I highly doubt that I'd be building today. We just didn't know how special it was having the Squadron Shop in our backyard, till we didn't have it any longer.
Joel
I totally agree. I was living in the Detroit area at that time and we had not one but two Squadron Shops one of which was the mail order store. I sure left a lot of face prints on the display cases

Cheers
Joel_W
Joined: December 04, 2010
KitMaker: 11,666 posts
AeroScale: 7,410 posts
Posted: Saturday, February 10, 2018 - 10:51 PM UTC
Quoted Text
Quoted TextMy 1st return to modeling was back in the early 70s when we discovered a little plastic only model shop in Syosset, New York: The Squadron Shop. Terry, the manager, took the time with each of us that thought we were hot shot builders from our younger days, and helped us learn the basics. Good enough to display our builds on a rotating basis in one of the their display cabinets.
If it wasn't for Terry and the Squadron Shop, I highly doubt that I'd be building today. We just didn't know how special it was having the Squadron Shop in our backyard, till we didn't have it any longer.
Joel
I totally agree. I was living in the Detroit area at that time and we had not one but two Squadron Shops one of which was the mail order store. I sure left a lot of face prints on the display cases
Cheers
Robbie,
And lets not forget the unlimited free coffee. We use to spend a few hours there once every other week, as that's about how long it took to build a single engine prop 1/72 scale kit back then. Then every week as we started to make friends with other regulars, and that's how our original local IPMS chapter was formed.
Of course it was more then 43 years ago, and then I was a spry 27. Now I'm 70
 . Time sure does fly.
Joel
Robbd01
#323
Joined: February 13, 2013
KitMaker: 791 posts
AeroScale: 213 posts
Posted: Sunday, February 11, 2018 - 01:52 AM UTC
I was 14 when I built my F3F-3. No coffee for me. Just went in, stared at the display cases, blew my allowance and my paper route money and left. Sometimes my dad would help 'chip in' if I was a tad short.
Cheers
Cheers
 |

WEB HOSTING BY


Copyright ©2021 AeroScale and Kitmaker Network, a subsidiary of Silver Star Enterprises
All Rights Reserved. Please read our Conditions of Use and Privacy Policy.
All Rights Reserved. Please read our Conditions of Use and Privacy Policy.