

Frederick, you got me. I thought that Scale Mates time line page showing the history of a kit linked it all, but I don't always put my glasses on to read stuff.
https://www.scalemates.com/kits/313642-otaki-ot2-16-300-curtiss-p-40e-warhawk
I could not really get a good look at some P-40 data to clear up the rear window area that you were talking about. I was under the impression that they changed as the a/c progressed in series, but still could not find that smoking gun. I appreciate the help I need all that is offered.
Bob
World War II
Discuss WWII and the era directly before and after the war from 1935-1949.
Discuss WWII and the era directly before and after the war from 1935-1949.
Hosted by Rowan Baylis
P-40E (3) COMPARISON BUILD

Bigrip74

Joined: February 22, 2008
KitMaker: 5,026 posts
AeroScale: 2,811 posts

Posted: Tuesday, September 12, 2017 - 01:39 AM UTC

goodn8

Joined: October 12, 2008
KitMaker: 709 posts
AeroScale: 651 posts
Posted: Friday, September 15, 2017 - 10:03 PM UTC
Fantastic work on that really ambitious thread, Bob!
Will follow your way through that triple
Thomas
Will follow your way through that triple
Thomas


Merlin

#017


Joined: June 11, 2003
KitMaker: 17,582 posts
AeroScale: 12,795 posts

Posted: Saturday, September 16, 2017 - 01:08 AM UTC
Hi Bob
Great work so far. This is a really interesting comparison build.
One point I'd make before you get too deep in is to watch out for the colour inside the glazed areas behind the main canopy. Kits all too often call out Interior Green - and it has been an on-going debate for yonks - but the consensus of opinion is that it was actually usually almost always the exterior colour.
All the best
Rowan

Bigrip74
Joined: February 22, 2008
KitMaker: 5,026 posts
AeroScale: 2,811 posts
Posted: Saturday, September 16, 2017 - 04:21 AM UTC
[quote]Hi Bob
Great work so far. This is a really interesting comparison build.
One point I'd make before you get too deep in is to watch out for the colour inside the glazed areas behind the main canopy. Kits all too often call out Interior Green - and it has been an on-going debate for yonks - but the consensus of opinion is that it was actually usually almost always the exterior colour.
All the bes
Rowan [/quote
Rowan, I Agree re: the color behind the cockpit area. Ive always thought as much, but as you stated it depends on the source. The research that I have done usually shows that the camo scheme dictates the color. What I am sure is the red gas cap cover located there.
Great work so far. This is a really interesting comparison build.
One point I'd make before you get too deep in is to watch out for the colour inside the glazed areas behind the main canopy. Kits all too often call out Interior Green - and it has been an on-going debate for yonks - but the consensus of opinion is that it was actually usually almost always the exterior colour.
All the bes
Rowan
[/quoteRowan, I Agree re: the color behind the cockpit area. Ive always thought as much, but as you stated it depends on the source. The research that I have done usually shows that the camo scheme dictates the color. What I am sure is the red gas cap cover located there.
Bigrip74
Joined: February 22, 2008
KitMaker: 5,026 posts
AeroScale: 2,811 posts
Posted: Monday, September 18, 2017 - 12:37 AM UTC
I started gluing the fuselage halves together.
The Encore gave me a problem with the resin scoop on top of the nose. You can see that my efforts with the sprue cutter was not the way to remove the excess. I will apply putty to fill in the broken area.


On the Otaki/Arii fuselage gave no problem going together, but when the cockpit was attached I needed to remove a massive amount of the bottom of the floor and the bottom of the wing attachment point on fuselage also so that the wing would sit flush with the root. A drill was used to try and make holes in the end of the exhaust.


The Encore gave me a problem with the resin scoop on top of the nose. You can see that my efforts with the sprue cutter was not the way to remove the excess. I will apply putty to fill in the broken area.
On the Otaki/Arii fuselage gave no problem going together, but when the cockpit was attached I needed to remove a massive amount of the bottom of the floor and the bottom of the wing attachment point on fuselage also so that the wing would sit flush with the root. A drill was used to try and make holes in the end of the exhaust.

md72

#439
Joined: November 05, 2005
KitMaker: 4,950 posts
AeroScale: 3,192 posts

Posted: Monday, September 18, 2017 - 12:42 AM UTC
I thought your eyes were giving out. I've upgraded mine to Mark 1 Mod 1 and things are going a lot better. I can actually see stuff, like the instructions. 

Bigrip74
Joined: February 22, 2008
KitMaker: 5,026 posts
AeroScale: 2,811 posts
Posted: Monday, September 18, 2017 - 01:02 AM UTC
Quoted Text
I thought your eyes were giving out. I've upgraded mine to Mark 1 Mod 1 and things are going a lot better. I can actually see stuff, like the instructions.
 Allergies have me down today Mark.
Bob
Bigrip74
Joined: February 22, 2008
KitMaker: 5,026 posts
AeroScale: 2,811 posts
Posted: Tuesday, September 26, 2017 - 07:43 AM UTC
It is time to tackle the wings! First is the Arii wing which went together with no problem, but you will notice the photo of the blemish on the wing bottom close to what looks like a landing light.
The Amtech and Encore wings assembled slightly off, not butting up flush with the other half without some persuasion.
All three wings attached to the fuselage with what looks like a 0 degree of dihedral. So the painters masking tape was used to help the wings to set at their proper dihedral. Just hope it works. More photos of this later.

Chadwick
Joined: January 02, 2018
KitMaker: 1 posts
AeroScale: 1 posts
Posted: Tuesday, January 02, 2018 - 07:20 AM UTC
This has been a great project. Any chance of continuing?
Bigrip74
Joined: February 22, 2008
KitMaker: 5,026 posts
AeroScale: 2,811 posts
Posted: Tuesday, January 02, 2018 - 10:31 AM UTC
Christopher, sorry for the delay. Life got in the way, but as soon as I can get done with the VA I will continue on the P-40's again.
Bob
Bob
Bigrip74
Joined: February 22, 2008
KitMaker: 5,026 posts
AeroScale: 2,811 posts
Posted: Saturday, March 23, 2019 - 07:18 AM UTC
I have been re-posting the photos that photo-bucket took off. And will start the blog back up.
Bob
Bob
Bigrip74
Joined: February 22, 2008
KitMaker: 5,026 posts
AeroScale: 2,811 posts
Posted: Saturday, March 23, 2019 - 10:33 AM UTC
Finally a new post:
I have filled the wing roots with Luquitex using the tool shown and adding painters tape to keep the other parts of the wing from being scratched by the sand paper.


I have filled the wing roots with Luquitex using the tool shown and adding painters tape to keep the other parts of the wing from being scratched by the sand paper.
Bigrip74
Joined: February 22, 2008
KitMaker: 5,026 posts
AeroScale: 2,811 posts
Posted: Saturday, March 23, 2019 - 11:28 AM UTC
I used the resin carburator scoop on the Encore fuselage, but has some trouble removing it from the tree. Had to use some Miliput on the rear of the scoop.


JPTRR
#051
Joined: December 21, 2002
KitMaker: 7,772 posts
AeroScale: 3,175 posts
Posted: Saturday, March 23, 2019 - 11:59 AM UTC
Welcome back!

md72
#439
Joined: November 05, 2005
KitMaker: 4,950 posts
AeroScale: 3,192 posts
Posted: Saturday, March 23, 2019 - 02:50 PM UTC
Neat Bob, I remember this one. Surprised by the Liquitex Modeling Paste. Looks like it's working OK. How do you rate it vs other fillers?
Bigrip74
Joined: February 22, 2008
KitMaker: 5,026 posts
AeroScale: 2,811 posts
Posted: Saturday, March 23, 2019 - 03:25 PM UTC
Frederick, thanks for the welcome.
Mark, I use the Liquitex to fill small fuselage cracks and seams where the wing meets the fuselage. After I finally figured out how to use it I love the stuff. Dries fast (but I let it dry over night) and sands easy. I just had to find that time when to quit or it was all gone, I wet sand. It leaves a nice surface and sometimes I will put a coate of Extra Thin over the putty to protect it.
For deeper cracks I use Tamiya gray putty.
Bob

c4willy
#305

Joined: February 01, 2006
KitMaker: 1,673 posts
AeroScale: 1,517 posts

Posted: Saturday, March 23, 2019 - 09:07 PM UTC
Hi Bob great to see this project moving forward!
My favourite scheme for P-40's is the "Wairarapa Wildcat" of Geoff Fisken however I believe the airframe concerned was an "M". I found this rendition online over on FLICKR.
 P40E Wairarapa Wildcat by Pete West, on Flickr
My favourite scheme for P-40's is the "Wairarapa Wildcat" of Geoff Fisken however I believe the airframe concerned was an "M". I found this rendition online over on FLICKR.
P40E Wairarapa Wildcat by Pete West, on Flickrgoodn8
Joined: October 12, 2008
KitMaker: 709 posts
AeroScale: 651 posts
Posted: Sunday, March 24, 2019 - 12:14 AM UTC
Great, Bob!
Nice to see this is moving on
Transferring all the pics was a good idea but time consuming, wasn't it?
Th
masBigrip74
Joined: February 22, 2008
KitMaker: 5,026 posts
AeroScale: 2,811 posts
Posted: Sunday, March 24, 2019 - 08:20 AM UTC
Chris, I like that scheme just those white stripes give me a headache.  I just learned how to paint on D-Day stripes a couple of years ago. So I will learn how to paint on RNZAF stripes.
Thomas, It took only a couple of hours because of trying to go back and forth from the blog page counting how many photos were in each post and transferring those from Postimage back to Aeroscale.
I just learned how to paint on D-Day stripes a couple of years ago. So I will learn how to paint on RNZAF stripes.Thomas, It took only a couple of hours because of trying to go back and forth from the blog page counting how many photos were in each post and transferring those from Postimage back to Aeroscale.
c4willy
#305
Joined: February 01, 2006
KitMaker: 1,673 posts
AeroScale: 1,517 posts
Posted: Monday, March 25, 2019 - 08:10 AM UTC
Bob I "cheat' and use decals for the stripes Ventura make a couple of great sets for RNZAF P-40's with decals for the stripes (er at least I think it was Ventura). I'll check my decals when I get home to confirm whose decals I was using LOL.
Bigrip74
Joined: February 22, 2008
KitMaker: 5,026 posts
AeroScale: 2,811 posts
Posted: Monday, March 25, 2019 - 01:15 PM UTC
Chris, thanks for the information. I will look up those decals, nothing wrong with a little cheating when it comes to white stripes.
I have applied liquitex to all three a/c anD will use tape to keep down the scratching on the wing.

I have applied liquitex to all three a/c anD will use tape to keep down the scratching on the wing.
Bigrip74
Joined: February 22, 2008
KitMaker: 5,026 posts
AeroScale: 2,811 posts
Posted: Tuesday, March 26, 2019 - 12:29 PM UTC
When I turned all 3 a/c over I noticed that the Amtech kit supplied a bottom cowl for the P-40F (which I did not notice until all 3 were on their backs.
A little surgery was done to remove the wrong cowl and the resin part attached.


A little surgery was done to remove the wrong cowl and the resin part attached.
c4willy
#305
Joined: February 01, 2006
KitMaker: 1,673 posts
AeroScale: 1,517 posts
Posted: Tuesday, March 26, 2019 - 01:19 PM UTC
Hi Bob nice work, wasn't too sure how much the rear of the radiator housing differed between the "F" and "E" variants (so that would be the differences between Rolls Royce Merlin or was that Packard and Allison engines).
I checked up on the decals and yes Ventura do do the stripes for the Pacific P-40's. Which I'm guessing would work just as well For USAAF as for RNZAF.
I checked up on the decals and yes Ventura do do the stripes for the Pacific P-40's. Which I'm guessing would work just as well For USAAF as for RNZAF.
JPTRR
#051
Joined: December 21, 2002
KitMaker: 7,772 posts
AeroScale: 3,175 posts
Posted: Friday, May 17, 2019 - 02:48 PM UTC
Hi Bob,
Glad to see the progress.
Here's a little taste of what follows.
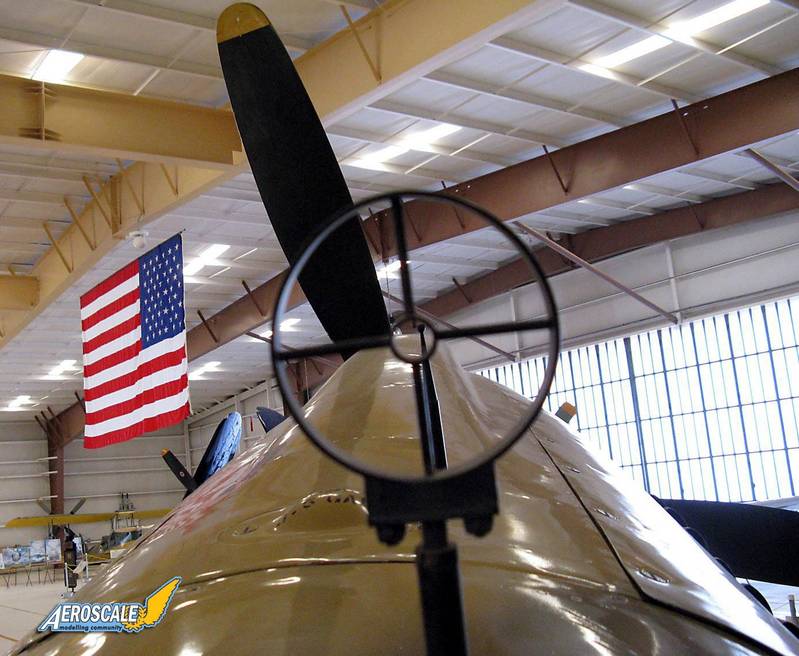
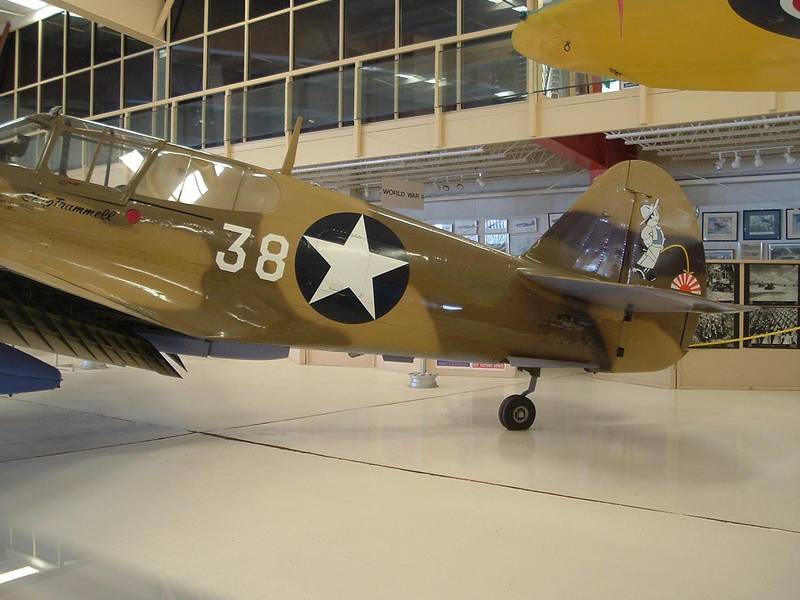
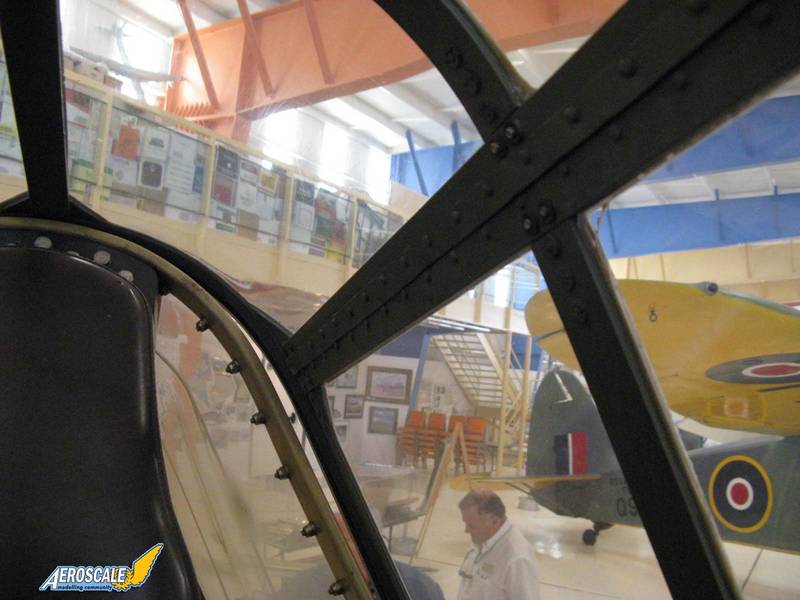
My apologies - I failed you. I meant to give you this URL to a P-40E walkaround (sit-in) I made: P-40E "Holding My Own"
May be too little too late but I hope these pix help your P-40s.
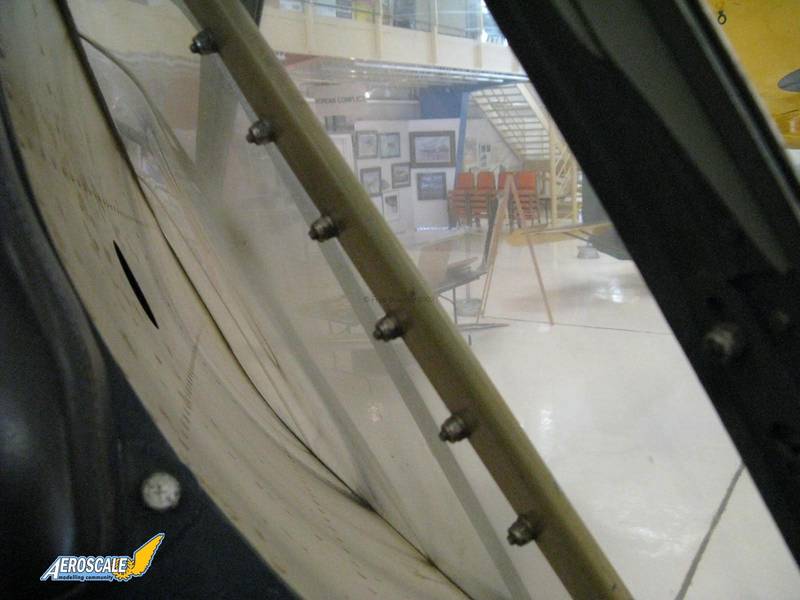
Here is a view of the fuselage cutouts behind the cockpit:
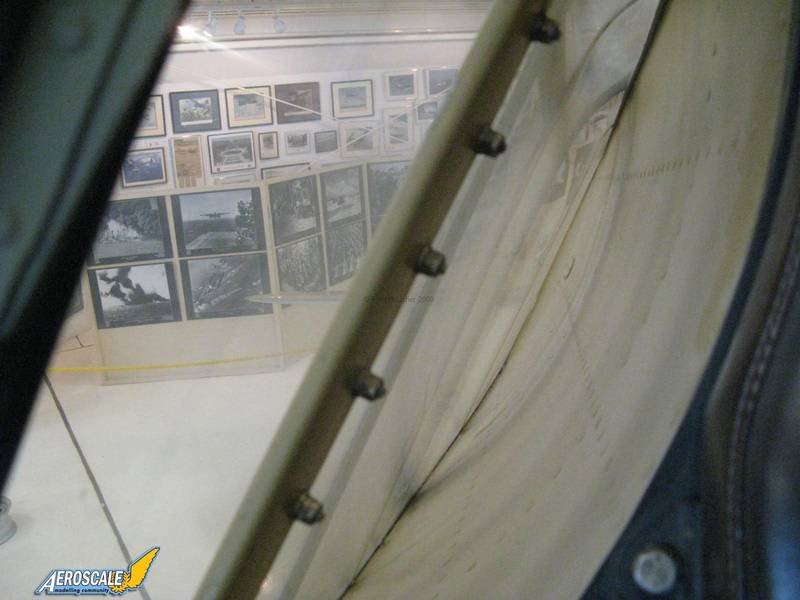
Here are views through those cutouts:
Glad to see the progress.
Here's a little taste of what follows.
My apologies - I failed you. I meant to give you this URL to a P-40E walkaround (sit-in) I made: P-40E "Holding My Own"
May be too little too late but I hope these pix help your P-40s.
Here is a view of the fuselage cutouts behind the cockpit:
Here are views through those cutouts:
Bigrip74
Joined: February 22, 2008
KitMaker: 5,026 posts
AeroScale: 2,811 posts
Posted: Thursday, June 04, 2020 - 09:30 AM UTC
Quoted Text
OK, I'm guessing that the AMTech kit is a reboxing of an older AMT/ESCI/ERTL offering. I'm familiar with the ARII kit, have a couple of it's cousins. But what's in the Squadron Box?
Mark, I know that this reply is a little late, but the Encore looks like an ATech, ESCI, ERTL mold.
After too many hospital visits most of my modeling stuff was packed away.
Today I rummaged through boxes and found more what I thought was lost builds and came across these P-40E's that started this blog.
And here are what their stage is today.


I will need to continue now.
Bob
 |

WEB HOSTING BY


Copyright ©2021 AeroScale and Kitmaker Network, a subsidiary of Silver Star Enterprises
All Rights Reserved. Please read our Conditions of Use and Privacy Policy.
All Rights Reserved. Please read our Conditions of Use and Privacy Policy.