

Gerry, nice kit to use for this campaign. I will follow your build to see how it goes together and maybe purchase one for myself.
Bob
Air Campaigns
Want to start or join a group build? This is where to start.
Want to start or join a group build? This is where to start.
Hosted by Frederick Boucher, Michael Satin
OFFICIAL: 2nd Gen. Jet Fighters Campaign

Bigrip74

Joined: February 22, 2008
KitMaker: 5,026 posts
AeroScale: 2,811 posts

Posted: Sunday, June 04, 2017 - 07:24 PM UTC
Bigrip74
Joined: February 22, 2008
KitMaker: 5,026 posts
AeroScale: 2,811 posts
Posted: Monday, June 05, 2017 - 03:02 AM UTC
Wing is attached waiting for some filler since I could not get the fit as good to not need any.


wrenchy

Joined: April 23, 2006
KitMaker: 140 posts
AeroScale: 89 posts
Posted: Monday, June 05, 2017 - 05:05 AM UTC
I'm in with a Hobbyboss Demon. The box says F3H-2 but the parts in the kit actually build the earlier -2n or m. I' ve got some Furball decals for it and a couple of other resin bits.


Nito74

Joined: March 04, 2008
KitMaker: 5,386 posts
AeroScale: 635 posts
Posted: Monday, June 05, 2017 - 02:08 PM UTC
Trumpeter's Su-9:


SpeedyJ

Joined: September 17, 2013
KitMaker: 1,617 posts
AeroScale: 212 posts
Posted: Monday, June 05, 2017 - 04:08 PM UTC
Hi John. Looking forward to your build. I have no background on building a Russian, so will be curious for progress on the SU-7. Colours are so different, like a lunapark those cockpits.
Kind regards,
Robert Jan
Kind regards,
Robert Jan

Emeritus

Joined: March 30, 2004
KitMaker: 2,845 posts
AeroScale: 1,564 posts

Posted: Tuesday, June 06, 2017 - 12:50 AM UTC
Some more progress on my Gnat.

Engine exhaust pipe parts ready for painting.

Though the instructions tell to glue the cockpit back wall to the main tub and only bring in the nose gear well when closing up the fuselage, I found out that the gluing surfaces between the cockpit tub and back wall aren't that large and gluing all three together at the same time makes for a much sturdier subassembly. I've also glued in some styrene sheet to the back wall to improve the fit of the ejection seat's upper frame and head cushion assembly.

As often the case, the kit-supplied pitot tube was flimsy and brittle (I managed to break it once already before taking this picture...), so off with that and in with a replacement made from a hypodermic needle and steel wire!

My metal replacement pitot lacks the tapered profile of the original portrayed in the plastic part, but I think the trade-off of being much more robust is more than worth it. (and when you take into consideration the mould seam removal needed in the plastic pitot, the result probably would have ended up less-than-round anyway...)
Also pictured is the aforementioned upper seat frame assembly with ejection handle added from thin wire, and the assembled nose cone with its glue seam treated and filled up with "Liquid Gravity" (essentially small-diameter metal shot sold for weighting purposes) to prevent tail-sitting.

Engine exhaust pipe parts ready for painting.
Though the instructions tell to glue the cockpit back wall to the main tub and only bring in the nose gear well when closing up the fuselage, I found out that the gluing surfaces between the cockpit tub and back wall aren't that large and gluing all three together at the same time makes for a much sturdier subassembly. I've also glued in some styrene sheet to the back wall to improve the fit of the ejection seat's upper frame and head cushion assembly.
As often the case, the kit-supplied pitot tube was flimsy and brittle (I managed to break it once already before taking this picture...), so off with that and in with a replacement made from a hypodermic needle and steel wire!
My metal replacement pitot lacks the tapered profile of the original portrayed in the plastic part, but I think the trade-off of being much more robust is more than worth it. (and when you take into consideration the mould seam removal needed in the plastic pitot, the result probably would have ended up less-than-round anyway...)
Also pictured is the aforementioned upper seat frame assembly with ejection handle added from thin wire, and the assembled nose cone with its glue seam treated and filled up with "Liquid Gravity" (essentially small-diameter metal shot sold for weighting purposes) to prevent tail-sitting.

PasiAhopelto
Joined: October 01, 2016
KitMaker: 514 posts
AeroScale: 239 posts
Posted: Thursday, June 08, 2017 - 11:24 PM UTC
I'd like to participate with Bobcat's Yak-28P Firebar in 1/48, which is a long range interceptor variant of Yak-28 family of combat aircraft:

There were also bomber, recce and EW versions. Compared to others, the Yak-28P had intercept radar, internal weapons bay replaced by fuel tanks and two or four missiles (2 x AA-3 Anab and sometimes 2 x AA-2 Atoll). The Firebar entered service in 1964.
Simply put: I like it's looks, so I'll try to build it Natural metal finish worries me most, but let's see how it turns out.
There were also bomber, recce and EW versions. Compared to others, the Yak-28P had intercept radar, internal weapons bay replaced by fuel tanks and two or four missiles (2 x AA-3 Anab and sometimes 2 x AA-2 Atoll). The Firebar entered service in 1964.
Simply put: I like it's looks, so I'll try to build it
Natural metal finish worries me most, but let's see how it turns out. Emeritus
Joined: March 30, 2004
KitMaker: 2,845 posts
AeroScale: 1,564 posts
Posted: Sunday, June 11, 2017 - 08:23 PM UTC
Another little update.

Not sure how visible these will be in the finished model, but I still added pieces of stretched sprue to the back of the instrument panel to represent the backs of the instruments.

First layers of paint are on. Now I'l just need to apply a bit of gloss varnish on the intstrument faces and I'm ready to assemble the cockpit get the fuselage together.
Not sure how visible these will be in the finished model, but I still added pieces of stretched sprue to the back of the instrument panel to represent the backs of the instruments.
First layers of paint are on. Now I'l just need to apply a bit of gloss varnish on the intstrument faces and I'm ready to assemble the cockpit get the fuselage together.
Bigrip74
Joined: February 22, 2008
KitMaker: 5,026 posts
AeroScale: 2,811 posts
Posted: Sunday, June 11, 2017 - 10:05 PM UTC
@Pasi : I would love to see your Yak28 build especially in 1/48. Do you know if the kit is available in the US?
@Eetu : Your Gnat is coming along nicely, but I could not see well enough to work in that scale.
Bob
@Eetu : Your Gnat is coming along nicely, but I could not see well enough to work in that scale.
Bob

Lakota

#123
Joined: November 17, 2008
KitMaker: 1,202 posts
AeroScale: 292 posts
Posted: Sunday, June 11, 2017 - 11:24 PM UTC
Howdy Y'all 
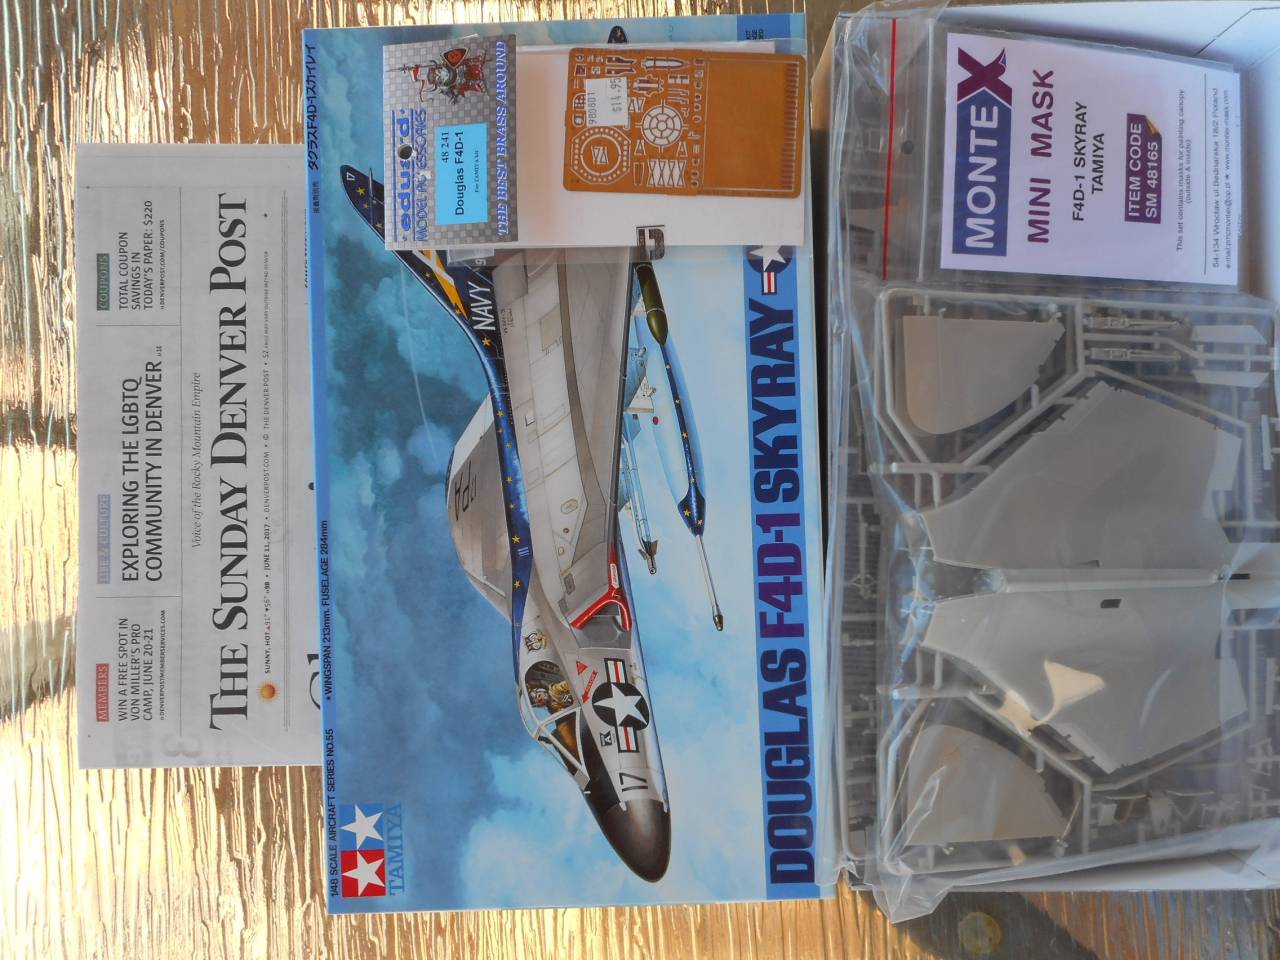
The kit I will be building.
Take care,
Don "Lakota"
The kit I will be building.
Take care,
Don "Lakota"
Emeritus
Joined: March 30, 2004
KitMaker: 2,845 posts
AeroScale: 1,564 posts
Posted: Monday, June 12, 2017 - 11:52 PM UTC
Quoted Text
@Eetu : Your Gnat is coming along nicely, but I could not see well enough to work in that scale.
Bob
Thanks!
Fuselage now assembled. The fit: excellent. Zero complaints with the kit so far.

Cool choice with the Skyray, Don. I've always liked the lines of that plane.


md72
#439
Joined: November 05, 2005
KitMaker: 4,950 posts
AeroScale: 3,192 posts

Posted: Wednesday, June 14, 2017 - 01:25 AM UTC
It's 1/144 is small, it's easy, it'll be fun I told my self....

OK, the fuselage mismatch behind the cockpit is all me. But the fuselage sides being offset to the wing is all ARII's fault.

And once I get the wing centered on the fuselage, there's gonna be gaps to fill fore, aft and side.

OK, the fuselage mismatch behind the cockpit is all me. But the fuselage sides being offset to the wing is all ARII's fault.

And once I get the wing centered on the fuselage, there's gonna be gaps to fill fore, aft and side.


SHAKY962

Joined: May 21, 2012
KitMaker: 765 posts
AeroScale: 316 posts

Posted: Wednesday, June 14, 2017 - 05:01 AM UTC
Here is my entry
Trumpeter F-105D wich I purchase last week in a model contest. I don´t have the box, but I take a picture of one bag of the kit over the TV wich I use for screen


Please let me know this will be OK
This is my second F-105 wich I make this year
Trumpeter F-105D wich I purchase last week in a model contest. I don´t have the box, but I take a picture of one bag of the kit over the TV wich I use for screen


Please let me know this will be OK
This is my second F-105 wich I make this year
Nito74
Joined: March 04, 2008
KitMaker: 5,386 posts
AeroScale: 635 posts
Posted: Wednesday, June 14, 2017 - 05:40 AM UTC
Sure Jose, no problem !
Nito74
Joined: March 04, 2008
KitMaker: 5,386 posts
AeroScale: 635 posts
Posted: Thursday, June 15, 2017 - 12:07 AM UTC
I have to admit I wasn't expecting these gaps,
dryfitting without the internal parts was almost perfect.
I think it was the nose cone fitting that were a bit tight, mayve some work was needed, anyway lesson learned for the Su-11
These were took 2 days ago, I already used putty and Mr.Surfacer for the gaps.


dryfitting without the internal parts was almost perfect.
I think it was the nose cone fitting that were a bit tight, mayve some work was needed, anyway lesson learned for the Su-11
These were took 2 days ago, I already used putty and Mr.Surfacer for the gaps.
Emeritus
Joined: March 30, 2004
KitMaker: 2,845 posts
AeroScale: 1,564 posts
Posted: Thursday, June 15, 2017 - 05:13 AM UTC
Gnat's moving on.


The fit of the fuselage halves was excellent, the seam only needing a nab of superglue at a few spots. However, a few recessed lines (pointed by arrows) on the underside were missing from what I presume to be maintenance hatches and needed scribing in. Not finding suitably detailed drawings online, I chose to trust the painting guide drawings of the kit instructions.

Comparing to photos of the real thing, the 'throats' of the engine intakes were too narrow. Fortunately enlarging them wasn't hard or time-consuming.
Still not quite as open as they could be, but I think that'll do in this scale.
While on it, I also drilled out the cannon ports and drilled deeper the 4 cannon ventilation holes on each side of the front fuselage.

And talking of those ventilation holes, they look pretty nice I think, but aren't quite 100% accurate sitting recessed like that. I'm finding myself kind of tempted to try out making more accurate vent pipes from hypodermic needle cut to length and filed to an angle. If a bit tedious to do, those would not only be more faithful to the original, but also ease painting since they could be attached during final assembly, instead of needing a crazy steady hand with an equally small brush, or having to paint the vent pipes and then touch up their surroundings to get a clean result.
P.s. anyone know if this set of drawings is anywhere near accurate in case I end up wanting to do some riveting on my model?
The fit of the fuselage halves was excellent, the seam only needing a nab of superglue at a few spots. However, a few recessed lines (pointed by arrows) on the underside were missing from what I presume to be maintenance hatches and needed scribing in. Not finding suitably detailed drawings online, I chose to trust the painting guide drawings of the kit instructions.
Comparing to photos of the real thing, the 'throats' of the engine intakes were too narrow. Fortunately enlarging them wasn't hard or time-consuming.
Still not quite as open as they could be, but I think that'll do in this scale.
While on it, I also drilled out the cannon ports and drilled deeper the 4 cannon ventilation holes on each side of the front fuselage.
And talking of those ventilation holes, they look pretty nice I think, but aren't quite 100% accurate sitting recessed like that. I'm finding myself kind of tempted to try out making more accurate vent pipes from hypodermic needle cut to length and filed to an angle. If a bit tedious to do, those would not only be more faithful to the original, but also ease painting since they could be attached during final assembly, instead of needing a crazy steady hand with an equally small brush, or having to paint the vent pipes and then touch up their surroundings to get a clean result.
P.s. anyone know if this set of drawings is anywhere near accurate in case I end up wanting to do some riveting on my model?
PasiAhopelto
Joined: October 01, 2016
KitMaker: 514 posts
AeroScale: 239 posts
Posted: Thursday, June 15, 2017 - 06:04 PM UTC
Quoted Text
@Pasi : I would love to see your Yak28 build especially in 1/48. Do you know if the kit is available in the US?
I ordered it from Lucky Model. I think Bobcat Models is related to Xuntong Models, so if there's a retailer for Xuntong in your area then they might be able to order also Bobcat Models.
Hangelafette
Joined: April 22, 2012
KitMaker: 344 posts
AeroScale: 8 posts

Posted: Saturday, June 17, 2017 - 07:48 AM UTC
Hi all,
I am going to join the fun with Trumpeter's Mig-21F-13.
 Mig21F-13 by Nathan Dewar, on Flickr
Cheers,
Nathan
I am going to join the fun with Trumpeter's Mig-21F-13.
Mig21F-13 by Nathan Dewar, on FlickrCheers,
Nathan
SHAKY962
Joined: May 21, 2012
KitMaker: 765 posts
AeroScale: 316 posts
Posted: Sunday, June 18, 2017 - 06:18 AM UTC
@JOhn, I really dispointed with the quality of the Su-9........ It´s a new mold.......
@Eety, I love your Gnat....
A little update on my Thud


@Eety, I love your Gnat....
A little update on my Thud


Bigrip74
Joined: February 22, 2008
KitMaker: 5,026 posts
AeroScale: 2,811 posts
Posted: Sunday, June 18, 2017 - 08:39 AM UTC
Eetu, I agree with Jose your Gnat is looking good.
Jose, the 105 is one of my favorite airplanes and cant wait to see yours painted.
Does anyone know of a mask kit for a 1/72 F8? I am tired of trying to cut tape for the canopy and not doing any good.
Bob
Jose, the 105 is one of my favorite airplanes and cant wait to see yours painted.
Does anyone know of a mask kit for a 1/72 F8? I am tired of trying to cut tape for the canopy and not doing any good.
Bob
md72
#439
Joined: November 05, 2005
KitMaker: 4,950 posts
AeroScale: 3,192 posts
Posted: Sunday, June 18, 2017 - 09:02 AM UTC
Well got the wing right on the second try... First time it was skewed off to the right. Now it's centered and I've started gluing in filler strips of plastic before I go for filler....


SHAKY962
Joined: May 21, 2012
KitMaker: 765 posts
AeroScale: 316 posts
Posted: Sunday, June 18, 2017 - 05:51 PM UTC
@Bob
The only mask wich I know is Eduard, bit only for the Academy kit. I think you need to adapt this.
The only mask wich I know is Eduard, bit only for the Academy kit. I think you need to adapt this.
Bigrip74
Joined: February 22, 2008
KitMaker: 5,026 posts
AeroScale: 2,811 posts
Posted: Sunday, June 18, 2017 - 07:55 PM UTC
Jose, thanks for the information.
Bob
Bob
Bigrip74
Joined: February 22, 2008
KitMaker: 5,026 posts
AeroScale: 2,811 posts
Posted: Sunday, June 18, 2017 - 08:28 PM UTC
Mark, congrats on getting the wing where you wanted. I attached the tail feathers and canopy to the my ESCI F8.


madnursegaz

Joined: March 21, 2010
KitMaker: 13 posts
AeroScale: 9 posts

Posted: Tuesday, June 20, 2017 - 03:15 PM UTC
OK, here goes!
Late to the party (as usual!)this is my first campaign on Aeroscale. I'm late because I'm working on models for GBs elsewhere as well, and I've been on vacation last week (to the beautiful Tenby in South Wales)
However, I'm here now.
I'll be building this:

I was intending to do the Swiss option for the markings, but then I saw that the RAF kite was from September 1963, whereas the Swiss one was from 1994, I felt the RAF option met the spirit of the campaign better, so that's what I'm doing!
Here are the sprues:

A week of night shifts starts tonight, so very little progress until the weekeknd, and I'll make a start.
This model is a big deal for me, I'm a careless and impatient kit assembler who usually works in 1/72.
Late to the party (as usual!)this is my first campaign on Aeroscale. I'm late because I'm working on models for GBs elsewhere as well, and I've been on vacation last week (to the beautiful Tenby in South Wales)
However, I'm here now.
I'll be building this:
I was intending to do the Swiss option for the markings, but then I saw that the RAF kite was from September 1963, whereas the Swiss one was from 1994, I felt the RAF option met the spirit of the campaign better, so that's what I'm doing!
Here are the sprues:
A week of night shifts starts tonight, so very little progress until the weekeknd, and I'll make a start.
This model is a big deal for me, I'm a careless and impatient kit assembler who usually works in 1/72.
 |

WEB HOSTING BY


Copyright ©2021 AeroScale and Kitmaker Network, a subsidiary of Silver Star Enterprises
All Rights Reserved. Please read our Conditions of Use and Privacy Policy.
All Rights Reserved. Please read our Conditions of Use and Privacy Policy.