Air Campaigns
Want to start or join a group build? This is where to start.
OFFICIAL: Western Front/ETO Campaign
PeeJay74
#363
_VISITCOMMUNITY
Pennsylvania, United States
Joined: January 08, 2014
KitMaker: 425 posts
AeroScale: 401 posts
Posted: Monday, March 20, 2017 - 07:05 AM UTC
Meng 1:48 P-51D Mustang

Time for another update, continuing on with the landing gear bay.

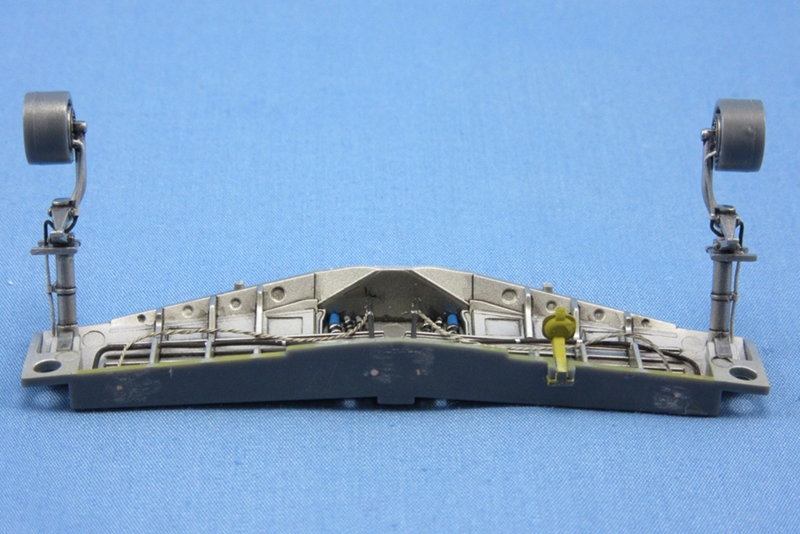
I added break lines to the landing gear and installed them into the gear bay. The lines are 0.015" lead fly wire with fittings made from aluminum micro tubing. I like the effect these give, and it is a pretty simple addition to make.

The gear bay is now complete with the exception of the tires. I'll add those at the end, they are going to require some cleaning up to make them look good. The mold seams will need removed and likely the tread pattern redone with a micro saw.


The legs click into place with some pressure. The fit was so tight there seemed zero chance they would come loose but I glued them anyway to guarantee it won't collapse suddenly one day.


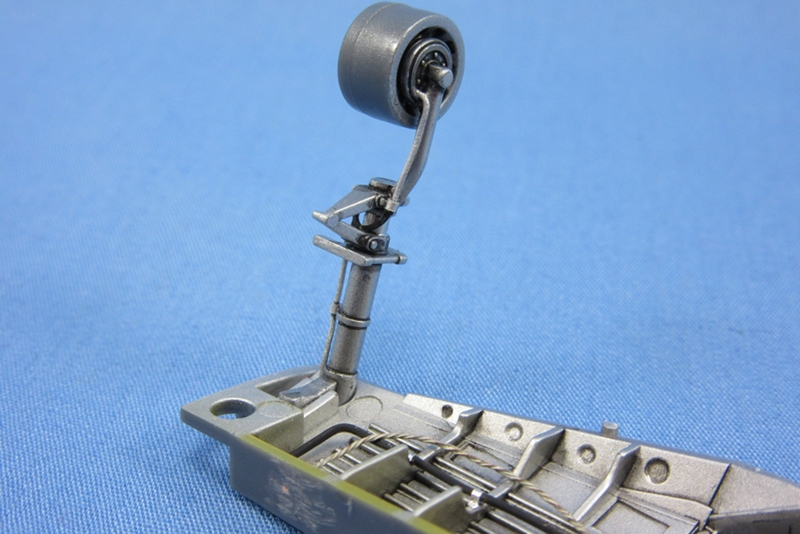
Brake lines added. I considered using micro-tubing for the upper and lower lengths which were not flexible on the real thing, but decided just to paint them silver with black for the flexible hose through the oleo scissors.


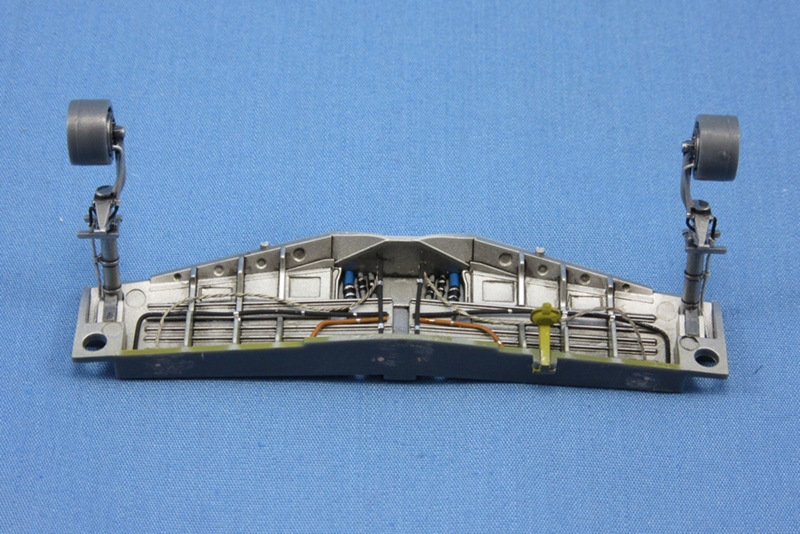
Decent view of the gear bay and all of the added wiring detail. I like how it came out, it looks much busier now.

One thing of note. I debated replacing the wheels with resin, but it was going to be tricky. Meng have molded the brake drums into the gear leg unlike most every other kit out there, which just have the legs and axles. This meant I'd either need to modify the resin wheels by removing the drums from each, or I'd have to conduct some surgery on the kit gear to remove the drums. In the end I decided to keep the build simple and go with the kit wheels. They aren't bad, they just are not as nice as the hollow wheels you can source from Eduard or Barracuda.

On to the wings...

I am happy with my putty work. A quick coat of primer showed almost no flaws.


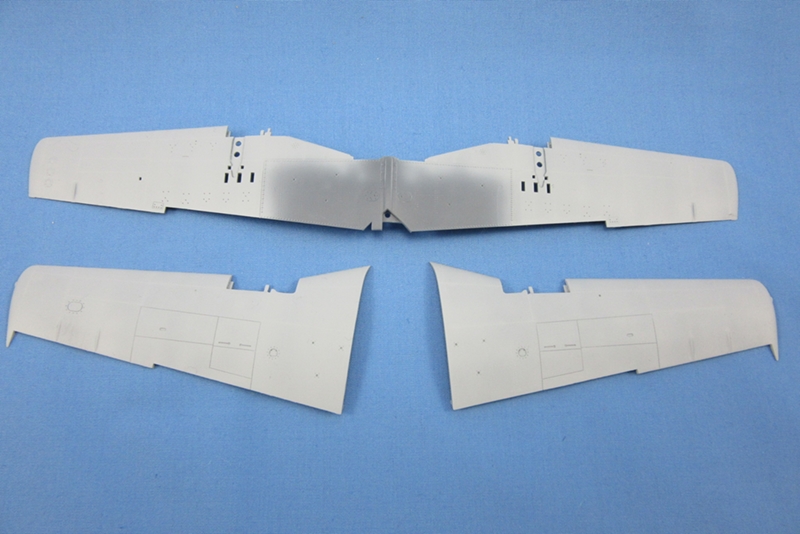
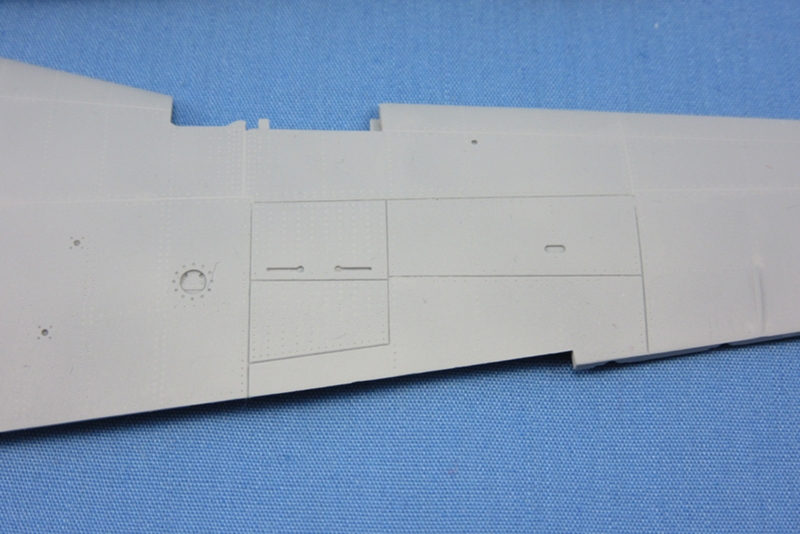
The wings are nice and smooth now, with just a few panel lines remaining. I do need to correct the bottoms.

If you notice the five clusters of rivets in a line towards the rear edge, those will need filled. Meng molded the wing as a P-51D-25, meaning those are the mount locations for the HVAR rails that became standard with this version of the Mustang. It's honestly a nice touch, but I need to get rid of them as "Big Beautiful Doll" was a P-51D-20 and wouldn't have have the zero rail mounts. FYI, the kit does not include HVAR's, just the mount locations on the wings.


All those rivets are gone finally.


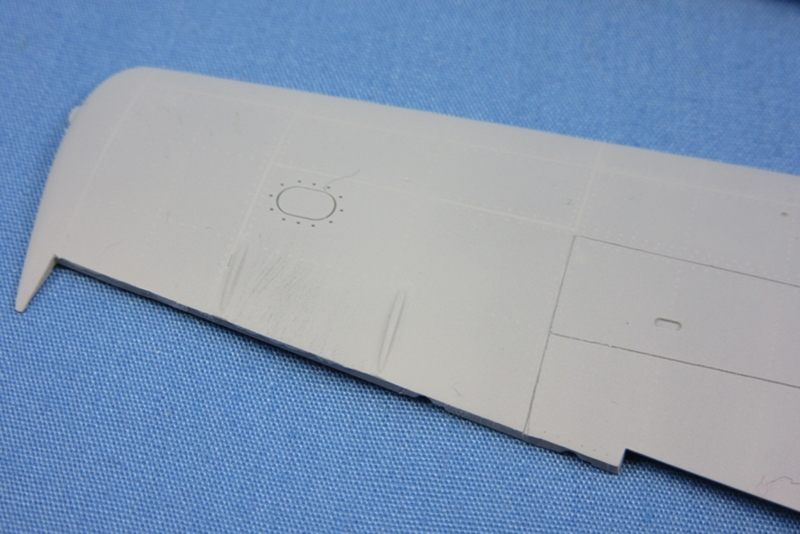
This was the only flaw I found. I'll need to sand this spot smooth so it doesn't show under paint. Easy fix.

I'm going to put the wings together and then do the final pass with filling and repairing the seams. It should be easy now that the majority of the putty work is done.

One last note while I am on the wings...

Meng did another small detail that really made me appreciate the detail they put into the kit. While I was hollowing out the gun barrels (so easy to do in this kit!) I noticed something I hadn't before: Meng molded the plumbing locations for the drop tanks.
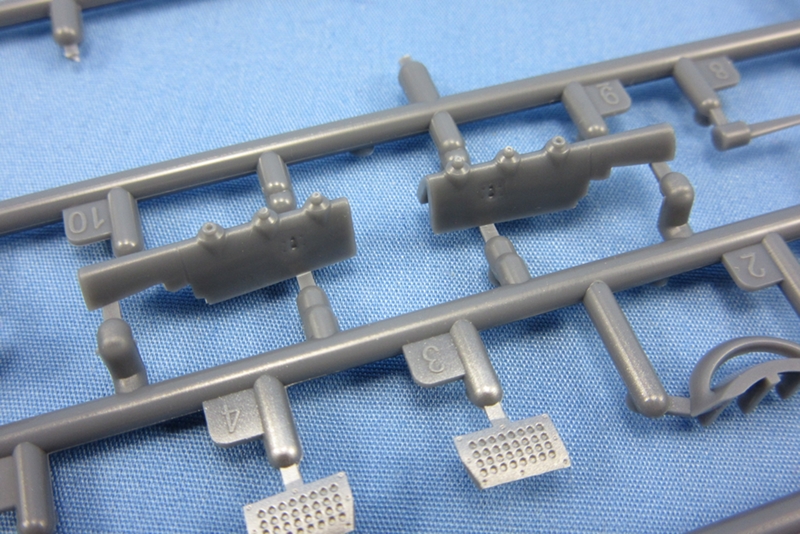

Nicely done, Meng!

Adding plumbing to the drop tanks will be a snap. I am not aware of any other 1:48 Mustang that the kit manufacturer bothered to go to these lengths to include these little details that stand out. I don't know, I just found that to be a nice touch.

More to come soon. I should have the wings assembled this week.
KelticKnot
_VISITCOMMUNITY
Scotland, United Kingdom
Joined: May 11, 2015
KitMaker: 768 posts
AeroScale: 656 posts
Posted: Monday, March 20, 2017 - 06:55 PM UTC
I'm going to be waiting on paint and varnish drying on my current ship project for a few days so instead of twiddling my thumbs it's time to officially crack open the box on the Mk1 Hurricane from Airfix.

Im excited to start this one, the detail and molding looks to amazing.
MichaelSatin
Staff MemberCampaigns Administrator
AEROSCALE
_VISITCOMMUNITY
Colorado, United States
Joined: January 19, 2008
KitMaker: 3,909 posts
AeroScale: 2,904 posts
Posted: Monday, March 20, 2017 - 07:22 PM UTC

Quoted Text

I'm going to be waiting on paint and varnish drying on my current ship project for a few days so instead of twiddling my thumbs it's time to officially crack open the box on the Mk1 Hurricane from Airfix.

Im excited to start this one, the detail and molding looks to amazing.


It's a very nice kit Paul! I wish I had several more. You'll enjoy it. Really glad to see Airfix back in the game!

I hope to get started on the 1/32 Tamiya P-51D this weekend. We'll see...

Michael
goodn8
_VISITCOMMUNITY
Berlin, Germany
Joined: October 12, 2008
KitMaker: 709 posts
AeroScale: 651 posts
Posted: Friday, March 24, 2017 - 01:19 AM UTC
1/48 Fw 190 A(G)8 Revell/Dragon/Trimaster

After filling, sanding and a coat of primer over the cowling I'm here now...


Quite happy, much more useful now. Mybe still some minor touch up's.

Thomas
c4willy
#305
_VISITCOMMUNITY
Christchurch, New Zealand
Joined: February 01, 2006
KitMaker: 1,673 posts
AeroScale: 1,517 posts
Posted: Friday, March 24, 2017 - 04:00 PM UTC
okay guys I'm in with this kit the Airfix new mould Blenheim as a night fighter. It's a gorgeous little kit with heaps of detail I can't wait to build, so here we go!

Antilles
_VISITCOMMUNITY
Nordrhein-Westfalen, Germany
Joined: March 22, 2015
KitMaker: 671 posts
AeroScale: 614 posts
Posted: Saturday, March 25, 2017 - 06:06 AM UTC
Paul: Your build of the Mustang is really most enoyable! Landing gear bay is great with all this wiring and the wing improvement is awesome!

Thomas: Great work on this bad fitting butcher bird. I will remember Your solution of stretching the fuselage with sprues. Very nice idea!

Richard: Be careful with the fitting of the lower wing on Your Typhoon. You can avoid lots of sanding, when You glue it in correct. Mine wasn't! Hence more sanding is needed!

Chris: Nice choice! like to hear more about this kit!

Oliver
Pave-Hawk
_VISITCOMMUNITY
Western Australia, Australia
Joined: May 05, 2006
KitMaker: 900 posts
AeroScale: 200 posts
Posted: Monday, March 27, 2017 - 12:30 PM UTC
Rather than the Salamander I originally intended, I have decided to go with my Aussie spitfire based in France, from Eduard.
I am building both Eduard spitfires from the combo kit together as part of this and the CBI campaign, and have started a build log here.
KelticKnot
_VISITCOMMUNITY
Scotland, United Kingdom
Joined: May 11, 2015
KitMaker: 768 posts
AeroScale: 656 posts
Posted: Monday, March 27, 2017 - 05:45 PM UTC
The new Airfix Hurricane appears to be a beautifully made kit so far. The engraving and detail is sharp and all the structural parts which make up the cockpit lend themselves to the canopy being left open for sure.

Pave-Hawk
_VISITCOMMUNITY
Western Australia, Australia
Joined: May 05, 2006
KitMaker: 900 posts
AeroScale: 200 posts
Posted: Thursday, March 30, 2017 - 01:52 PM UTC
My spitfire builds have begun


Antilles
_VISITCOMMUNITY
Nordrhein-Westfalen, Germany
Joined: March 22, 2015
KitMaker: 671 posts
AeroScale: 614 posts
Posted: Saturday, April 01, 2017 - 01:05 AM UTC
Paul: The Hurricane interior detail of this kit is great. Got to get one of these kits!

Pave Hawk: Nice kick off!

After having some problems with the Typhoon´s decals (the ones I had were really sturdy and reacted after 3 hours with the constantly applied MicroSol ?!?) I finished my Tiffy.

Hope You enjoy it.

And these guys better take cover:


...there is a storm coming:


Oliver
c4willy
#305
_VISITCOMMUNITY
Christchurch, New Zealand
Joined: February 01, 2006
KitMaker: 1,673 posts
AeroScale: 1,517 posts
Posted: Sunday, April 02, 2017 - 01:22 AM UTC
The Blenheim kit is just a little cracker! All the control surfaces are separate and posable including the split flaps. There are wing spars to attach the undercarriage to.

The undercarriage is scale thin but rather sturdy when all the parts are together. I chose to assemble the undercarriage onto the mounts in the upper wing before I glued the bottom section in place. This simplified the assembly and painting. The bottom wing slides easily over the gear once assembled so no issues there. Care will be needed in the continued construction but it's a trade I was willing to make.

I do recommend that you follow Airfix's instructions to the letter as the parts are very fine and the retraction gear is braced because it is so delicate. Once glued in place the supports are removed it ensures good alignment and that the parts come out of the sprues and go into the landing gear unbroken. Take care when removing them as mine broke but were easily repaired because of the bracing. I used snippers but I think a fine saw may provide better results when removing them from the sprue.

The fuselage is in two sections the nose and the fuselage itself and the wings. Parts of the wing joining surface on the fuselage were impact damaged because the plastic is reasonably soft. But straightened easily with a little judicious force. it'll require a smudge of filler to completely blend it in but it's no biggie.

The cockpit is nicely detailed right out of the box with lovely detail but some ejector pin marks that are rather visible. The construction of the pilots seat is particularly fiddly but looks a million bucks when assembled. Again here I suggest that you follow Airfix's instructions closely as there is quite a bit to cram in. I still need to apply wash's and a little wear in places. I've also still got to paint the pilots seat back. (Missed that just noticed it in the photo's!)

The bomb-bay is also multi part because of the way the wings are designed. But just requires a little sanding to get it to go together easily. There are locating lugs to keep everything aligned. It is well detailed right out of the box and is supplied with ordinance to fill it nice one Airfix! Fitting the one piece bomb-bay doors dose require a little packing out in places but the may have been excessive sanding on my part. The doors are supplied singly so you can pose them open and I'll do this for the MK-I I have to build.

However building the MkIVF none of it will be seen so the parts will be relegated to the spares department. I did struggle with the belly gun pack trying to get the barrels in place but this was my issue not Airfix's instructions. There is a blast shield for the belly but this is not shown in the instructions though the instructions do tell you to drill out the required mounting holes. Oops Airfix slipped up on that one.

The engineering of the kit is outstanding as are the panel lines. I'm really very impressed with this kit I'm loving it so far!. I will be buying more of these in the future as the camo and markings are just so varied.

Anyway here are some pics.


Antilles
_VISITCOMMUNITY
Nordrhein-Westfalen, Germany
Joined: March 22, 2015
KitMaker: 671 posts
AeroScale: 614 posts
Posted: Sunday, April 02, 2017 - 02:53 AM UTC
Chris: Thank's for the detailed report on Your Blenheim. This kit is definetely on my wish list and Your experience with the kit is welcome!

Oliver
goodn8
_VISITCOMMUNITY
Berlin, Germany
Joined: October 12, 2008
KitMaker: 709 posts
AeroScale: 651 posts
Posted: Sunday, April 02, 2017 - 02:40 PM UTC
Chris: Nice progress & thanks for the additional Infos and pics. I'll follow up the build and put the kit on my list.

Oliver: Great work - love it! Beautiful job on the paint, weathering and camo, really nice. The heavy armament let it look very evil. You made this scale "great again" . Cute kit, already bought it and looked inside.
Congrats for finishing
Thomas
KelticKnot
_VISITCOMMUNITY
Scotland, United Kingdom
Joined: May 11, 2015
KitMaker: 768 posts
AeroScale: 656 posts
Posted: Monday, April 03, 2017 - 02:38 AM UTC
Oliver, your Typhoon looks amazing. Well done !

I'm working away at the Hurricane and have scratched some seatbelts out of masking tape which don't look too bad...
And since there is so much cool optional detail in the gun bays i've chosen to open one of them up.

ClaytonFromEllijay
#454
_VISITCOMMUNITY
Georgia, United States
Joined: July 10, 2016
KitMaker: 1,273 posts
AeroScale: 63 posts
Posted: Monday, April 03, 2017 - 03:53 AM UTC
"Not too bad", Paul, how about spot on? Very nice work!
PasiAhopelto
_VISITCOMMUNITY
Uusimaa, Finland
Joined: October 01, 2016
KitMaker: 514 posts
AeroScale: 239 posts
Posted: Friday, April 07, 2017 - 10:04 AM UTC
Some progress with Tempest. First unpainted cockpit:


And painted with seat belts:


The kit is labeled "hi-tech", and it comes with resin, photo-etch and flexible seat belts. It needs more work and fitting than average Tamiya or Eduard, but no real problems so far. Instructions could be clearer. For example illustration of finished cockpit would help.
KelticKnot
_VISITCOMMUNITY
Scotland, United Kingdom
Joined: May 11, 2015
KitMaker: 768 posts
AeroScale: 656 posts
Posted: Monday, April 10, 2017 - 07:19 PM UTC
I have to agree with every review of these new airfix kits. They are superb!

My Hurri is starting to look like an aircraft and there have been no major fit problems with the fuselage.
A thin plastic shim in the 'chin' piece helped maintain the shape and prevent a step and the tail pieces could be a bit more snug fitting but a tiny bit of putty with fix that.
The fuselage to wing fit was great and needed the smallest bit of sanding where the parts joined the sprue to help things along.

Pave-Hawk
_VISITCOMMUNITY
Western Australia, Australia
Joined: May 05, 2006
KitMaker: 900 posts
AeroScale: 200 posts
Posted: Tuesday, April 11, 2017 - 06:23 AM UTC
Spitfire Cockpit is completed and ready to install in fuselage.


Seen here with it's CBI campaign brother:

goodn8
_VISITCOMMUNITY
Berlin, Germany
Joined: October 12, 2008
KitMaker: 709 posts
AeroScale: 651 posts
Posted: Friday, April 14, 2017 - 07:37 PM UTC
Nice progress guys, pits looking good so far.

Paul: Great work on the interior and a good choice to open up a gun bay. What a pity to hide all the framework after closing the fuselage.

Meanwhile put the RLM 76 on, canopy painted in- and outside and the gliding mechanism was fixed. Also produced some seatbelts from some stuff (metal,tape,foil) lying around to improve (? not sure) the pit.


Thomas
KelticKnot
_VISITCOMMUNITY
Scotland, United Kingdom
Joined: May 11, 2015
KitMaker: 768 posts
AeroScale: 656 posts
Posted: Saturday, April 15, 2017 - 01:14 PM UTC

Quoted Text


Paul: Great work on the interior and a good choice to open up a gun bay. What a pity to hide all the framework after closing the fuselage.

Meanwhile put the RLM 76 on, canopy painted in- and outside and the gliding mechanism was fixed. Also produced some seatbelts from some stuff (metal,tape,foil) lying around to improve (? not sure) the pit.


Thanks Thomas, there is so much going on inside the fuselage its like airfix are daring you to open up some of the side panels.
I like the look of your seatbelts by the way... The buckles look great!
Antilles
_VISITCOMMUNITY
Nordrhein-Westfalen, Germany
Joined: March 22, 2015
KitMaker: 671 posts
AeroScale: 614 posts
Posted: Tuesday, April 18, 2017 - 12:52 AM UTC
So back out of a nice holiday trip I am fascinated about the progress here!

Thomas: Thank´s for Your very kind words. I am glad You like my little Typhoon. You will definitely have great fun with Yours.
Your Würger comes along nicely. The home made seat belts are great.

Paul: Thank You for your comment! Your Hurricane looks fine, too and the opened gun bay will be an eye catcher.

Pasi: The working place looks very good!

Iain: Nice double feature! Is the interior color of one cockpit slightly darker or is this due to the light?

Oliver
Pave-Hawk
_VISITCOMMUNITY
Western Australia, Australia
Joined: May 05, 2006
KitMaker: 900 posts
AeroScale: 200 posts
Posted: Tuesday, April 18, 2017 - 04:02 AM UTC

Quoted Text


Iain: Nice double feature! Is the interior color of one cockpit slightly darker or is this due to the light?

Oliver


Same final colour was used, but one was primed in black the other in white, so one appears darker than the other.
KelticKnot
_VISITCOMMUNITY
Scotland, United Kingdom
Joined: May 11, 2015
KitMaker: 768 posts
AeroScale: 656 posts
Posted: Wednesday, April 19, 2017 - 02:38 PM UTC
One of the most satisfying moments is pulling a mask and discovering that it actually worked !

The Hurricane is looking pretty cool if I may so so myself and the gun bay stands out nicely now the camo colour is down.


I've chosen to paint and attach all the gear bay panels and intake later. Seemed an easier masking job to me.
ClaytonFromEllijay
#454
_VISITCOMMUNITY
Georgia, United States
Joined: July 10, 2016
KitMaker: 1,273 posts
AeroScale: 63 posts
Posted: Wednesday, April 19, 2017 - 07:11 PM UTC
Great paint job, Paul, it looks flawless!
KelticKnot
_VISITCOMMUNITY
Scotland, United Kingdom
Joined: May 11, 2015
KitMaker: 768 posts
AeroScale: 656 posts
Posted: Wednesday, April 19, 2017 - 07:38 PM UTC
Cheers Clayton ! There are a couple of spots that need retouching but on the whole I'm quite pleased.
All my aircraft weathering to date has been very subtle so I'm going to push myself here to be bolder and make this hurricane look well used !