OFFICIAL: Western Front/ETO Campaign
Uusimaa, Finland
Joined: October 01, 2016
KitMaker: 514 posts
AeroScale: 239 posts
Posted: Monday, February 20, 2017 - 01:17 AM UTC
I was thinking of building P-47D or FW-200 Condor, but changed may mind and decided to try building Special Hobby's Tempest V in 1/32 scale:

There are five marking options, and I'll probably build Pierre Clostermann's plane from April 1945.
Nordrhein-Westfalen, Germany
Joined: March 22, 2015
KitMaker: 671 posts
AeroScale: 614 posts
Posted: Tuesday, February 21, 2017 - 01:32 AM UTC
Hello fellow modelers!
Very nice builds are going on here. As I have finished my last model, I now have time for a new one. I will try some of Airfix newer kits. The Typhoon in 1/72.

Oliver

On the desk: Probably a Panzer III.
MichaelSatin
 Campaigns Administrator
Colorado, United States
Joined: January 19, 2008
KitMaker: 3,909 posts
AeroScale: 2,904 posts
Posted: Tuesday, February 21, 2017 - 04:33 AM UTC
Very nice kit Oliver, and I NEVER build 1/72!
Michael

On the bench:
Sorta depends on your definition of "on the bench"...
Nordrhein-Westfalen, Germany
Joined: March 22, 2015
KitMaker: 671 posts
AeroScale: 614 posts
Posted: Wednesday, February 22, 2017 - 07:18 PM UTC
Quoted Text
Very nice kit Oliver, and I NEVER build 1/72!
Michael
Michael,
maybe You should try one of these new 1/72 kits. They are great fun!
Oliver
On the desk: Probably a Panzer III.
MichaelSatin
Campaigns Administrator Colorado, United States
Joined: January 19, 2008
KitMaker: 3,909 posts
AeroScale: 2,904 posts
Posted: Wednesday, February 22, 2017 - 07:46 PM UTC
Quoted Text
Quoted Text
Very nice kit Oliver, and I NEVER build 1/72!
Michael
Michael,
maybe You should try one of these new 1/72 kits. They are great fun!
Oliver
Actually I have built that Typhoon, and highly recommend it! But the old eyes and fat fingers have a hard time with tininess.
Michael
On the bench:
Sorta depends on your definition of "on the bench"...
Nordrhein-Westfalen, Germany
Joined: March 22, 2015
KitMaker: 671 posts
AeroScale: 614 posts
Posted: Wednesday, February 22, 2017 - 08:52 PM UTC
Well,
I have to build my stash of 1/72 kits and than I will turn to the next bigger scale, as my arms are not long enough to read the smaller lines in the newspaper already.
Oliver
Quoted Text
Quoted Text
Quoted Text
Very nice kit Oliver, and I NEVER build 1/72!
Michael
Michael,
maybe You should try one of these new 1/72 kits. They are great fun!
Oliver
Actually I have built that Typhoon, and highly recommend it! But the old eyes and fat fingers have a hard time with tininess.
Michael
On the desk: Probably a Panzer III.
Bangkok, Thailand / ไทย
Joined: September 17, 2013
KitMaker: 1,617 posts
AeroScale: 212 posts
Posted: Saturday, February 25, 2017 - 07:28 PM UTC
Progress so far the Fokker D.21. Like it very much. First time Special Hobbies, so will get some more...


More to come.
Regards,
Robert Jan
MichaelSatin
Campaigns Administrator Colorado, United States
Joined: January 19, 2008
KitMaker: 3,909 posts
AeroScale: 2,904 posts
Posted: Saturday, February 25, 2017 - 08:42 PM UTC
Nice indeed Robert Jan! Special Hobby kits can be tricky (I'm building their 1/32 P-39 right not) but they do interesting subjects and are generally worth the extra work.
Michael
On the bench:
Sorta depends on your definition of "on the bench"...
Scotland, United Kingdom
Joined: May 11, 2015
KitMaker: 768 posts
AeroScale: 656 posts
Posted: Sunday, February 26, 2017 - 06:48 PM UTC
I promised myself I'd enter more campaigns this year so once I finish the tiny New Orleans in the background I'll get going with Airfix's really nice looking Hurricane Mk1 in 48th scale.

Pax & Pallets: Revell 1/48 Dakota
Terrible Teens : Revell 1/48 F15E Strike Eagle
Airfix IV : Airfix 1.72 Vulcan
Nordrhein-Westfalen, Germany
Joined: March 22, 2015
KitMaker: 671 posts
AeroScale: 614 posts
Posted: Tuesday, February 28, 2017 - 03:32 AM UTC
Robert Jan: The Fokker kit has really fine details and You are building and presenting it very nice!
Paul: The Airfix Hurricane is a wonderful choice. Please tell us more about this kit.
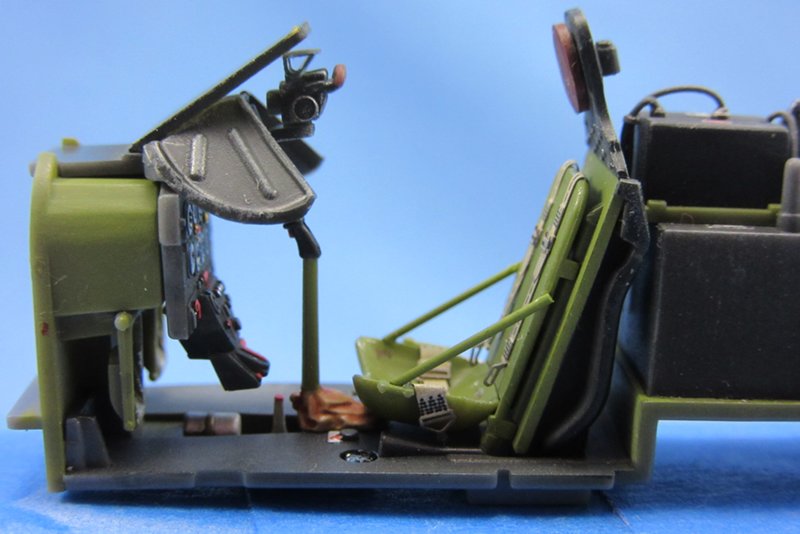
The inside of my Tiffy is mostly done. I just added some tamiya tape seat belts. The detailing of the inside is very nice in this kit, but, I am afraid, not much will be visible after closing the frame.


Oliver
On the desk: Probably a Panzer III.
Scotland, United Kingdom
Joined: May 11, 2015
KitMaker: 768 posts
AeroScale: 656 posts
Posted: Wednesday, March 01, 2017 - 04:09 AM UTC
Quoted Text
Paul: The Airfix Hurricane is a wonderful choice. Please tell us more about this kit.
Oliver
Ive only had a peek into the box so far but it looks very good. Similar to your typhoon I imagine with a lot of interesting interior detail. This will be my first truly modern aircraft model and I hear good things about Airfix's new toolings.

Pax & Pallets: Revell 1/48 Dakota
Terrible Teens : Revell 1/48 F15E Strike Eagle
Airfix IV : Airfix 1.72 Vulcan

#363
Pennsylvania, United States
Joined: January 08, 2014
KitMaker: 425 posts
AeroScale: 401 posts
Posted: Wednesday, March 01, 2017 - 09:13 AM UTC
Meng 1:48 P-51D MustangI finished up the cockpit and closed the fuselage up. Next will need to decide to putty the wings or not.
I continue to be impressed by the little things in this build, such as the kit K-14 gunsight above. Typically I find kit gunsights are not much better than clear blobs with something resembling reflector lenses. Meng's gunsight has some very good detail. All I did with it was tape off the lens surfaces and add a spot of liquid mask to sides of the sunshade framing. A quick spray with the airbrush and some dry-brushing and you have a completely acceptable 1:48 K-14 reflector sight. Nicely done Meng!
On the Bench:
The Big Three: Eduard 1:48 Bf 109G-2 Trop
Radial Fighters: Hasegawa 1:48 Ki84 Frank
The Mighty Eighth: Eduard 1:48 P-51D-10
Berlin, Germany
Joined: October 12, 2008
KitMaker: 709 posts
AeroScale: 651 posts
Posted: Wednesday, March 01, 2017 - 01:20 PM UTC
Quoted Text
Thomas, nice kick off! The pit looks good. It is always a pleasure to follow Your build!
Oliver
Herzlichen Dank, Oliver!
@ Mike: Thanks a lot for the kind words! Hope you'll wake up your Fw190 soon...
Nice progress here, guys.
Paul: great work on the Mustang-pit and sidewalls!
Robert Jan: nice choice and progress. It's a cool and not often seen aircraft.
Paul-KelticKnot; surely will follow that Hurricane-build as I have that in my stash as well from the "Ready for Battle"-kit.
Oliver: Very good start, will seriously follow your progress as the kit is on my wish list

btw: to get your avatar back/changed you have to click "save changes" very down on the "settings-modify profile"-site in the yellow ribbon.
... meanwhile doing some smaller things on the "Butcher", some bench-pics will be shown soon ...
Thomas
Sometimes you need to distance yourself to see things clearly - Lao Tzu -
... in scale and in real life -T.
Berlin, Germany
Joined: October 12, 2008
KitMaker: 709 posts
AeroScale: 651 posts
Posted: Wednesday, March 01, 2017 - 11:04 PM UTC
1/48 Fw 190 A(G)8 Revell/Dragon/Trimaster Well, some WIP-details&pics
This kit is quite nicely molded and has fine details on the surface but the fit isn't that good and fiddling.
Before glueing the wing halves together you have to fix the wheel wells and check carefully the alignment especially for the gun openings (had to be drilled for better shape) and front closure. So better you glue it step by step.
Also the empty shell chutes are closed and had to be cutted out.

Done the headrest/canopy-mechanism (4 parts, and added 2 additional struts from sprue). To align you have to use the canopy while glue them together for a correct fit later on.
Painted the (drilled out) exhausts, won't be much visible when cowling is on.
btw the cowling: 4+3 parts and a challenge to glue...


Some sub-assamblies : Wheels, struts and the 7-part SD/PC 1400 bomb.

Thomas
Sometimes you need to distance yourself to see things clearly - Lao Tzu -
... in scale and in real life -T.
Nordrhein-Westfalen, Germany
Joined: March 22, 2015
KitMaker: 671 posts
AeroScale: 614 posts
Posted: Thursday, March 02, 2017 - 08:23 PM UTC
Thomas: Nice progress. The bomb seems really big for the Focke Wulf. I guess the performance of the plane was bad carrying this bomb, and the pilot was glad to get rid of it.
Oliver
On the desk: Probably a Panzer III.
Ontario, Canada
Joined: February 04, 2008
KitMaker: 2,507 posts
AeroScale: 1,814 posts
Posted: Saturday, March 04, 2017 - 10:55 PM UTC
" The Die Hards"
43rd MIDDLESEX REGIMENT
MACHINE GUN CORPS
XXX CORP
The most effective way to do it, is to do it.
- Amelia Earhart
Berlin, Germany
Joined: October 12, 2008
KitMaker: 709 posts
AeroScale: 651 posts
Posted: Wednesday, March 08, 2017 - 10:40 PM UTC
Quoted Text
Thomas: Nice progress. The bomb seems really big for the Focke Wulf. I guess the performance of the plane was bad carrying this bomb, and the pilot was glad to get rid of it.
Oliver
Thanks Oliver!
Yep, and now imagine 2 additional fuel tanks...
To compensate the weight they usually remove the cowling guns and/or at least a pair of the wing guns. And often they use only 1 fuel tank under the wing. But at the late wartime all versions were possible and mixed depending on the mission.
As for my build there is a major issue with the wing roots. Comparing my last post it wasn't easy to fit the wings. So there was no chance of fixing the wing roots on the fuselage before assembling the whole wing.
... and of course there is a huge gap on both sides

But instead of using amounts of putty I spreaded the fuselage with 2 styrene spacers to fit - turned out much better, just few putty should be enough.
Next step will be the cowling - first look shows a hard way too...

Thomas
Sometimes you need to distance yourself to see things clearly - Lao Tzu -
... in scale and in real life -T.
#363
Pennsylvania, United States
Joined: January 08, 2014
KitMaker: 425 posts
AeroScale: 401 posts
Posted: Friday, March 10, 2017 - 07:30 AM UTC
Meng 1:48 P-51D MustangOn to the wings...
One day I hope someone molds the wings smooth for a change. Are you listening Eduard???
 Got putty?
 On the Bench:
The Big Three: Eduard 1:48 Bf 109G-2 Trop
Radial Fighters: Hasegawa 1:48 Ki84 Frank
The Mighty Eighth: Eduard 1:48 P-51D-10
MichaelSatin
Campaigns Administrator Colorado, United States
Joined: January 19, 2008
KitMaker: 3,909 posts
AeroScale: 2,904 posts
Posted: Friday, March 10, 2017 - 07:53 PM UTC
Quite the putty job Paul! But I have a general Mustang related question. I know the wing seams on the real aircraft were puttied and painted to keep the airflow smooth, but would that have extended to the gun bay doors? The had to be opened for every mission to service and re-arm the guns. I just have a feeling that in front line combat units, they wouldn't have been re-puttied and painted every time that happened, and NAA would have recognized that and not done it to them either.
My 2 cents worth.
Michael
On the bench:
Sorta depends on your definition of "on the bench"...
#439
Washington, United States
Joined: November 05, 2005
KitMaker: 4,950 posts
AeroScale: 3,192 posts
Posted: Friday, March 10, 2017 - 09:39 PM UTC
Great point Michael. My experience on the F-16 is that the 'putty' was actually applied under the panels. They laid a bead of putty along the wing structure (stringers and ribs), then pressed the panels into place and held them in location with spring loaded pins, When the putty cured, they trimmed it flush to the adjacent skins. Then they removed the panel and trimmed the overflow putty with the edges of the structure. This left an upside down "T" shaped gasket between the panels. So that when they reassembled the skins and riveted or screwed them in place there was no gap between the panels.
So they could have done this on the gun access panels and kept a reasonably flush surface even with combat maintenance.

Hanger Queens in Waiting:
Monogram 1/72 F8F-1
Corsair the Sky Pirate - 1/72 Ace A-7D
Century Series - Airfix 1/72 F-105G
Anti Shipping - Academy 1/72 PBJ-1D
Academy 1/72 F-84E
#363
Pennsylvania, United States
Joined: January 08, 2014
KitMaker: 425 posts
AeroScale: 401 posts
Posted: Friday, March 10, 2017 - 10:25 PM UTC
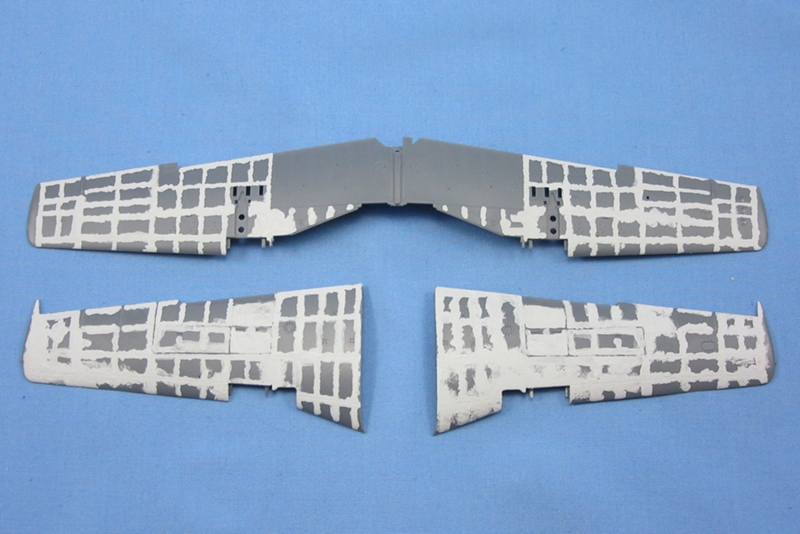
Meng 1:48 P-51D Mustang@Michael -I didn't completely fill the wing panel lines, just all of the rivets.
I used J. Heilig's diagram for P-51 wings to determine which ones to fill. It's easily found on the web but I'll re-post it here in case anyone wants it as a reference.
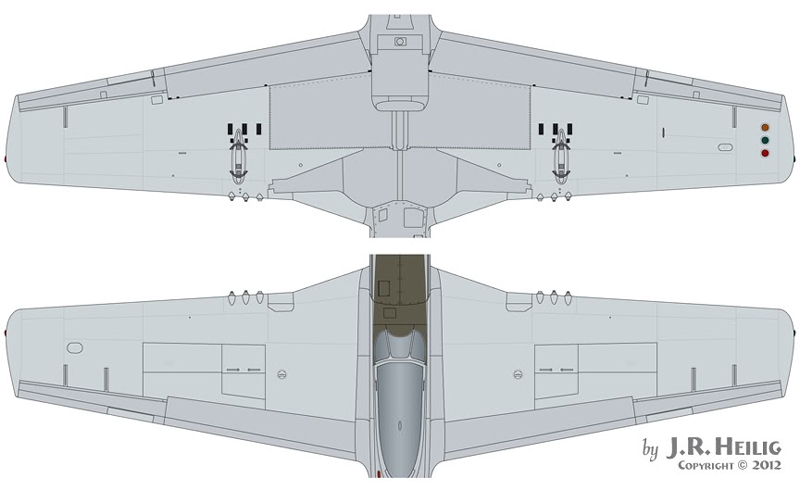 Credit and copyright to J.R. Heilig, as indicated.
As you can see, there will still be a few panel lines remaining. Meng covered the wings in rivets though, which would look nice on a plane whose wings had been stripped but I don't know if Big Beautiful Doll was one of those. It's possible but I chose to fill them as I wanted smooth wings.
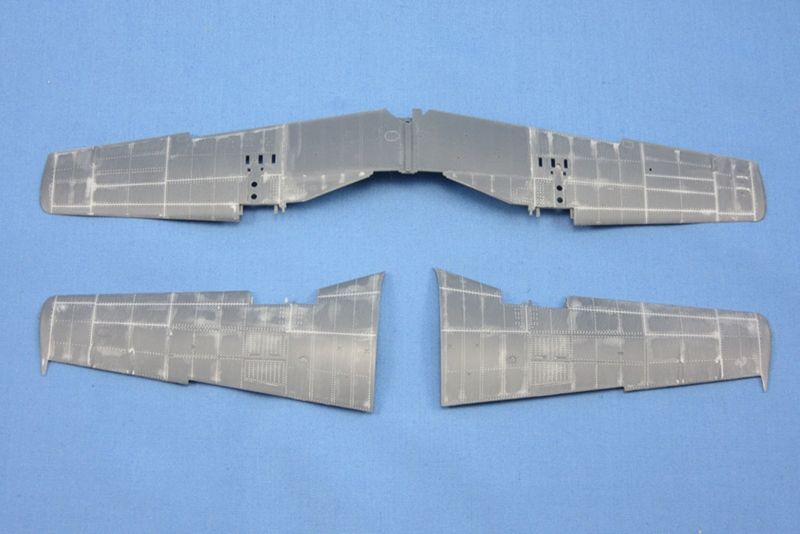 After the first pass of sanding. I need to touch up a couple of the lines and re-putty.
I used Tamiya Basic Putty thinned down with lacquer thinner for the fill work. It was easier than Mr. Surfacer 500, which I tried and found too thick.
Anyway, that's where we are now. I will post some shots of the wheel wells next. I added some simple wiring to spruce them up a bit.
On the Bench:
The Big Three: Eduard 1:48 Bf 109G-2 Trop
Radial Fighters: Hasegawa 1:48 Ki84 Frank
The Mighty Eighth: Eduard 1:48 P-51D-10
Pennsylvania, United States
Joined: June 17, 2009
KitMaker: 566 posts
AeroScale: 507 posts
Posted: Sunday, March 12, 2017 - 01:19 AM UTC
First obstacle cleared! I successfully dremeled out the exhaust openings and cooling gills on my 1/72 Hasegawa fw 190! Now I suppose I should be filling them with some pipes but first I need to fit the resin AML wheel wells and make sure that will work out because if not Ive already chopped up the wing and I'll need to move on to a different kit.

"...Fat, drunk, and stupid is no way to go through life son"
Alberta, Canada
Joined: January 19, 2008
KitMaker: 6,743 posts
AeroScale: 6,151 posts
Posted: Tuesday, March 14, 2017 - 04:41 AM UTC
Wings are looking good Paul . Finally made a start on my and got the base colours on for the cockpit .
What do you think of the kit so far ?
Terri
#363
Pennsylvania, United States
Joined: January 08, 2014
KitMaker: 425 posts
AeroScale: 401 posts
Posted: Friday, March 17, 2017 - 06:51 AM UTC
Meng 1:48 P-51D Mustang@Terri - So far I am very happy with the kit, personally I think it is a big improvement over the older Tamiya and Hasegawa kits. They are nice, but Meng had close to 20 years to improve on them. I will get another but I'm curious to try the Airfix and Eduard offerings first. My only real criticism is the same as many others have noted, fit is good but the kit needs glue to get some areas perfect. That's not a black mark in my opinion, I for one don't get offended it isn't truely "glue free".
Anyway, as far as my progress goes. I added some wiring to the gear bay just to spruce it up a bit. A couple strands of copper wiring and some braided lengths as well to give it a busier appearance. I loosely based it on some googled photos of the gear bay. It's not remotely accurate to a rivet counter but I like the way it came out.
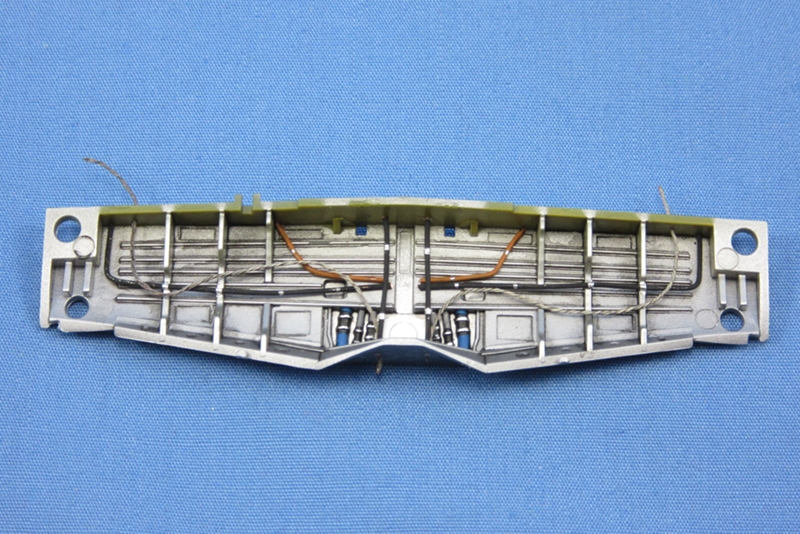 A splash of color and a little busier appearance now with the wires. Brackets were added from bare metal foil.
I will have the wings done tomorrow, I'll post some more pics after I shoot some primer to see how my putty work turned out.
On the Bench:
The Big Three: Eduard 1:48 Bf 109G-2 Trop
Radial Fighters: Hasegawa 1:48 Ki84 Frank
The Mighty Eighth: Eduard 1:48 P-51D-10
Berlin, Germany
Joined: October 12, 2008
KitMaker: 709 posts
AeroScale: 651 posts
Posted: Saturday, March 18, 2017 - 07:31 PM UTC
1/48 Fw 190 A(G)8 Revell/Dragon/Trimaster And again, as expected the fit is awful.
The cowling/fuselage connection is horrible! To join at least the upper and under portion (guns and wheel wells) and aligning the exhausts I had to use a trusty stick of a cotton bud to stretch the cowling. So there will be "only" gaps on both sides...

Thomas
Sometimes you need to distance yourself to see things clearly - Lao Tzu -
... in scale and in real life -T.


