

Thanks gents for the kind words !
Hubert - thanks for the photos- these are a few I have never seen. The bottom one is of particular interest as some of the drums have three stripes and also appear to have lighter tops. I may do one of the drums in this fashion to break up the monotony. All the aircraft components in the photo seem to be IJN subjects so perhaps the stripes are peculiar to naval supply but I may play the artistic license card again and use the idea anyway !
Cheers - Richard
Hosted by Rowan Baylis
1/48 Hasegawa Ki 43 Hayabusa build

rdt1953

Joined: February 06, 2015
KitMaker: 1,098 posts
AeroScale: 900 posts
Posted: Wednesday, December 06, 2017 - 04:33 PM UTC

Merlin

#017


Joined: June 11, 2003
KitMaker: 17,582 posts
AeroScale: 12,795 posts

Posted: Thursday, December 07, 2017 - 03:03 AM UTC
Hi Richard
That is a very neat idea on the fuel drum. Seeing Hubert's shots, I'll have a hunt through my references to see if I can spot anything. I'll post it if I do.
All the best
Rowan
That is a very neat idea on the fuel drum. Seeing Hubert's shots, I'll have a hunt through my references to see if I can spot anything. I'll post it if I do.
All the best
Rowan

rdt1953
Joined: February 06, 2015
KitMaker: 1,098 posts
AeroScale: 900 posts
Posted: Thursday, December 07, 2017 - 05:03 AM UTC
Quoted Text
Hi Richard
That is a very neat idea on the fuel drum. Seeing Hubert's shots, I'll have a hunt through my references to see if I can spot anything. I'll post it if I do.
All the best
Rowan
Thanks Rowan - All the best because you're the best ! - Richard

mrockhill
Joined: June 17, 2009
KitMaker: 566 posts
AeroScale: 507 posts

Posted: Friday, December 08, 2017 - 07:21 AM UTC
Cool touch for your Hayabusa scene!!! Im also going to scan my references to see if I can find anything useful for you 
rdt1953
Joined: February 06, 2015
KitMaker: 1,098 posts
AeroScale: 900 posts
Posted: Friday, December 08, 2017 - 07:28 AM UTC
Quoted Text
Cool touch for your Hayabusa scene!!! Im also going to scan my references to see if I can find anything useful for you
Thanks Mike !
mrockhill
Joined: June 17, 2009
KitMaker: 566 posts
AeroScale: 507 posts
Posted: Saturday, December 09, 2017 - 08:43 AM UTC
Richard so far through several references, mostly of IJA aircraft, I havent noted standout details on the fuel drums, which are frequently seen. I did notice the barrels with 3 stripes painted round the center section were frequently seen but only in what appear to be IJN settings. I did see several barrels with variations of corrugations around the top and bottom thirds of the drums. I saw these in both IJA and IJN settings.
So not much to work with but I do like the artistic license youve applied thus far. That and some liberal application of dents and weathering should create plenty of interest.
So not much to work with but I do like the artistic license youve applied thus far. That and some liberal application of dents and weathering should create plenty of interest.
rdt1953
Joined: February 06, 2015
KitMaker: 1,098 posts
AeroScale: 900 posts
Posted: Saturday, December 16, 2017 - 02:48 AM UTC
I think the scene composition is pretty well pinned down with the exception of the back corner where I am toying with the idea of a stand of bamboo - nothing says Asia to me quite like bamboo so this will depend on how well I can pull off the bamboo. The name plates have been finalized and are off to the engraver and I should have them in hand next week.

Here are a couple more studies for the ground work - I've settled on a mixture of Durham's water putty and acrylic craft paints to tint it to a rich grey/brown/green turf color. The paint really slows the drying time but that is a plus as it gives more working time. Left overnight in the closet with our heat system bakes it very nicely. I plan to have a chalked flight line/ propeller warning stripe on the grass and this can be seen in one study . A simple acetate stencil and airbrushed white paint seems to do it -

Here is the final choice for the static grass adhesive - acrylic matte medium tinted to medium green/brown with Vallejo Model Air-

I'll be working on the fuel drums some more as well as some wheel chocks and other details while I sort out the bamboo thicket method .
Thanks for looking in ! Richard
Here are a couple more studies for the ground work - I've settled on a mixture of Durham's water putty and acrylic craft paints to tint it to a rich grey/brown/green turf color. The paint really slows the drying time but that is a plus as it gives more working time. Left overnight in the closet with our heat system bakes it very nicely. I plan to have a chalked flight line/ propeller warning stripe on the grass and this can be seen in one study . A simple acetate stencil and airbrushed white paint seems to do it -
Here is the final choice for the static grass adhesive - acrylic matte medium tinted to medium green/brown with Vallejo Model Air-
I'll be working on the fuel drums some more as well as some wheel chocks and other details while I sort out the bamboo thicket method .
Thanks for looking in ! Richard
Joel_W
Joined: December 04, 2010
KitMaker: 11,666 posts
AeroScale: 7,410 posts
Posted: Saturday, December 16, 2017 - 03:20 AM UTC
Richard,
Great start to the texturing of the base.
Joel
Great start to the texturing of the base.
Joel


thegirl

Joined: January 19, 2008
KitMaker: 6,743 posts
AeroScale: 6,151 posts
Posted: Saturday, December 16, 2017 - 06:03 AM UTC
Beautiful work on the base so far Richard . 
Terri
Terri
rdt1953
Joined: February 06, 2015
KitMaker: 1,098 posts
AeroScale: 900 posts
Posted: Sunday, December 17, 2017 - 03:59 AM UTC
Joel & Terri - Thanks for the compliments, moving forward inch by inch .
Cheers - Richard
Cheers - Richard
Joel_W
Joined: December 04, 2010
KitMaker: 11,666 posts
AeroScale: 7,410 posts
Posted: Sunday, December 17, 2017 - 04:15 AM UTC
Quoted Text
Joel & Terri - Thanks for the compliments, moving forward inch by inch .
Cheers - Richard
Richard,
The important thing is that you're moving forward. I can't count the number of times my movement was back where I just came from.
Joel
Merlin
#017
Joined: June 11, 2003
KitMaker: 17,582 posts
AeroScale: 12,795 posts
Posted: Sunday, December 17, 2017 - 03:56 PM UTC
Hi Richard
Nice progress on the base. I'm afraid I haven't been able to find many photos of fuel drums in my books that are likely to be a great deal of help. There's one with what appears to be of an end cap painted and bearing characters:
Another with what looks like a band of characters around it:
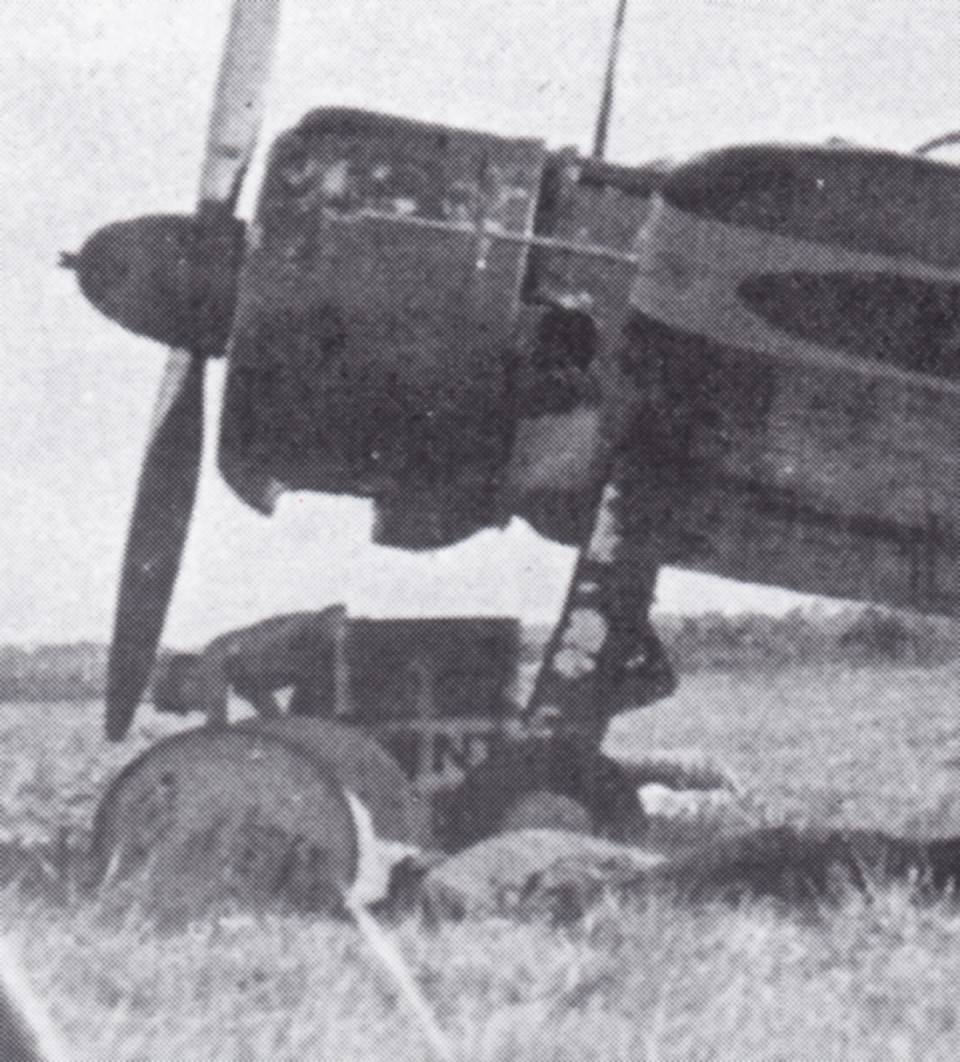
And, finally, a clear shot of a coloured band on a drum fitted into the rear cockpit of a Ki-9 trainer as an improvised kamikaze aircraft:

I've found a few shots of plain drums, but it's a bit of a surprise and rather disappointing how few of my reference photos have any fuel drums in them.
All the best
Rowan
Nice progress on the base. I'm afraid I haven't been able to find many photos of fuel drums in my books that are likely to be a great deal of help. There's one with what appears to be of an end cap painted and bearing characters:
Another with what looks like a band of characters around it:
And, finally, a clear shot of a coloured band on a drum fitted into the rear cockpit of a Ki-9 trainer as an improvised kamikaze aircraft:
I've found a few shots of plain drums, but it's a bit of a surprise and rather disappointing how few of my reference photos have any fuel drums in them.
All the best
Rowan
rdt1953
Joined: February 06, 2015
KitMaker: 1,098 posts
AeroScale: 900 posts
Posted: Sunday, December 17, 2017 - 04:35 PM UTC
Thanks Rowan - I think the center picture is a real find as it looks very similar to what I have done - a validation of sorts. I have seen the top photo before but not that large and I think I may do the top of one of the drums in that fashion . Interesting to note that the drum in the back appears to have " J NT " or something similar in non - kanji characters . The last picture of the drum in the Ki 9 is also interesting- I think it may be possible that what we are seeing as a painted stripe may actually be a strap of some sort securing the drum .
All pics are great finds and very helpful - Thanks again ! Richard
All pics are great finds and very helpful - Thanks again ! Richard
Merlin
#017
Joined: June 11, 2003
KitMaker: 17,582 posts
AeroScale: 12,795 posts
Posted: Sunday, December 17, 2017 - 10:29 PM UTC
Hi Richard
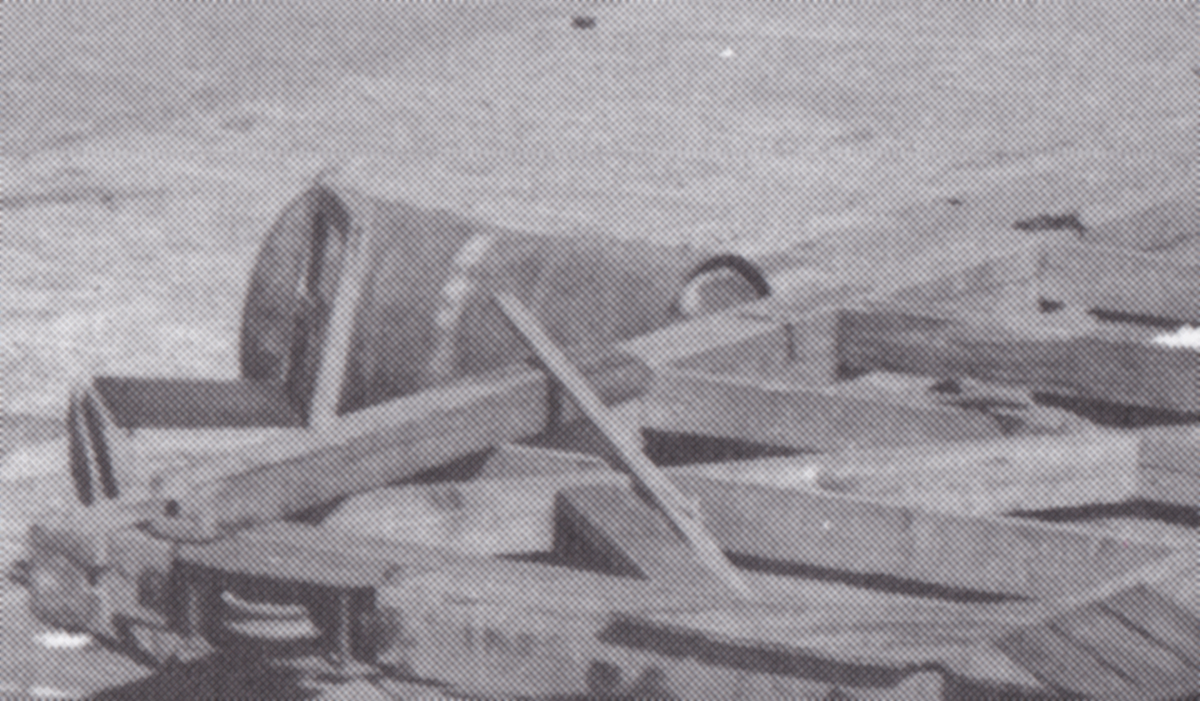
I also wondered whether the last photo shows a strap, but the reason I included it is that I'm sure I spotted a photo during my original search of a barrel on the ground with a painted ring at each end in a similar position. Typically, though, I couldn't find the photo again when I did the scans this morning!
In the first photo, I'm not sure if it's another drum in the background or a stack of boxes - I can see it either way, depending on how I look at it.
All the best
Rowan
rdt1953
Joined: February 06, 2015
KitMaker: 1,098 posts
AeroScale: 900 posts
Posted: Friday, December 22, 2017 - 11:24 PM UTC
Quoted Text
Hi Richard
I also wondered whether the last photo shows a strap, but the reason I included it is that I'm sure I spotted a photo during my original search of a barrel on the ground with a painted ring at each end in a similar position. Typically, though, I couldn't find the photo again when I did the scans this morning!
In the first photo, I'm not sure if it's another drum in the background or a stack of boxes - I can see it either way, depending on how I look at it.
All the best
Rowan
Rowan - Now that you mention it does indeed look like it could be boxes or a drum. I stumbled upon this in one of my books grouped together with the photo in question. I believe it to be the same aircraft/ drums viewed from the opposite side.

Although difficult to see it does appear to be a drum .
If so I suppose I now have license to put non-kanji characters on the drums as well if I choose . Thanks again for the pics- they certainly validate what I am trying to portray .
Cheers ! Richard
rdt1953
Joined: February 06, 2015
KitMaker: 1,098 posts
AeroScale: 900 posts
Posted: Friday, December 22, 2017 - 11:37 PM UTC
The plates are back from the engraver- I was concerned that the type did not look parallel to the edges until I realized that the outer edges are only a matrix -

I've also knocked out a pair of the typical Japanese slat style wheel chocks seen in so many images -

built up of sheet styrene , painted dessert yellow then wood grained with artists oils.
working on bamboo methods - not real happy yet so the bamboo thicket idea may be dumped . We'll see .
Thanks for looking in - Richard
I've also knocked out a pair of the typical Japanese slat style wheel chocks seen in so many images -
built up of sheet styrene , painted dessert yellow then wood grained with artists oils.
working on bamboo methods - not real happy yet so the bamboo thicket idea may be dumped . We'll see .
Thanks for looking in - Richard
Joel_W
Joined: December 04, 2010
KitMaker: 11,666 posts
AeroScale: 7,410 posts
Posted: Saturday, December 23, 2017 - 12:03 AM UTC
Richard,
those plaques look fantastic.
Nice going on that chock.
Joel
those plaques look fantastic.
Nice going on that chock.
Joel
Merlin
#017
Joined: June 11, 2003
KitMaker: 17,582 posts
AeroScale: 12,795 posts
Posted: Saturday, December 23, 2017 - 01:53 AM UTC
Hi again Richard
That could well be the same aircraft from the other side - the position and angle of what is definitely a barrel on the far side vs. the undercarriage ties in nicely.
So, yep - a barrel with a broad white centre band with characters - plus... it looks pretty heavily weathered in your shot.
Great catch! This is the kind of "photo sleuthing" I love - stitching together evidence that's gone unnoticed for so many years.
All the best
Rowan
rdt1953
Joined: February 06, 2015
KitMaker: 1,098 posts
AeroScale: 900 posts
Posted: Saturday, December 30, 2017 - 10:17 PM UTC
Here is what I've come up with for the bamboo -
I found some 3/64 Plastruct rod at my LHS. This is some type of butyl plastic covering a steel rod so it is rigid but bendable . After searching for photo etch brass leaves approximating bamboo and finding none I looked into producing my own but it looked pretty expensive. I settled on this fern offered by The Scenic Factory intended for making pine trees.

I next filed one end of the Plastruct rod to a taper -

and then laid off 1/4 " increments along the stalk -

I then scored through the plastic by rolling the rod under a knife on a glass plate to produce the nodes -

Let me state that I don't pretend to know much about botany/agriculture . I have been told by gardeners that I couldn't grow mold on old bread in a damp basement and I agree with their assessment . I vaguely recall some of my pals getting involved with trying to grow a certain type of plant during my brief stint in college during the early seventies - but the memory is very foggy for some reason.
The stalk was then cut to length and sprayed dessert yellow -

then brush painted with artist's oils Sap Green and the wiped of with a small stiff brush-


Working from images of bamboo found on the net leaves were cut from the fern and glued to the stalk with PVA . when dry I went over all joins with a dilute mixture of acrylic matte medium with a drop of Dawn dish detergent added to ease the surface tension. I then lightly airbrushed the leaf matter with yellow.
Here is the finished product set in one of the groundwork studies -

all that remains is to do this again about twenty times - - and then decide if I like it .
Thanks for looking in and Happy New Year to all ! - Richard
I found some 3/64 Plastruct rod at my LHS. This is some type of butyl plastic covering a steel rod so it is rigid but bendable . After searching for photo etch brass leaves approximating bamboo and finding none I looked into producing my own but it looked pretty expensive. I settled on this fern offered by The Scenic Factory intended for making pine trees.
I next filed one end of the Plastruct rod to a taper -
and then laid off 1/4 " increments along the stalk -
I then scored through the plastic by rolling the rod under a knife on a glass plate to produce the nodes -
Let me state that I don't pretend to know much about botany/agriculture . I have been told by gardeners that I couldn't grow mold on old bread in a damp basement and I agree with their assessment . I vaguely recall some of my pals getting involved with trying to grow a certain type of plant during my brief stint in college during the early seventies - but the memory is very foggy for some reason.
The stalk was then cut to length and sprayed dessert yellow -
then brush painted with artist's oils Sap Green and the wiped of with a small stiff brush-
Working from images of bamboo found on the net leaves were cut from the fern and glued to the stalk with PVA . when dry I went over all joins with a dilute mixture of acrylic matte medium with a drop of Dawn dish detergent added to ease the surface tension. I then lightly airbrushed the leaf matter with yellow.
Here is the finished product set in one of the groundwork studies -
all that remains is to do this again about twenty times -
- and then decide if I like it . Thanks for looking in and Happy New Year to all ! - Richard
thegirl
Joined: January 19, 2008
KitMaker: 6,743 posts
AeroScale: 6,151 posts
Posted: Saturday, December 30, 2017 - 10:35 PM UTC
Nice job on making the bamboo tree Richard . It looks part on my end and works very well with the ground work already applied . Looking forward on the other 20
See , you do have a green thumb even though you can't remember

Terri
See , you do have a green thumb even though you can't remember
Terri
Joel_W
Joined: December 04, 2010
KitMaker: 11,666 posts
AeroScale: 7,410 posts
Posted: Sunday, December 31, 2017 - 01:01 AM UTC
Richard,
The Bamboo tree looks great. Just one question, will those needles dry out over time and fall off, or will the glue keep them in place?
Joel
The Bamboo tree looks great. Just one question, will those needles dry out over time and fall off, or will the glue keep them in place?
Joel
rdt1953
Joined: February 06, 2015
KitMaker: 1,098 posts
AeroScale: 900 posts
Posted: Sunday, December 31, 2017 - 01:12 AM UTC
Quoted Text
Richard,
The Bamboo tree looks great. Just one question, will those needles dry out over time and fall off, or will the glue keep them in place?
Joel
Thanks Joel - I am wondering the same regarding the longevity of the needles.
They are very fragile already and will inevitably become more so with age.
Photoetch brass would be so much better but I cannot bring myself to put in the effort and put out the money for something I may not even use . I am going to overspray a piece of the fern with acrylic matte varnish to see if that helps- a sort of " skin " over all - I'll post the results
Richard

greif8

Joined: January 17, 2006
KitMaker: 673 posts
AeroScale: 492 posts
Posted: Sunday, December 31, 2017 - 02:36 PM UTC
Beautiful work on the plane and diorama Richard. The bamboo looks very convincing - first class job there!
Ernest
Ernest
rdt1953
Joined: February 06, 2015
KitMaker: 1,098 posts
AeroScale: 900 posts
Posted: Sunday, January 14, 2018 - 04:05 AM UTC
Hi to all - I've been working on some accessories -
Here is an oil drum variation -

I want to add a tailwheel dolly as can be seen in many Japanese wartime images -

I will be using soldered brass for most of the structure - photo etch wire wheels from Tom's Modelworks 1/72 WW I aircraft set - and tires turned from styrene rod .

The photo etch wheels are flat and must be dished so I made a die set by turning a piece of aluminium rod to the O.D. of the photo etch wheel then centerdrilled for a brass axle to hold the wheel . I then tapered the face with the compound tool post to produce the dish.

I made the female half of the die by casting Durhams Water Putty around the male end of the rod


The etched wheels were cut from the fret , rims cut in four places and then placed on the pin and pushed into the female die to produce the dish -

The profile cutter for the tires was milled and then filled out of a piece of mild steel -

The styrene rod was bored to the inside rim diameter and turned to the outside tire diameter then the half round profile was faced with the cutter-

Each tire half was then parted off and the next one profiled - each had a slight rabbet faced on the inside to accept the photo etch rim.
all wheel/tire assemblies will be made in two halves then cemented together.
Here are the components so far - one more wheel to dish-

More to follow - Thanks for watching - Richard
Here is an oil drum variation -
I want to add a tailwheel dolly as can be seen in many Japanese wartime images -
I will be using soldered brass for most of the structure - photo etch wire wheels from Tom's Modelworks 1/72 WW I aircraft set - and tires turned from styrene rod .
The photo etch wheels are flat and must be dished so I made a die set by turning a piece of aluminium rod to the O.D. of the photo etch wheel then centerdrilled for a brass axle to hold the wheel . I then tapered the face with the compound tool post to produce the dish.
I made the female half of the die by casting Durhams Water Putty around the male end of the rod
The etched wheels were cut from the fret , rims cut in four places and then placed on the pin and pushed into the female die to produce the dish -
The profile cutter for the tires was milled and then filled out of a piece of mild steel -
The styrene rod was bored to the inside rim diameter and turned to the outside tire diameter then the half round profile was faced with the cutter-
Each tire half was then parted off and the next one profiled - each had a slight rabbet faced on the inside to accept the photo etch rim.
all wheel/tire assemblies will be made in two halves then cemented together.
Here are the components so far - one more wheel to dish-
More to follow - Thanks for watching - Richard
Joel_W
Joined: December 04, 2010
KitMaker: 11,666 posts
AeroScale: 7,410 posts
Posted: Sunday, January 14, 2018 - 06:29 AM UTC
Richard,
OMG !! that's absolutely astounding. your lath skills are something else. Just an amazing modeling feat.
Joel
OMG !! that's absolutely astounding. your lath skills are something else. Just an amazing modeling feat.
Joel
 |

WEB HOSTING BY


Copyright ©2021 AeroScale and Kitmaker Network, a subsidiary of Silver Star Enterprises
All Rights Reserved. Please read our Conditions of Use and Privacy Policy.
All Rights Reserved. Please read our Conditions of Use and Privacy Policy.