OFFICIAL: Canvas Falcons III: 1916-17
MichaelSatin
 Campaigns Administrator
Colorado, United States
Joined: January 19, 2008
KitMaker: 3,909 posts
AeroScale: 2,904 posts
Posted: Monday, January 30, 2017 - 06:05 PM UTC
Good one to start with Linus. Fairly simple kit of a fairly simple airplane with little rigging. And I think they're easier in 1/32, a little more room to work. Welcome to the club!
Michael

On the bench:
Sorta depends on your definition of "on the bench"...
Uusimaa, Finland
Joined: October 01, 2016
KitMaker: 514 posts
AeroScale: 239 posts
Posted: Tuesday, January 31, 2017 - 12:00 AM UTC
And also Triplane is proceeding:

The picture is over exposed. Colour is much darker in reality.
As I suspected the cockpit didn't fit nicely between fuselage because of my "easy" interior rigging job. Took few hours of cutting and sanding, but now it's glued and painted. Have to touch up details before applying decals and weathering, but I think what's remaining should be quite straight forward going.
MichaelSatin
Campaigns Administrator Colorado, United States
Joined: January 19, 2008
KitMaker: 3,909 posts
AeroScale: 2,904 posts
Posted: Tuesday, January 31, 2017 - 02:00 AM UTC
Nice Pasi!
I have to admit, the Tripe is probably my favorite Great War aircraft and I'm having a very hard time not dropping all my other plans and just going ahead and doing one, despite your very nice job. Mine would be one of Ray Collishaw's Black Marias.
Michael
On the bench:
Sorta depends on your definition of "on the bench"...
Uusimaa, Finland
Joined: October 01, 2016
KitMaker: 514 posts
AeroScale: 239 posts
Posted: Wednesday, February 01, 2017 - 12:31 AM UTC
Thanks Michael. I see no reason why you couldn't do another Tripe, it would be interesting see how it turns out.
Uusimaa, Finland
Joined: October 01, 2016
KitMaker: 514 posts
AeroScale: 239 posts
Posted: Tuesday, February 14, 2017 - 12:07 AM UTC
And more progress:

There are four small parts missing, some paint, some weathering and rigging. So should get done this or next week.
California, United States
Joined: October 10, 2012
KitMaker: 204 posts
AeroScale: 52 posts
Posted: Monday, February 20, 2017 - 06:56 AM UTC
small update have the main body built although its going to need some glue and putty to get rid of those seams

Uusimaa, Finland
Joined: October 01, 2016
KitMaker: 514 posts
AeroScale: 239 posts
Posted: Friday, March 10, 2017 - 01:53 AM UTC
Completed this a while ago:

Had a surprise with matt varnish. It worked just fine out of the bottle on my previous model, but now it was just a bit thicker and dried to blotchy white finish. I luckily managed it to tone the effect down with heavily thinned layers of original colour.
Another aspect I'm not happy with is that many of the rigging lines are twisted, but not redoing it -- I'll get better results next time (got hang of it finally at the end). Also some of the line ends are bit uneven.
Anyway it's done, and there are some aspects in the model I actually like. Rest of the photos are in the gallery.
Thanks for the campaing

Had fun build, and Wingnut Wings's Tripe was surprisingly easy kit to build.
MichaelSatin
Campaigns Administrator Colorado, United States
Joined: January 19, 2008
KitMaker: 3,909 posts
AeroScale: 2,904 posts
Posted: Friday, March 10, 2017 - 05:28 AM UTC
Very nice Pasi! I'm looking at my first time with the RAF wires myself and am nervous about twisting them. Got any tips?
Michael
On the bench:
Sorta depends on your definition of "on the bench"...
Uusimaa, Finland
Joined: October 01, 2016
KitMaker: 514 posts
AeroScale: 239 posts
Posted: Saturday, March 11, 2017 - 12:00 AM UTC
I used EZ Line between loops twisted of 0.2 mm brass wire. First I pulled the line through a loop while keeping it straight, and pulled it tight. Then I wrapped it twice around itself and applied a drop of CA. The problem I had was that I kept the line too tight while glueing it. It got twisted, and CA made sure it remained that way. Solution was to ease off the tension until the line became untwisted, and only then apply the glue. This shouldn't be an issue if using tubing or similar to imitate turnbuckles.
England - South West, United Kingdom
Joined: May 11, 2007
KitMaker: 210 posts
AeroScale: 59 posts
Posted: Wednesday, May 17, 2017 - 07:45 PM UTC
Nearly got Werner Voss finished all that's left is to build the triplane.

Should star that shortly.

Back in a short while.
Cheers
Martin
Bangkok, Thailand / ไทย
Joined: September 17, 2013
KitMaker: 1,617 posts
AeroScale: 212 posts
Posted: Saturday, May 27, 2017 - 03:13 PM UTC
Hello everybody.
Making big steps this weekend. It's raining cats & dogs in Thailand. Cooling down and nice to work on bits and pieces.
Will wait for some critiques after you all seen the pics I will post. Final layer of matt varnish has to wait, humidity is over 80% last weeks. So avoid disaters.
Fokker Dr.1 Hans Weiss.


Plane is not my most enjoyable build so far. But picking it up yesterday morning was a good choice. Turned out into a pretty bird to watch.
Wings and fuselage will get some additional weathering later. Needs to sink a bit for a fresh approach.
Hope you all like it. Comments and critique are very welcome.
Kind regards,
Robert Jan
Bangkok, Thailand / ไทย
Joined: September 17, 2013
KitMaker: 1,617 posts
AeroScale: 212 posts
Posted: Saturday, May 27, 2017 - 03:33 PM UTC
England - South West, United Kingdom
Joined: May 11, 2007
KitMaker: 210 posts
AeroScale: 59 posts
Posted: Saturday, May 27, 2017 - 03:53 PM UTC
Good looking build Robert
England - South East, United Kingdom
Joined: February 05, 2008
KitMaker: 1,381 posts
AeroScale: 1,110 posts
Posted: Friday, June 09, 2017 - 11:57 PM UTC
some great looking builds on here.
mine is coming along slowly, next up is masking before spraying the markings etc.

paul
MichaelSatin
Campaigns Administrator Colorado, United States
Joined: January 19, 2008
KitMaker: 3,909 posts
AeroScale: 2,904 posts
Posted: Sunday, June 18, 2017 - 05:26 AM UTC
Nice work here, glad to see things picking up!
No surprise to anyone paying attention to my
review activity, but I've finally decided on a kit.
I'll be doing Raymond Collishaw's aeroplane, which is only a week or so late for the "suggested" period covered in this particular campaign. I'll call that a win!
Michael
On the bench:
Sorta depends on your definition of "on the bench"...
England - South West, United Kingdom
Joined: May 11, 2007
KitMaker: 210 posts
AeroScale: 59 posts
Posted: Tuesday, June 20, 2017 - 02:38 AM UTC
looking forward to seeing that build Michael.

#372
United Kingdom
Joined: March 10, 2010
KitMaker: 2,568 posts
AeroScale: 1,619 posts
Posted: Wednesday, June 21, 2017 - 03:28 AM UTC
Some fantastic builds going on here. I really need to stop by more often.
Michael, looking forward to seeing how the Camel builds. This one is high up on my wish list and I might treat myself a little later in the year.
I'll be submitting my build soon, the WNW Rumpler C.IV. I only have the cockpit and engine assembled from a previous campaign.
On the bench: 1/72 Mosquito, Lightning F.6, DH.2,
AMT Vulcan Shuttle Surak.
Cyber-Hobby 1:35 Sherman Firefly IC - still stalled.
England - South East, United Kingdom
Joined: February 05, 2008
KitMaker: 1,381 posts
AeroScale: 1,110 posts
Posted: Friday, June 23, 2017 - 10:53 PM UTC
another update,masking and spraying.


paul
#372
United Kingdom
Joined: March 10, 2010
KitMaker: 2,568 posts
AeroScale: 1,619 posts
Posted: Saturday, July 01, 2017 - 07:28 PM UTC
Paul, the paint job turned out fantastic on your Fokker! Udet's scheme was very loud for a warplane. He clearly wanted everyone to know he was around.
Looking forward to seeing the finished result.
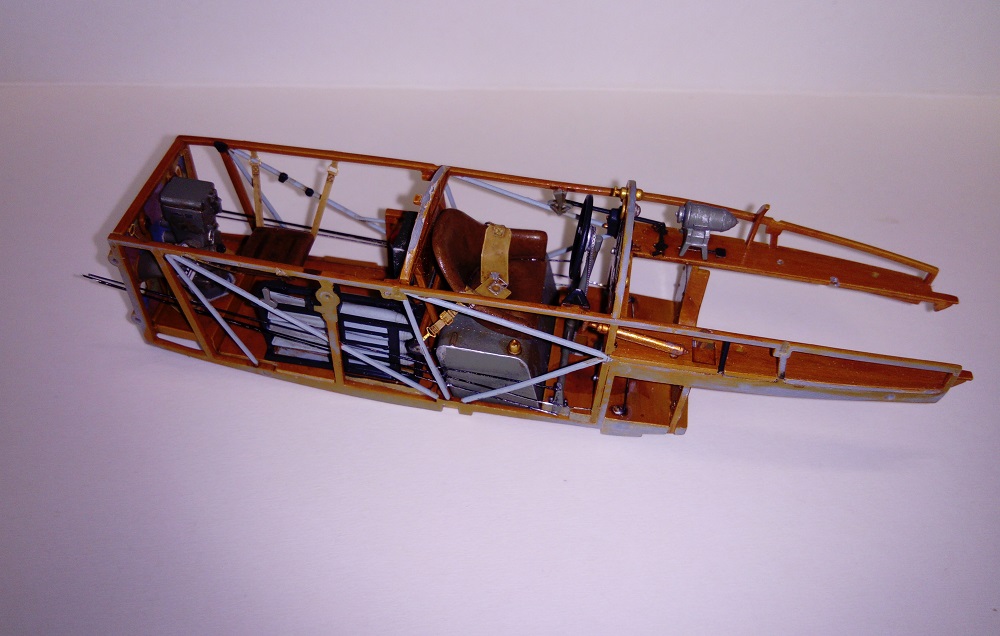
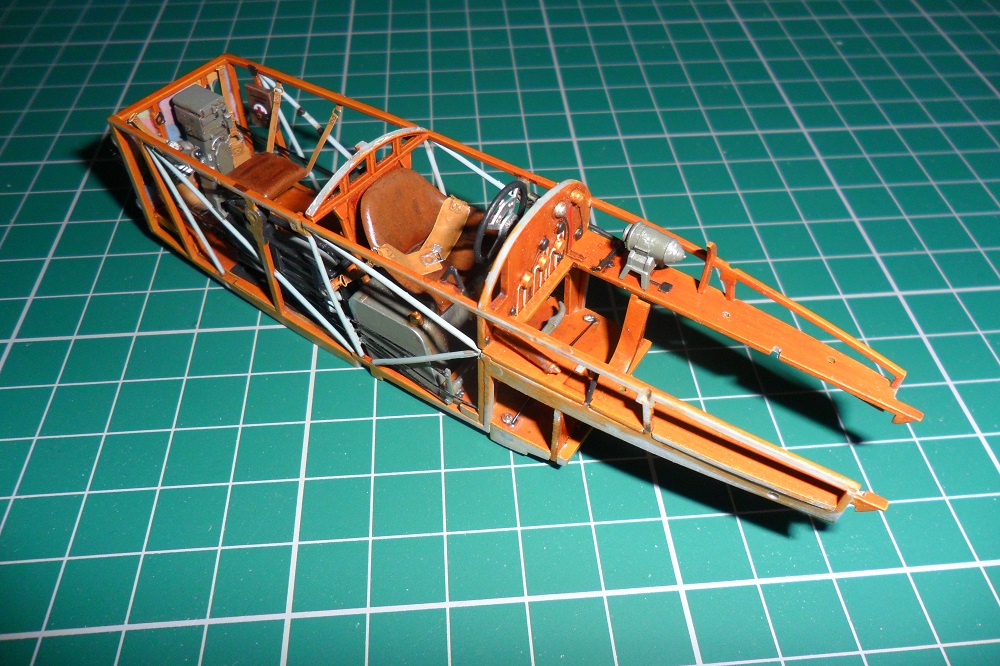
Here's how my build was left from last time.
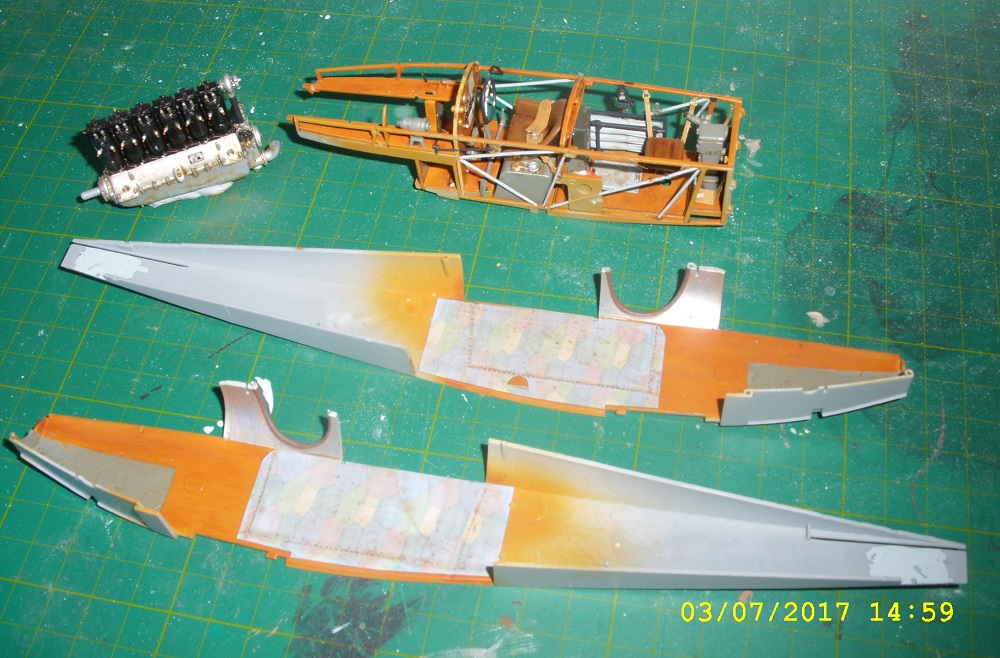
Most of the major building and paint work for the interior is complete. This is probably the most complex part of this kit (save for the rigging!) and with it out the way the rest should come together fairly easily.
I still have to build the machine gun and add wiring to the engine. i believe I can add these after the fuselage is together which will limit the risk of accidental damage while I build and paint it. I'll have a play around with that.
One more thing to add before that are the control cables running from the stick and rudder, through the cockpit and out through two small holes in the rear wall. I'm going to use guitar E strings (009 gauge - the thinnest my local music store sold) as I needed something with a little rigidity. My first attempt with uschi thread was a disaster!
Big question is what to do about the highly reflective nickel coating. Do I black the string with permanent marker or burn it off with a candle flame?
I have a long 6 week holiday coming up I'll use to get a few projects completed and a big chunk off the Rumpler.
On the bench: 1/72 Mosquito, Lightning F.6, DH.2,
AMT Vulcan Shuttle Surak.
Cyber-Hobby 1:35 Sherman Firefly IC - still stalled.
#372
United Kingdom
Joined: March 10, 2010
KitMaker: 2,568 posts
AeroScale: 1,619 posts
Posted: Sunday, July 16, 2017 - 12:23 AM UTC
Got the control wires fitted this weekend.
The E-strings worked perfectly and looked good after being coloured with a black sharpie. Some scratched off so will need a little touching up. Great that something worked after my misadventures with the cooling jackets last week. This little victory gave me back my mojo for this kit.
I also painted and decaled the first aid kit that I'll strap to the the frame in the rear cockpit. Not going to add anything else as I don't want to clutter it. One thing I can't work out is where, or even if, extra mags for the LMG14 were kept. Looking at the instructions for the DFW CV kit, a comparable aeroplane, it has a shelf in the rear for 2 mags. But nothing in the Rumpler.
Something to ponder on.
On the bench: 1/72 Mosquito, Lightning F.6, DH.2,
AMT Vulcan Shuttle Surak.
Cyber-Hobby 1:35 Sherman Firefly IC - still stalled.
#372
United Kingdom
Joined: March 10, 2010
KitMaker: 2,568 posts
AeroScale: 1,619 posts
Posted: Thursday, August 03, 2017 - 09:10 PM UTC
Little more work on the Rumpler.
One little thing I decided to add was the first aid kit from the equipment sprue. I made a leather strap around it from masking tape and painted a buckle on. Thought I had a spare etch buckle left over from an earlier project but I could not find it. Looks pretty good though. I attached this to the one of the rear frames.
Then it was a simple matter of fitting this into the fuselage an joining up the halves. I also fitted the tailplane and skid as some test fitting showed that it would be very hard to fit them in after.
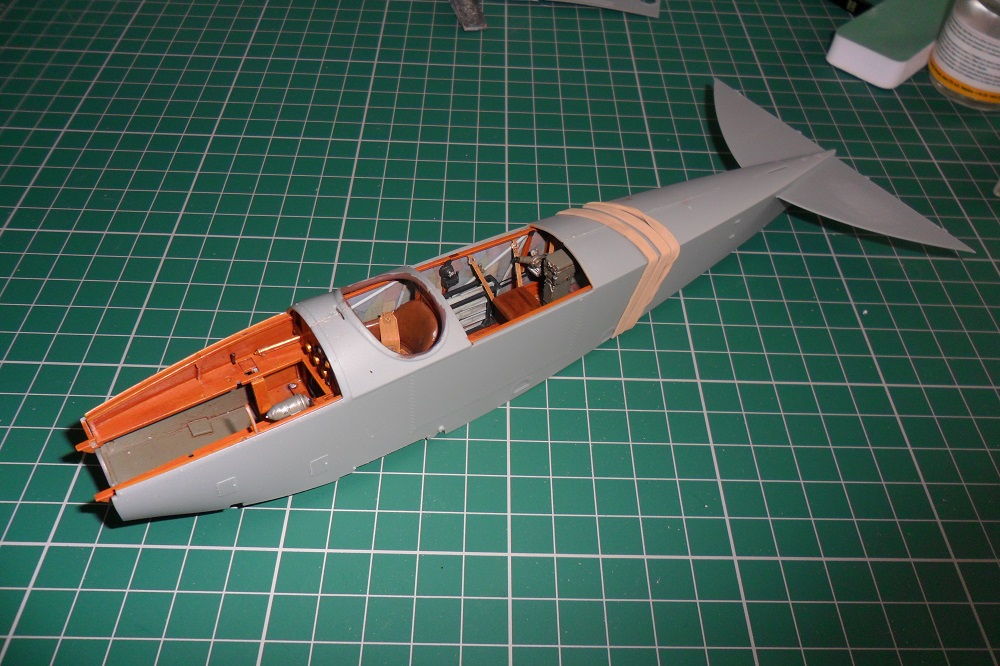
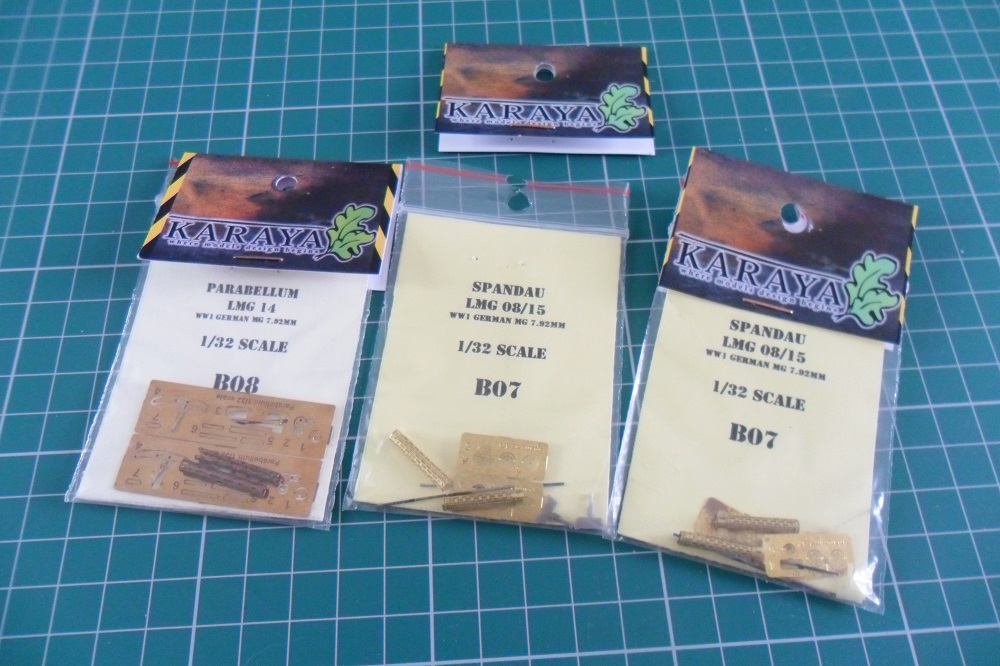
After my misadventures with trying to roll the kit supplied gun jackets, I bought some preformed jackets from Karaya. VERY cheap if you buy direct from them. Have to say they are fantastic and have saved me a lot of effort and are better than what I could have done. I ordered two sets for the LMG08's and a set of LMG14's. These should see me through a couple of projects.
Next up the wings.
On the bench: 1/72 Mosquito, Lightning F.6, DH.2,
AMT Vulcan Shuttle Surak.
Cyber-Hobby 1:35 Sherman Firefly IC - still stalled.
Berlin, Germany
Joined: October 12, 2008
KitMaker: 709 posts
AeroScale: 651 posts
Posted: Thursday, August 03, 2017 - 09:21 PM UTC
Phan-tastic work, Stephen! This looks really great, keep on the good work!
Thomas

Sometimes you need to distance yourself to see things clearly - Lao Tzu -
... in scale and in real life -T.
#372
United Kingdom
Joined: March 10, 2010
KitMaker: 2,568 posts
AeroScale: 1,619 posts
Posted: Thursday, August 03, 2017 - 10:14 PM UTC
Thanks Thomas.
Really liking these kits at the moment. 1/32 is the perfect scale for WW1 aircraft. Have their Sopwith Pup, Snipe, Pfalz D.III and DFW C.V to build after. Roden are not too bad either. Have their Sopwith Tripe, SE.5 and Richtoffens Albatros.
Just finding the time to build them all!
On the bench: 1/72 Mosquito, Lightning F.6, DH.2,
AMT Vulcan Shuttle Surak.
Cyber-Hobby 1:35 Sherman Firefly IC - still stalled.
United Kingdom
Joined: January 04, 2015
KitMaker: 32 posts
AeroScale: 29 posts
Posted: Friday, August 04, 2017 - 10:17 PM UTC
I've just noticed this build. I started this Roland CII as a bit of a breather from the HS 123 I'm also putting together at the moment.

Got as far as basecoating the interior

cheers
stu
United Kingdom
Joined: January 04, 2015
KitMaker: 32 posts
AeroScale: 29 posts
Posted: Wednesday, August 23, 2017 - 10:48 AM UTC
got the wood effect done, quite pleased with how it looks - not that it'll be all that visible when the fuselage is closed up, but hey.


also included my DR1; started before this campaign, it's now practically completed. I was inspired to post one pic here by Robert's lovely example above.

cheers
stu