Air Campaigns
Want to start or join a group build? This is where to start.
OFFICIAL: Dive Bomber Campaign
modelguy2
_VISITCOMMUNITY
Ohio, United States
Joined: March 09, 2002
KitMaker: 818 posts
AeroScale: 137 posts
Posted: Friday, April 08, 2016 - 08:31 PM UTC
Got the interior finished and buttoned up the fuselage last night...


klimmer
_VISITCOMMUNITY
Ontario, Canada
Joined: May 16, 2003
KitMaker: 250 posts
AeroScale: 207 posts
Posted: Friday, April 08, 2016 - 11:24 PM UTC
Hi Everyone,

I have made some progress on my Avenger, interior is complete and fuselage has been buttoned up, along with the underside painted. Hopefully I have finally figured out how to post pictures.


That's it for now.


MichaelSatin
Staff MemberCampaigns Administrator
AEROSCALE
_VISITCOMMUNITY
Colorado, United States
Joined: January 19, 2008
KitMaker: 3,909 posts
AeroScale: 2,904 posts
Posted: Saturday, April 09, 2016 - 03:56 AM UTC
I've got an awful lot of balls in the air at this point, but if I ever do get going on this one...

 photo 20160409_151759_zpshs7i4nob.jpg

Box is a little the worse for wear, but the plastic is fine:

 photo 20160409_151815_zpsm1bztqja.jpg

I did get some aluminum painting done, but that's it. I've always liked this early war Navy scheme, so I think the box art is the one I'll do.

Michael
c4willy
#305
_VISITCOMMUNITY
Christchurch, New Zealand
Joined: February 01, 2006
KitMaker: 1,673 posts
AeroScale: 1,517 posts
Posted: Saturday, April 09, 2016 - 05:21 AM UTC
Hey Michael .... I want I want I want! Been looking for this kit at a reasonable price since forever!
MichaelSatin
Staff MemberCampaigns Administrator
AEROSCALE
_VISITCOMMUNITY
Colorado, United States
Joined: January 19, 2008
KitMaker: 3,909 posts
AeroScale: 2,904 posts
Posted: Saturday, April 09, 2016 - 05:42 AM UTC

Quoted Text

Hey Michael .... I want I want I want! Been looking for this kit at a reasonable price since forever!


I got one of each when they first came out and they've been in the stash since. Hope Italeri or someone re-releases them some day!

Michael
modelguy2
_VISITCOMMUNITY
Ohio, United States
Joined: March 09, 2002
KitMaker: 818 posts
AeroScale: 137 posts
Posted: Saturday, April 09, 2016 - 07:27 AM UTC
Got some color on today...


AussieReg
Staff MemberAssociate Editor
AUTOMODELER
#007
_VISITCOMMUNITY
Victoria, Australia
Joined: June 09, 2009
KitMaker: 8,156 posts
AeroScale: 3,756 posts
Posted: Saturday, April 09, 2016 - 07:52 AM UTC

Quoted Text


Quoted Text

Hey Michael .... I want I want I want! Been looking for this kit at a reasonable price since forever!


I got one of each when they first came out and they've been in the stash since. Hope Italeri or someone re-releases them some day!

Michael


Chris, I think I would read that as a no! Keep searching mate

Mike, very nice work on the paint, looks great!

Cheers, D
modelguy2
_VISITCOMMUNITY
Ohio, United States
Joined: March 09, 2002
KitMaker: 818 posts
AeroScale: 137 posts
Posted: Sunday, April 10, 2016 - 04:20 AM UTC
Bit more paint work...


MichaelSatin
Staff MemberCampaigns Administrator
AEROSCALE
_VISITCOMMUNITY
Colorado, United States
Joined: January 19, 2008
KitMaker: 3,909 posts
AeroScale: 2,904 posts
Posted: Sunday, April 10, 2016 - 04:38 AM UTC
Moving right along there Mike!

Michael
klimmer
_VISITCOMMUNITY
Ontario, Canada
Joined: May 16, 2003
KitMaker: 250 posts
AeroScale: 207 posts
Posted: Thursday, April 14, 2016 - 12:14 AM UTC
Just a quick update on my Avenger.
Have completed the painting of it, and am in the process of applying the decals and stencils.


Cheers
rochaped
_VISITCOMMUNITY
Lisboa, Portugal
Joined: August 27, 2010
KitMaker: 679 posts
AeroScale: 669 posts
Posted: Thursday, April 14, 2016 - 01:41 AM UTC
I see a lot of nice dive bombers, but what about the quintessential of this weapon??

No brave chap willing to include at least one in this campaign?

Cheers
Pedro
c4willy
#305
_VISITCOMMUNITY
Christchurch, New Zealand
Joined: February 01, 2006
KitMaker: 1,673 posts
AeroScale: 1,517 posts
Posted: Thursday, April 14, 2016 - 03:20 AM UTC
The Stuka? The Luftwaffe's flying artillery? Uhmmmm I have two in 1/24th scale but I doubt I could get one finished in time!
rochaped
_VISITCOMMUNITY
Lisboa, Portugal
Joined: August 27, 2010
KitMaker: 679 posts
AeroScale: 669 posts
Posted: Thursday, April 14, 2016 - 04:07 PM UTC
Yep, that's the one Chris

I remember building the Airfix 1/24 in my teenage years, and I loved it! Huge and well engineered.

Too bad the only Stuka I have is a G version, not really a dive bomber

Cheers
Pedro
c4willy
#305
_VISITCOMMUNITY
Christchurch, New Zealand
Joined: February 01, 2006
KitMaker: 1,673 posts
AeroScale: 1,517 posts
Posted: Friday, April 15, 2016 - 04:05 AM UTC
After consulting the database I discover I have Italeri's 1/72nd Ju87B-2/R2! So just for Jose I'll build this one also.... I'll have to look but I think it has decals for the Regia Aeronautica.
klimmer
_VISITCOMMUNITY
Ontario, Canada
Joined: May 16, 2003
KitMaker: 250 posts
AeroScale: 207 posts
Posted: Friday, April 15, 2016 - 05:25 AM UTC
Well I am calling this one done.


I have nothing but praise for this kit. Detail is amazing to say the least. Instructions could be a little better.

Cheers
modelguy2
_VISITCOMMUNITY
Ohio, United States
Joined: March 09, 2002
KitMaker: 818 posts
AeroScale: 137 posts
Posted: Friday, April 15, 2016 - 05:41 AM UTC
Nicely done Ted!
c4willy
#305
_VISITCOMMUNITY
Christchurch, New Zealand
Joined: February 01, 2006
KitMaker: 1,673 posts
AeroScale: 1,517 posts
Posted: Friday, April 15, 2016 - 10:37 AM UTC
Nice clean build Ted, I must say I do really like the Atlantic camouflage, it makes a striking difference to the three tone Pacific colour scheme etc.
c4willy
#305
_VISITCOMMUNITY
Christchurch, New Zealand
Joined: February 01, 2006
KitMaker: 1,673 posts
AeroScale: 1,517 posts
Posted: Friday, April 15, 2016 - 10:42 AM UTC
Okay here's a pic of the Italeri offering I'll be doing the North African aircraft with the snake! Surprise surprise lol!

kamadoma
_VISITCOMMUNITY
Philippines
Joined: December 24, 2015
KitMaker: 48 posts
AeroScale: 35 posts
Posted: Friday, April 15, 2016 - 05:36 PM UTC
This will be my entry for the very first group build I'm participating on.


First impressions on my initial test fits, this kit is going to be a challenge in terms of fitting and gap filling. I will be doing this OOB so the empty cockpit walls will have to remain empty. I think my major focus of learning here would be fixing the poor fittings. This tooling is way back from the '80s so poor fittings are not surprising at all.

For some reason the edges of the wings have yellowed a bit. No idea what caused that. The instructions are okay (not yellowed), so I think this is more from a recent production run. This tooling has been having reboxed released up to 2015, according to Scalemates.com


So we all start with the cockpit. And I present to you, probably the comfiest seats in Imperial Japan. The instrument panel has no decals, but surprisingly the dials are sculpted. I can probably try to do a little wash or something here to liven it up, but I won't spend too much time in the cockpit work. And sadly, the kit comes with a rear machine gun but no mount for it, and no mention in the instructions as well. Probably because there is no open canopy option.


God, this kit sure has a lot of fitting issues. It could be a contender for the forum's Hall of Shame but then this being my first circa '80s kit I won't make judgements.

So first I airbrushed the usual interior green on the cockpit areas.


Upon assembly, one can finally encounter the struggles. First, would be fitting the cockpit tub between the fuselage halves. That's centering the tub and making sure it's on the assigned grooves while holding two fuselage halves.

As the photo shows, I deliberately applied a lot of super glue to make sure the tub stays put. The fuselage halves won't sit flush together, so when the cement was dried I took some Tamiya putty to fill in the gaps, and then wet-sanded it once the putty has dried.


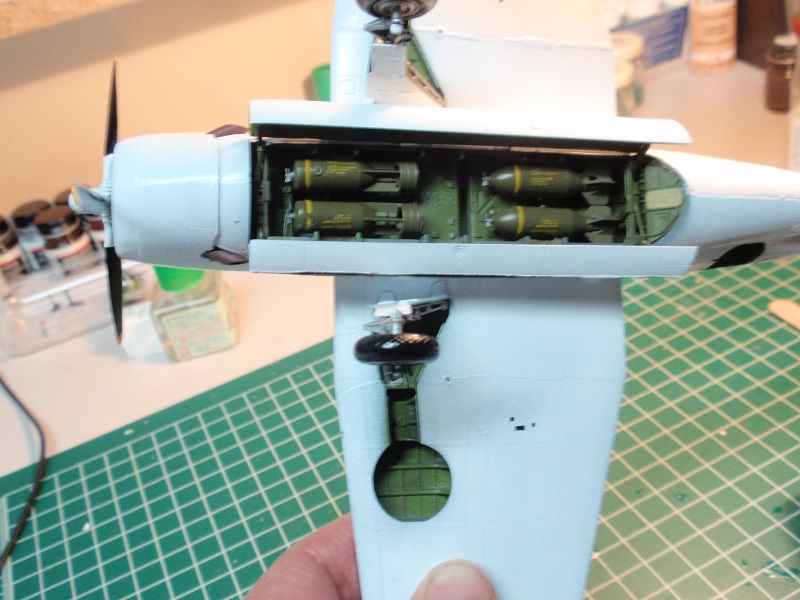
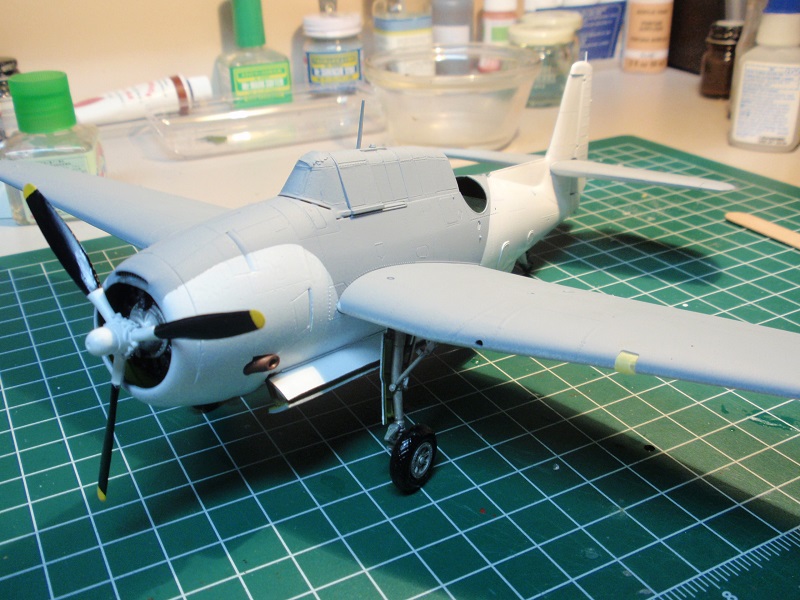
Now for the wings. Dry fitting shows two humongous gaps. I did a bit of sanding around the surfaces to be joined, applied cement, and assembled them together. The starboard wing seems okay, but the port side one still has the huge gap. That will have to be filled with putty on my next sitting.

klimmer
_VISITCOMMUNITY
Ontario, Canada
Joined: May 16, 2003
KitMaker: 250 posts
AeroScale: 207 posts
Posted: Saturday, April 16, 2016 - 01:57 AM UTC
Thank you gentlemen for the comments.

I also am very impressed with the Atlantic scheme as well, very unique, looks great on the display shelf !

I look forward to continue following the remainder of the builds for the balance of this campaign.

Cheers Ted
c4willy
#305
_VISITCOMMUNITY
Christchurch, New Zealand
Joined: February 01, 2006
KitMaker: 1,673 posts
AeroScale: 1,517 posts
Posted: Saturday, April 16, 2016 - 02:13 AM UTC
Welcome to your first campaign/group build vincent! Interesting choice of kit, I like what you've done so far.

I would make the suggestion that if you have access to plastic strip or plasticard I'd use that to fill the gap initially. If not you could always use stretched sprue to gap fill. If your not familiar with stretched sprue it's simply sprue from your kit heated by a match or lighter till it's soft (but not burnt or on fire, don't ask how I know this!) and then stretched.

The reason for this being that large areas of putty are brittle and weak and will not take the wings flexing. Using plastic to fill the gap will make the joint stronger and provide a solid bed for the putty.
kamadoma
_VISITCOMMUNITY
Philippines
Joined: December 24, 2015
KitMaker: 48 posts
AeroScale: 35 posts
Posted: Saturday, April 16, 2016 - 07:35 PM UTC
Thank for the tip, Chris. I do have some styrene sheets here that I might try to get in that gap. This kit has quite a number of fitting issues, even the rudder has some.


Cowling halves have been cemented together and the engine was painted (and will be masked prior to priming of course). Here's a dry fit of the cowling. Seeing the thing take shape somewhat gives me that additional drive to push through despite the fitting problems.

BoiseBlade
#523
_VISITCOMMUNITY
Idaho, United States
Joined: February 28, 2014
KitMaker: 342 posts
AeroScale: 250 posts
Posted: Sunday, April 17, 2016 - 11:11 PM UTC
Mike,
Nicely done so far. I really like the images of the paint build up.... I like that technique...

Chris....
Ah The Snake scheme, No Forza Italia!


Jeff D
BoiseBlade
#523
_VISITCOMMUNITY
Idaho, United States
Joined: February 28, 2014
KitMaker: 342 posts
AeroScale: 250 posts
Posted: Sunday, April 17, 2016 - 11:27 PM UTC
Welcome Vincent!

Looking good so far.
I agree with Chris. I learned the "Hard Way" about large gap filling with putty It did not crack immediately it wait till not long after it was all completed, As usual.

I have my Aichi B7A Ryusei/Grace I should post the start images that I took 2 days ago....
c4willy
#305
_VISITCOMMUNITY
Christchurch, New Zealand
Joined: February 01, 2006
KitMaker: 1,673 posts
AeroScale: 1,517 posts
Posted: Monday, April 18, 2016 - 05:32 AM UTC
Hi Jeff, I could do the Regia Areonautica scheme but it is a simple green over blue with painted out Balkan Kreuz. I suppose the snake scheme is pretty much done to death.