Air Campaigns
Want to start or join a group build? This is where to start.
OFFICIAL: Hairy Stick Campaign
sneakypete
_VISITCOMMUNITY
Armed Forces Pacific, United States
Joined: June 10, 2006
KitMaker: 149 posts
AeroScale: 49 posts
Posted: Tuesday, February 24, 2015 - 07:15 AM UTC


Sorry for the quality.... Here is the camel start. Ill get better pics later. I added some strips to dress up the cockpit area as runners on the side. Laid down a coat of brown for the wood color, which will be the challenge.

Dan
tinbanger
_VISITCOMMUNITY
Ontario, Canada
Joined: February 04, 2008
KitMaker: 2,507 posts
AeroScale: 1,814 posts
Posted: Tuesday, February 24, 2015 - 07:41 AM UTC
Welcome to the campaign Dan
rolltide31
#377
_VISITCOMMUNITY
Texas, United States
Joined: June 27, 2010
KitMaker: 1,481 posts
AeroScale: 7 posts
Posted: Wednesday, February 25, 2015 - 06:20 AM UTC
Hi all

I'm late to the party but here is my entry


Gonna get started tomorrow

Dave
ljames0874
_VISITCOMMUNITY
England - South East, United Kingdom
Joined: August 15, 2012
KitMaker: 408 posts
AeroScale: 365 posts
Posted: Sunday, March 01, 2015 - 10:20 PM UTC
Right - I'm finally getting somewhere with this. All the exterior parts have had the huge rivets sanded off, and so far, the fuselage has been re-scribed. Note the African-American pilot - that should give you a clue as to the markings this 'stang will be finished with:

Cheers Everyone!
Thudius
_VISITCOMMUNITY
Uusimaa, Finland
Joined: October 22, 2012
KitMaker: 1,194 posts
AeroScale: 19 posts
Posted: Sunday, March 01, 2015 - 10:52 PM UTC
Finally back to this, made good progress over the last week. Tracks are done and painted (not shown of course), talk about a pain in the backside. So much flash to clean up and poorly molded as well. Camo paint on, the base coat has already been modulated with filters, the camo will get the same treatment.


I managed to get the filters down and details painted, no time for pics though. Starting to see light at the end of the tunnel.

Kimmo
scribbles101
_VISITCOMMUNITY
United Kingdom
Joined: May 25, 2013
KitMaker: 137 posts
AeroScale: 103 posts
Posted: Monday, March 02, 2015 - 08:16 PM UTC
I know I am a little late, but mind if I jump in?
I am planning to build this thing


it is a 1:48 scale messerschmitt Bf109 E-3 from Airfix with decals for a machine captured by the RAF and tested at Boscombe down in 1941, so bright yellow underside, and green and brown camouflage on top
PeeDee
_VISITCOMMUNITY
England - North West, United Kingdom
Joined: September 03, 2011
KitMaker: 608 posts
AeroScale: 31 posts
Posted: Monday, March 02, 2015 - 08:24 PM UTC
David good luck with that old box of Tamiya.
Kimmo looks fantastic even though it's "so far" mate

Paul
Thudius
_VISITCOMMUNITY
Uusimaa, Finland
Joined: October 22, 2012
KitMaker: 1,194 posts
AeroScale: 19 posts
Posted: Monday, March 02, 2015 - 09:17 PM UTC
Thanks Paul. The painting is actually the easiest part of this build. Finished with detail painting and minor wear, next up will be washes and weathering, hopefully I'll have some pics in a couple of days.

Kimmo
PeeDee
_VISITCOMMUNITY
England - North West, United Kingdom
Joined: September 03, 2011
KitMaker: 608 posts
AeroScale: 31 posts
Posted: Monday, March 02, 2015 - 09:52 PM UTC
Hi guys,
You will be thinking by now I'm commenting and not doing,
Well this was my starting point a week ago

http://gallery3.kitmaker.net/showgallery.php?cat=29736

I have two packs of these and want at some point to put a large group together for a scene of hand to hand fighting at the battle of kohima.

But for now...
I've split open a pack of figures and tipped all the major components into a bowl and mixing them up., taking parts out at random with eyes closed, one head torso leg set and arms.

The reults are surprising and I'll show you later the figure ready for prime and paint, for now I hope you are all having as much fun as I am with a completely random figure.
I'm uploading this info from my phone whilst having a bite to eat on my way home!
Back later.
Paul
Delbert
#073
_VISITCOMMUNITY
Pennsylvania, United States
Joined: October 05, 2002
KitMaker: 2,659 posts
AeroScale: 209 posts
Posted: Tuesday, March 03, 2015 - 05:04 AM UTC
Kimmo, that is looking Great..

anyways here is my latest photo of using the hairy stick..


Detailing the tools in 1/144 is not so easy.. LOL

later
Delbert
PeeDee
_VISITCOMMUNITY
England - North West, United Kingdom
Joined: September 03, 2011
KitMaker: 608 posts
AeroScale: 31 posts
Posted: Tuesday, March 03, 2015 - 05:20 AM UTC
Looks really good except......
I can see the speedometer is in MPH and shouod be
In KPH I think you will find; Bad slip there sir.
Hahaha

It's Very very good finish, emlarging small models is cruel in that the slightest mistake shows up.

In this case it looks terrific

Congratulations
Paul
PeeDee
_VISITCOMMUNITY
England - North West, United Kingdom
Joined: September 03, 2011
KitMaker: 608 posts
AeroScale: 31 posts
Posted: Tuesday, March 03, 2015 - 06:08 PM UTC
Well here he is, my first conversion in a series by glueing random multipose to make something paintable.
I shall add the chinstrap ties and helmet liner out of putty and a star on the front of the helmet later.
The only addition is the copper wire canteen sling

Please Have a look at this link
There are some other figures there that I also put together in the same way, but it's this one that is my official entry

http://gallery3.kitmaker.net/data/29736/IMG-20150112-00499.jpg

Cheers all

Paul
Delbert
#073
_VISITCOMMUNITY
Pennsylvania, United States
Joined: October 05, 2002
KitMaker: 2,659 posts
AeroScale: 209 posts
Posted: Wednesday, March 04, 2015 - 01:24 AM UTC


PeeDee's photo up..
PeeDee
_VISITCOMMUNITY
England - North West, United Kingdom
Joined: September 03, 2011
KitMaker: 608 posts
AeroScale: 31 posts
Posted: Wednesday, March 04, 2015 - 01:56 AM UTC
Hey thanks a lot.

How did you do that?

It's not on my instruction sheet !

Paul

tinbanger
_VISITCOMMUNITY
Ontario, Canada
Joined: February 04, 2008
KitMaker: 2,507 posts
AeroScale: 1,814 posts
Posted: Wednesday, March 04, 2015 - 03:27 AM UTC
"I know I am a little late, but mind if I jump in?"

Welcome Simon
Delbert
#073
_VISITCOMMUNITY
Pennsylvania, United States
Joined: October 05, 2002
KitMaker: 2,659 posts
AeroScale: 209 posts
Posted: Wednesday, March 04, 2015 - 05:28 AM UTC

Quoted Text

Hey thanks a lot.

How did you do that?

It's not on my instruction sheet !

Paul


Hey Paul.. when you are making a post click on the img box in the lower right and put your photo url between the img commands..

img]http://put.url.here/image.file[/img
PeeDee
_VISITCOMMUNITY
England - North West, United Kingdom
Joined: September 03, 2011
KitMaker: 608 posts
AeroScale: 31 posts
Posted: Wednesday, March 04, 2015 - 05:39 AM UTC
That's simple enough even I should be able to do that
I was posting emails with stamps on until last year,
(I get quicker answers now and save on inkjet cartridges too )
Hee hee
Thanks a lot
Paul
scribbles101
_VISITCOMMUNITY
United Kingdom
Joined: May 25, 2013
KitMaker: 137 posts
AeroScale: 103 posts
Posted: Thursday, March 05, 2015 - 12:51 AM UTC
We have lift-off woth the Messerschmitt 109


the cockpit, all painted assembled and dry-brushed, I must say I am quite pleased with how this turned out

fuselage halves have had the same treatment

and there is the lot so far, all stuck together, and showing the engine detail as well.

constructive criticism is very welcome
Cheers, Simon
Thudius
_VISITCOMMUNITY
Uusimaa, Finland
Joined: October 22, 2012
KitMaker: 1,194 posts
AeroScale: 19 posts
Posted: Thursday, March 05, 2015 - 01:19 AM UTC
Tools and exhaust painted. As seems to be the case, no time for pics after today's session of washes and decals. Pigments will go on next, maybe tomorrow or Saturday.


Kimmo
PeeDee
_VISITCOMMUNITY
England - North West, United Kingdom
Joined: September 03, 2011
KitMaker: 608 posts
AeroScale: 31 posts
Posted: Thursday, March 05, 2015 - 11:46 AM UTC
I paint my figures in successive lighter layers over a darker base.
And so instead of spray priming I use a couple of layers of base tone and get cracking.

Using vallejo:
Flesh:
sunny flesh

Clothing:
shirt yellow olive and english uniform and black mix

Trousers same without the black
Equipment helmet and rifle black
All seams painted on with black grey.

More soon
Paul

http://gallery3.kitmaker.net/showphoto.php/photo/426758image.file" BORDER="0">
http://gallery3.kitmaker.net/showphoto.php/photo/426755/image.file" BORDER="0">
Thudius
_VISITCOMMUNITY
Uusimaa, Finland
Joined: October 22, 2012
KitMaker: 1,194 posts
AeroScale: 19 posts
Posted: Friday, March 06, 2015 - 07:27 PM UTC
Another day closer to getting this wrapped up. First pigments down on the lower hull, running gear and tracks in place. I seem to be making a habit of not getting photos at the end of each session, so here's what everything looked like with just washes.


Hopefully the next session will be the last one, I need to add some more dirt and then dust.

Kimmo
tinbanger
_VISITCOMMUNITY
Ontario, Canada
Joined: February 04, 2008
KitMaker: 2,507 posts
AeroScale: 1,814 posts
Posted: Friday, March 06, 2015 - 09:36 PM UTC
Nice paint job Kimmo.
Thudius
_VISITCOMMUNITY
Uusimaa, Finland
Joined: October 22, 2012
KitMaker: 1,194 posts
AeroScale: 19 posts
Posted: Monday, March 09, 2015 - 05:58 PM UTC
Thanks Richard. Finally wrapped this up, a few shots added to the gallery. A fun campaign, wish I could say the same about the kit. Overall I'm pleased with the end result.


Kimmo
scribbles101
_VISITCOMMUNITY
United Kingdom
Joined: May 25, 2013
KitMaker: 137 posts
AeroScale: 103 posts
Posted: Monday, March 09, 2015 - 08:35 PM UTC
Ok, got plenty of work done on the 109 over the weekend, so much so that it is actually nearing completion now. This kit just goes together really nicely, nothing complicated about it at all, it is great fun and I think airfix have really upped their game with all these new toolings


Wings assembled, with flaps show in the down position and leading edge slats deployed


Tail control surfaces attached


Wings attached to the fuselage, cannons and ailerons now also attached


Assembly all done now, almost ready for the hairy stick treatment


Pre-shading done using a fine tipped permanent marker pen, and the camouflage pattern drawn on with a pencil


Here is what the ol' schmitt looks like now, a little bit of neatening up still needed, but when that is done, I can go on to do the decals, however that may have to wait a bit because I am all out of Micro-sol

As always, constructive criticism is very welcome!
Cheers, Simon

p.s
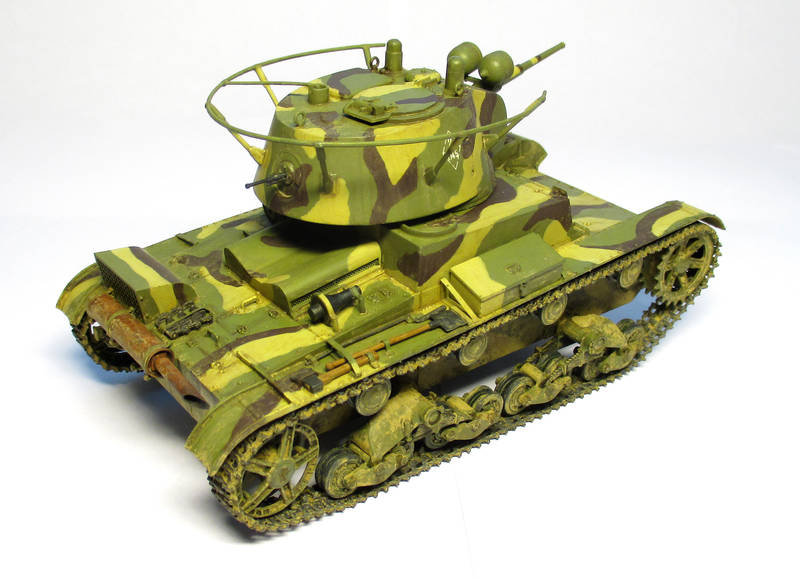
That T26 looks really good Kimmo, nice job!
Thudius
_VISITCOMMUNITY
Uusimaa, Finland
Joined: October 22, 2012
KitMaker: 1,194 posts
AeroScale: 19 posts
Posted: Monday, March 09, 2015 - 09:22 PM UTC
Thanks Simon. That wingy thingy is looking nice too. There's something so wrong, yet so right seeing a 109 in RAF colours.

Kimmo