


Air Campaigns
Want to start or join a group build? This is where to start.
Want to start or join a group build? This is where to start.
Hosted by Frederick Boucher, Michael Satin
OFFICIAL: Big Bad Bombers Campaign

Nito74

Joined: March 04, 2008
KitMaker: 5,386 posts
AeroScale: 635 posts
Posted: Sunday, June 22, 2014 - 04:22 AM UTC
Small update on the Badger cockpit

Berwickboy

Joined: April 27, 2013
KitMaker: 450 posts
AeroScale: 387 posts
Posted: Wednesday, June 25, 2014 - 09:38 AM UTC
I thought I would introduce you to my entry into the 'Big Bomber' campaign, the rather small but quite neatly formed Cyber-Hobby 1/200 Avro Vulcan B2.


This photo of the decals has been altered to make the Yellow and White ones more prominent


I intend to show it in flight so everything will be 'buttoned up';
I've had to do some research into exactly what this Vulcan would have looked like in 1962 and the biggest help has been the instructions from the Funkdecal Vulcan sheet. One of the options they have is a 617sqn Blue Steel aircraft and this is the all White, Low Vis options in the kit albeit a different serial. In the kit is XL 321 which happens to be the Vulcan with the highest number of flight hours of the fleet.
Changes need to be made to the kit
1 There is no ground following radar 'pimple' on the nose, that needs removing
2 It is highly unlikely to have had a re-fueling probe fitted in 1962 so the locating hole needs filling
3 There are 4 small projections in front of each engine nacelle on the underside which were not present on Olympus 104 powered aircraft and so need removing
4 Just behind each leading edge is a blister for aircraft fitted for the Douglas Skybolt which was not on 321 so again, need removing
5 This aircraft was fitted with 2 sets of ECM equipment under each engine pair and fortunately, there are 2 included.
I have started the build with the underside and for a modern kit, am a bit disappointed with the fit. The bomb bay insert for the Blue Steel has quite a gap around on all sides and the fit between top and bottom fuselage/wing also seems poor. We shall see though, test fit, test fit and more test fit is the answer.


Bigrip74

Joined: February 22, 2008
KitMaker: 5,026 posts
AeroScale: 2,811 posts

Posted: Sunday, June 29, 2014 - 05:11 AM UTC
WOW! I love the different subjects here and several I have never seen.
Was able to post some pics of my build for this campaign:
Airfix HP Hampden. I did not like the heavy rivet pattern so I have been sanding as much as possible to remove them. I lost the top window piece that covers the fuse just behind the canopy. I used some clear plastic to try and replace the lost peice. Does anyone have any advice on how to return the luster to the clear plastic after sanding?


Savage

Joined: June 04, 2003
KitMaker: 1,405 posts
AeroScale: 97 posts

Posted: Sunday, June 29, 2014 - 06:37 AM UTC
Unfortunately my primary choices fell through. I was hoping to build a Lockheed Hudson or an A-6E Intruder.
Well now it's the Welly....
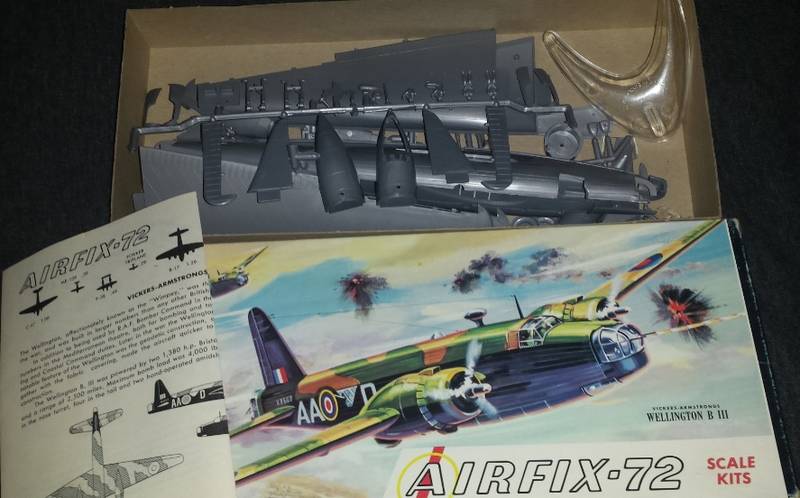
Well now it's the Welly....

Jessie_C


Joined: September 03, 2009
KitMaker: 6,965 posts
AeroScale: 6,247 posts

Posted: Sunday, June 29, 2014 - 06:52 AM UTC
To restore clarity to sanded clear plastic, first you need to polish it with ever-increasing grits of sandpaper. Start with a medium sanding stick on up through fine and extra fine, then finish it off with a triple-grit buffing stick. Then brush on a little Future to make it sparkle.

SaxonTheShiba
Joined: February 01, 2009
KitMaker: 1,233 posts
AeroScale: 663 posts

Posted: Sunday, June 29, 2014 - 07:29 AM UTC
Per my original post, I had intended to do a scribed NMF 48th scale B-58 for this but I had a moment of clarity and decided I would never get that done by November Instead, I am going to go back to my original plan of a 48th scale SAAF B-24.
Best wishes,
Ian


Best wishes,
Ian

Bigrip74
Joined: February 22, 2008
KitMaker: 5,026 posts
AeroScale: 2,811 posts
Posted: Sunday, June 29, 2014 - 08:09 AM UTC
@Eric: I love the Wellington ever since the old black and white movie "ONE OF OUR AIRCRAFT IS MISSING" don't hold me to the title. Saw it in the early 1960's.
@Jessie: thanks for the tips. I had heard of using toothpaste some years ago (too many to remember), but does it work?
Bob
@Jessie: thanks for the tips. I had heard of using toothpaste some years ago (too many to remember), but does it work?
Bob
Jessie_C
Joined: September 03, 2009
KitMaker: 6,965 posts
AeroScale: 6,247 posts
Posted: Sunday, June 29, 2014 - 09:42 AM UTC
Toothpaste is exactly like plastic polish; a slightly gritty cream. You can also get good results from rubbing with soft denim.
Bigrip74
Joined: February 22, 2008
KitMaker: 5,026 posts
AeroScale: 2,811 posts
Posted: Sunday, June 29, 2014 - 10:00 AM UTC
Jessie, thanks for the encouragement I will try those tips and see if the luster will return to that piece of plastic.
Bob
Bob

nico37

Joined: May 23, 2011
KitMaker: 651 posts
AeroScale: 181 posts

Posted: Sunday, June 29, 2014 - 11:53 PM UTC
Hi all,
here i come with a ww2 polish bomber :

some kit review pics :


I don't know yet which one i'll choose but there is not much differences between them...
And i began the pilot seat, i guess i'll have some scratch built do do....althought i don't really have many interior reference pics.


Cheers
nico

ljames0874

Joined: August 15, 2012
KitMaker: 408 posts
AeroScale: 365 posts

Posted: Monday, June 30, 2014 - 02:47 AM UTC
Here we go then! My campaign entry will give Mike a sense of deja vu:


For variety's sake, I will do the alternate colour scheme, ie XM595, which definitely had a refuelling probe! I will also be doing it gear down and ladder deployed. One thing about this kit made me laugh - they've actually supplied 1/200 pilot figures! A nice touch, but utterly pointless in this scale. I think I will paint the inside of the canopy, and fill the cockpit area with ballast, as there isn't a lot of space in the nose for weight to prevent tail sitting. Ho hum, should be fun - Cheers Everybody!
For variety's sake, I will do the alternate colour scheme, ie XM595, which definitely had a refuelling probe! I will also be doing it gear down and ladder deployed. One thing about this kit made me laugh - they've actually supplied 1/200 pilot figures! A nice touch, but utterly pointless in this scale. I think I will paint the inside of the canopy, and fill the cockpit area with ballast, as there isn't a lot of space in the nose for weight to prevent tail sitting. Ho hum, should be fun - Cheers Everybody!
Bigrip74
Joined: February 22, 2008
KitMaker: 5,026 posts
AeroScale: 2,811 posts
Posted: Monday, June 30, 2014 - 02:35 PM UTC
@Nicolas: nice subject, I will keep an eye on your progress.
@Mike and Lee: that airplane still brings back memories of "THUNDERBALL".
Bob
@Mike and Lee: that airplane still brings back memories of "THUNDERBALL".
Bob
Bigrip74
Joined: February 22, 2008
KitMaker: 5,026 posts
AeroScale: 2,811 posts
Posted: Saturday, July 05, 2014 - 05:00 AM UTC
A little more sanding on those rivets. I do not remember this kit being so heavy at this stage. Seems like it is like an old Aurora kit with the solid pieces:


Berwickboy
Joined: April 27, 2013
KitMaker: 450 posts
AeroScale: 387 posts
Posted: Saturday, July 05, 2014 - 10:11 AM UTC
The Vulcan progresses 
The patches of White show modifications and fillings I have made. They are:
1: Refuelling probe locating hole filled
2: Terrain following Radar housing removed from the extreme nose, XL321 was not yet fitted with these in 1962
3: Skybolt fixings under-wing (which were used for the Falklands raid) removed
4: Small exhausts in front of the engine housings removed, not used on Olympus 100 series engines
5: Holes for Blue Steel attachment filled except the hole for the fin.
6: A rather curious oblong hole behind the bomb bay was filled, this has no semblance to anything on the actual aircraft and I only presume this is for the tanker version that Cyber-Hobby also kit.
What you can;t see are the small 10 thou Microstrip pieces fitted to each corner of the bomb bay opening to raise the insert nearly level to the underside. I have also used Humbrol Crystal Clear to fill in the bomb aimers window then painting the inside with Revell Tar Grey acrylic. I have also painted the inside of the cockpit, ejector seats, instrument panel and pilots, alright, you won't be able to see them clearly but, what the heck? I know they're there.
I am finding this a rewarding build as things are going the way I want but please note, the two halves have not yet been joined

PeeJay74

#363
Joined: January 08, 2014
KitMaker: 425 posts
AeroScale: 401 posts

Posted: Tuesday, July 08, 2014 - 12:31 PM UTC
I have managed to get some work done on it slowly over the last few weeks. Mostly I have been doing surgery on kit parts to prep for the resin or PE upgrades. The cockpit was a chore, Eduard's instrument panel looks great but it was not easy to install. If I build another AM B-25, I may skip using any PE outside of seatbelts. We'll see how much of that nice detail can be seen in the cockpit when it's all finished. I am very pleased with the Verlinden set so far, it's a huge improvement over the kit plastic.

PBJ-1D cockpit after Eduard PE panel and scratch levers added.

Verlinden seats and armor plate, just needs PE belts added. Oxygen bottles waiting for detail.

Fuselage interior with the little bits added and painting started.
Hopefully I will get more done soon, I plan to build/paint/Future all of the sub-assemblies then wash and Dullcote everything at once.
PBJ-1D cockpit after Eduard PE panel and scratch levers added.
Verlinden seats and armor plate, just needs PE belts added. Oxygen bottles waiting for detail.
Fuselage interior with the little bits added and painting started.
Hopefully I will get more done soon, I plan to build/paint/Future all of the sub-assemblies then wash and Dullcote everything at once.

shorty53
#330

Joined: July 15, 2011
KitMaker: 175 posts
AeroScale: 103 posts

Posted: Tuesday, July 08, 2014 - 06:37 PM UTC
Nice job Paul. The instrument panel looks like it was worth the extra effort.

tinbanger
Joined: February 04, 2008
KitMaker: 2,507 posts
AeroScale: 1,814 posts

Posted: Sunday, July 13, 2014 - 03:09 AM UTC
Some work on my Bomber:-


JClapp
#259
Joined: October 23, 2011
KitMaker: 2,265 posts
AeroScale: 1,715 posts

Posted: Sunday, July 13, 2014 - 04:09 AM UTC
Quoted Text
Hmmm! I wonder if this campaign has need of a CP-140 Aurora? Or is that considered an unbomber as much as it's considered rcaf over navy???
Ben the Aurora sorta seems out of scope to me, main mission being surveillance rather than destruction, but if you can put it away til next spring it would fit perfectly into the Lockheed campaign...


md72
#439
Joined: November 05, 2005
KitMaker: 4,950 posts
AeroScale: 3,192 posts

Posted: Monday, July 14, 2014 - 05:53 AM UTC
OK, maybe this is a sign, stumbled across a 1/144 Minicraft B-1A for U$8. Might just do this instead of the Baltimore...

Berwickboy
Joined: April 27, 2013
KitMaker: 450 posts
AeroScale: 387 posts
Posted: Saturday, July 19, 2014 - 09:13 AM UTC
I am proceeding in an upward direction and am nearly ready to apply paint. Eliminating the seams is very difficult foor a man of my advanced age and chunky fingers, the kit having some lovely fitting parts and yet others have a yawning chasm between, the upper and lower fuselage/wing halves being a case in point.

Note, I have included the crew. The canopy has been masked with water soluble masking liquid


To be continued

Note, I have included the crew. The canopy has been masked with water soluble masking liquid


To be continued
Savage
Joined: June 04, 2003
KitMaker: 1,405 posts
AeroScale: 97 posts
Posted: Sunday, July 20, 2014 - 07:56 AM UTC
All pegged up.
Unfortunately the lower fuselage has some warping that I can't correct, so will try to fill it.
Unfortunately the lower fuselage has some warping that I can't correct, so will try to fill it.
SaxonTheShiba
Joined: February 01, 2009
KitMaker: 1,233 posts
AeroScale: 663 posts
Posted: Sunday, July 20, 2014 - 09:57 AM UTC
Nice looking projects, thus far, everybody. I was able to crack open the Monogram 1/48th scale B-24 this weekend and I began work on the interiors. I think I have all my research rounded up for the South African markings as well.
Since this is a late model Liberator, the interior was painted Bronze Green and Aluminum. I used the new Testors CREATEFX Silver and it laid down perfectly.


Post shading was then added using a lightened shade of the Bronze Green.

Following that, a wash of Acrylic Black diluted with Pledge Floor Wax was added.


Next, I will work on the interior details.
Best wishes,
Ian

iflytb20

#501

Joined: August 25, 2009
KitMaker: 292 posts
AeroScale: 194 posts

Posted: Tuesday, July 22, 2014 - 01:42 AM UTC
My entry. It's a Hasegawa Ju88 A-4.

The Kit


I took this picture on the 17th. Got busy with work and was unable to post it here. Hope it wont be a problem

The intended marking

AM that I will be using

Reference material
The Kit
I took this picture on the 17th. Got busy with work and was unable to post it here. Hope it wont be a problem
The intended marking
AM that I will be using
Reference material

ljames0874
Joined: August 15, 2012
KitMaker: 408 posts
AeroScale: 365 posts
Posted: Thursday, July 31, 2014 - 04:30 AM UTC
Time for a small update - the building, filling and sanding is done - ready for the fun bit!

Cheers everybody!
Cheers everybody!
Dragon164
#226
Joined: February 20, 2012
KitMaker: 1,909 posts
AeroScale: 508 posts

Posted: Tuesday, August 05, 2014 - 06:51 PM UTC
I will be building Monograms B-24J, I have not started yet as I am debating on what to do about the raised panel lines. 
All I think I will add to this is Eduard's SA cockpit set and some SuperScale decals.
Cheers Rob.
All I think I will add to this is Eduard's SA cockpit set and some SuperScale decals.
Cheers Rob.

 |

WEB HOSTING BY


Copyright ©2021 AeroScale and Kitmaker Network, a subsidiary of Silver Star Enterprises
All Rights Reserved. Please read our Conditions of Use and Privacy Policy.
All Rights Reserved. Please read our Conditions of Use and Privacy Policy.