OFFICIAL: Rescue Me Campaign
New York, United States
Joined: March 08, 2010
KitMaker: 3,662 posts
AeroScale: 174 posts
Posted: Tuesday, November 19, 2013 - 02:52 PM UTC
Active Campaigns on the bench:
Operation Fall Gelb - Pz.Kpfw. IV Ausf. C
Engineering the Future - M-26 Recovery Vehicle
115 Campaigns completed
South Australia, Australia
Joined: August 14, 2007
KitMaker: 5,926 posts
AeroScale: 2,201 posts
Posted: Wednesday, November 20, 2013 - 09:06 PM UTC
Riding on a chopper like that would have been as terrifying as the injury!

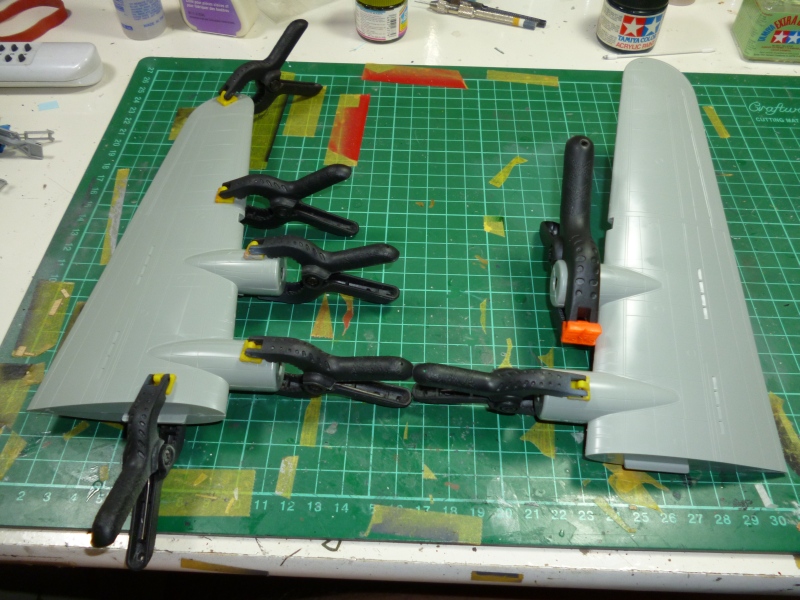
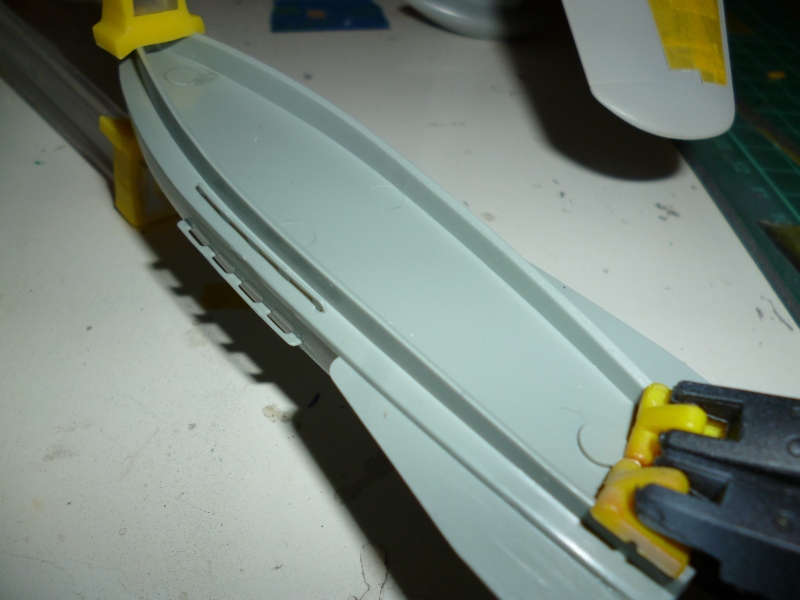
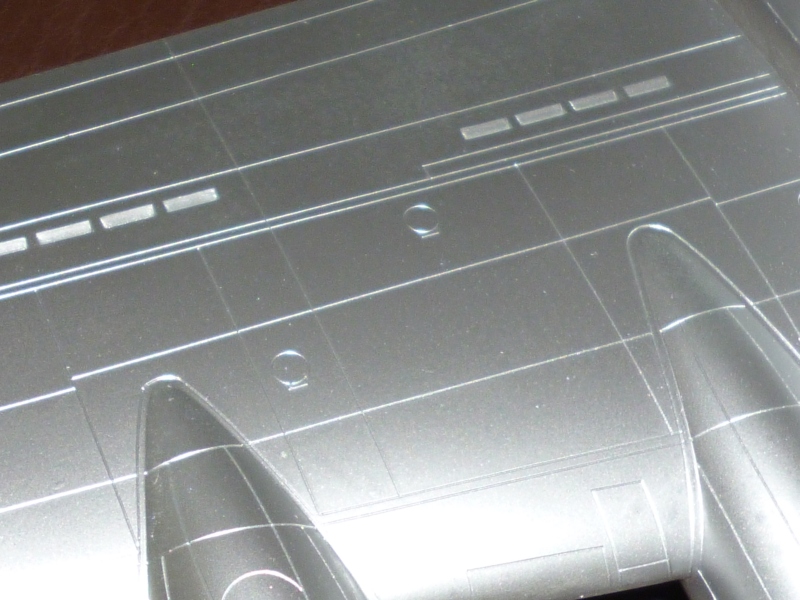
Got some more work done on the SB-17..
The starboard side has both gunners positions included so you can do the staggered positions as in later B-17s or the earlier side-by-side positions. I dislike doing jobs like this as I seem to be able to fins ways to stuff it up!
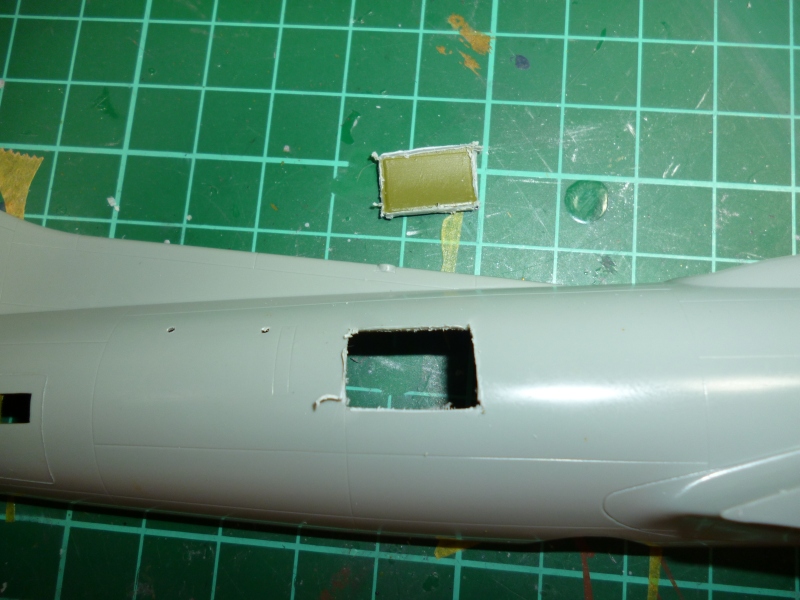
And here is the interior that just needs a few touchups and some windows installed and she will be ready to button up. I have already done a dry run and it is going to be one of the ones you need to glue a little at a time using CA and accelerator then go around later and strengthen it with liquid polystyrene cement..

That's all for now
Warren
You may be right, I may be crazy.
South Australia, Australia
Joined: August 14, 2007
KitMaker: 5,926 posts
AeroScale: 2,201 posts
Posted: Friday, November 22, 2013 - 08:33 PM UTC
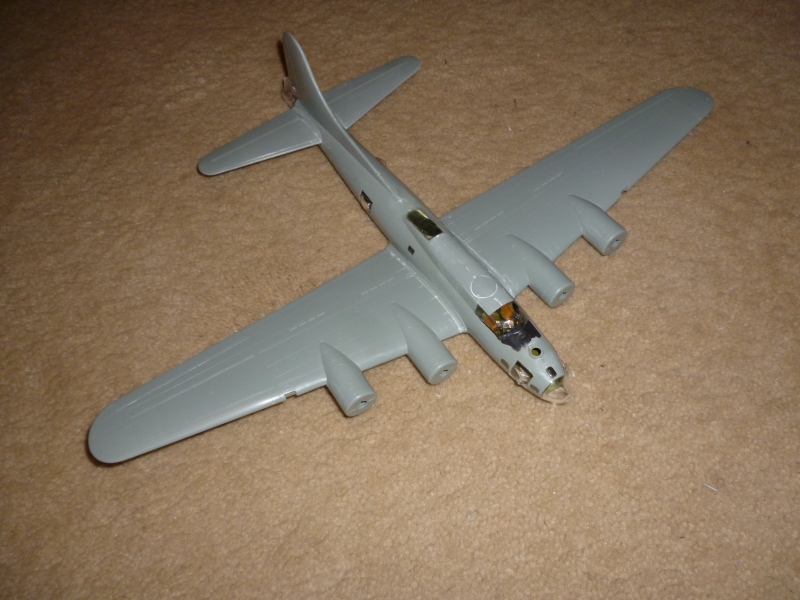
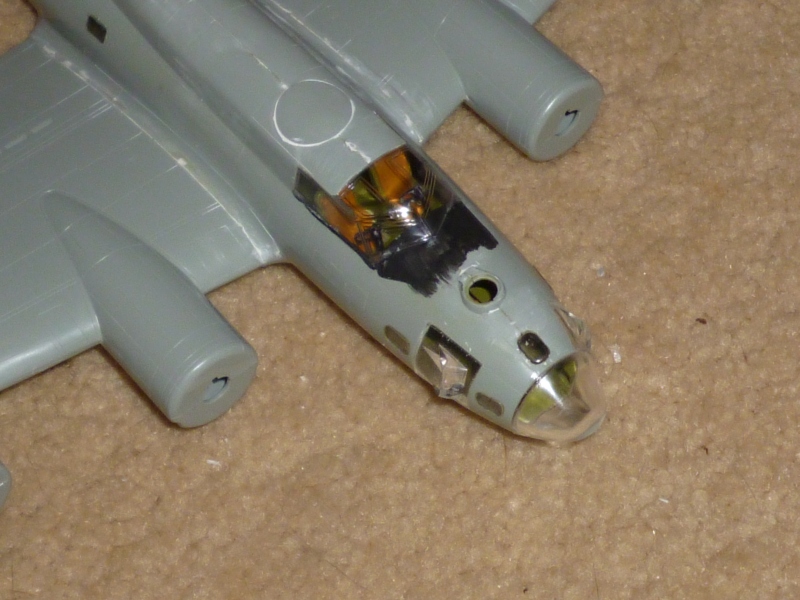
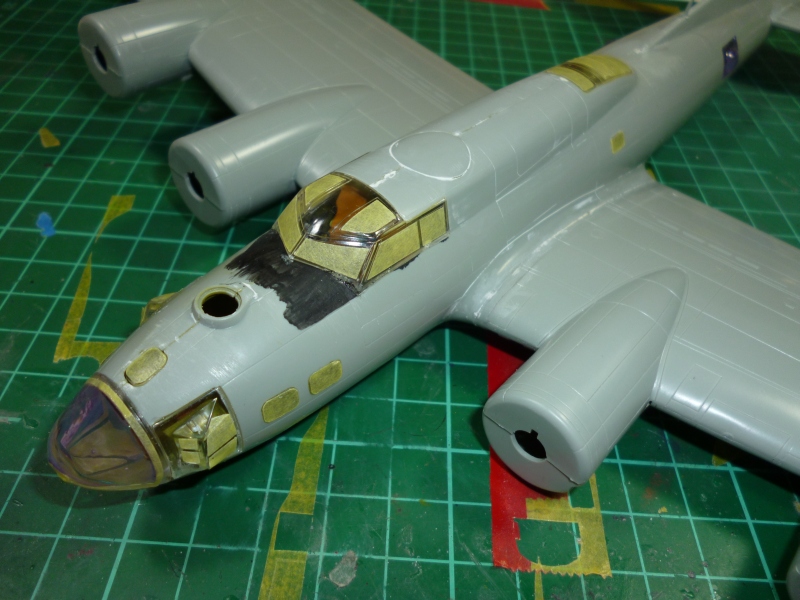
Some more progress.
The closing of the fuselage..
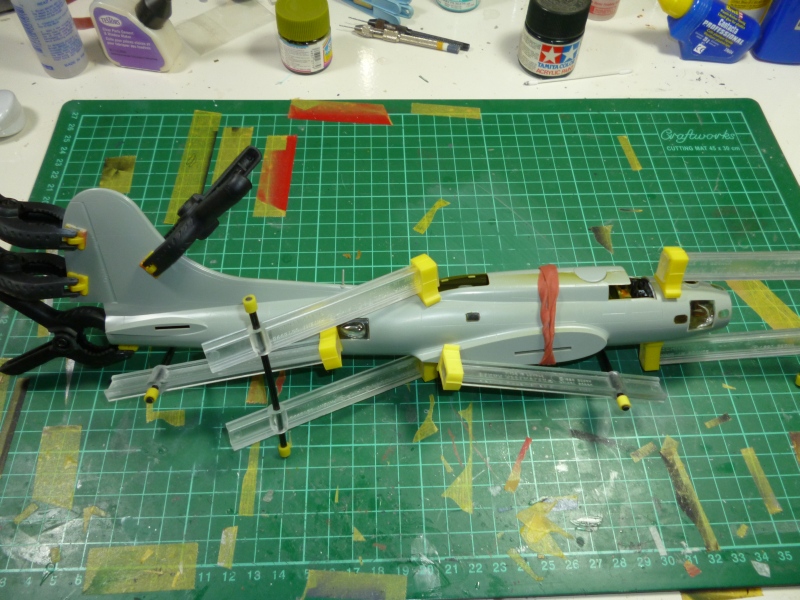
The crappy fit of the upper turret blanking plate and roof above the cockpit. Gonna need some filler here!
I actually detached the tewo halves of the roof and tried again. Will see how it comes out.
Wings glued together. Fit is good here.
That's it for now. Construction should be finished tomorrow if something terrible doesn't happen (and I bet it will now I have typed that)..
Cheers all
Warren
You may be right, I may be crazy.
England - South East, United Kingdom
Joined: August 15, 2012
KitMaker: 408 posts
AeroScale: 365 posts
Posted: Saturday, November 23, 2013 - 03:04 AM UTC
Now I've got the Phantom out of the way, time to finish this beast. Despite my best efforts at widening the nose, and shimming the rear of the cabin, The canopy transparency still overhangs slightly, so I've had to fair it in with milliput.:

On the workbench
National Pride - 1/72 BAe Nimrod MR2.P
Tiger Meet! - 1/72 Panavia Tornado ECR (Luftwaffe)
Airfix III - 1/72 Hawker Hunter FGA.9
Hairy Brush - 1/72 P-51D Mustang
Mustang 75 - 1/72 P-51D "Ferocious Frankie"
South Australia, Australia
Joined: August 14, 2007
KitMaker: 5,926 posts
AeroScale: 2,201 posts
Posted: Monday, November 25, 2013 - 07:26 PM UTC
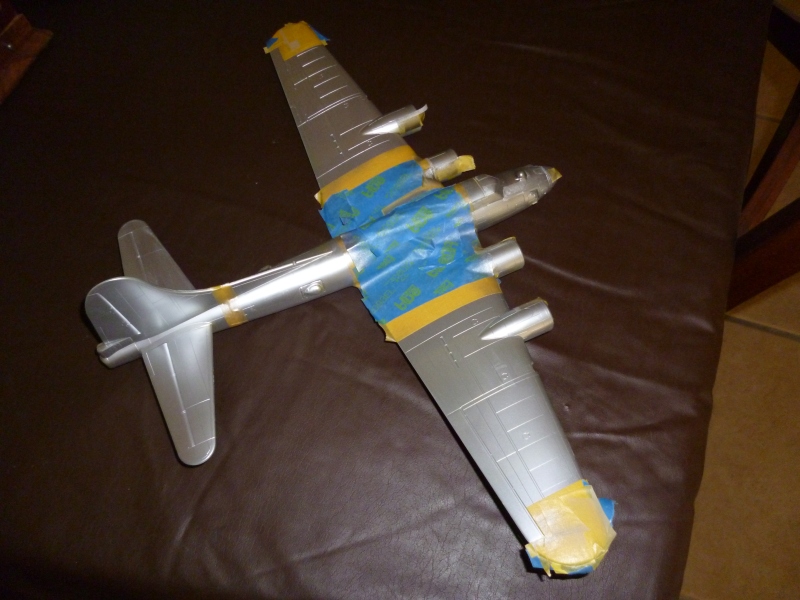
The SB-17 is progressing well. Not much filler needed so far. Needed a bit of fettling to avoid having lots of filler on the left hand wing root.
Ready for masking
Engines ready
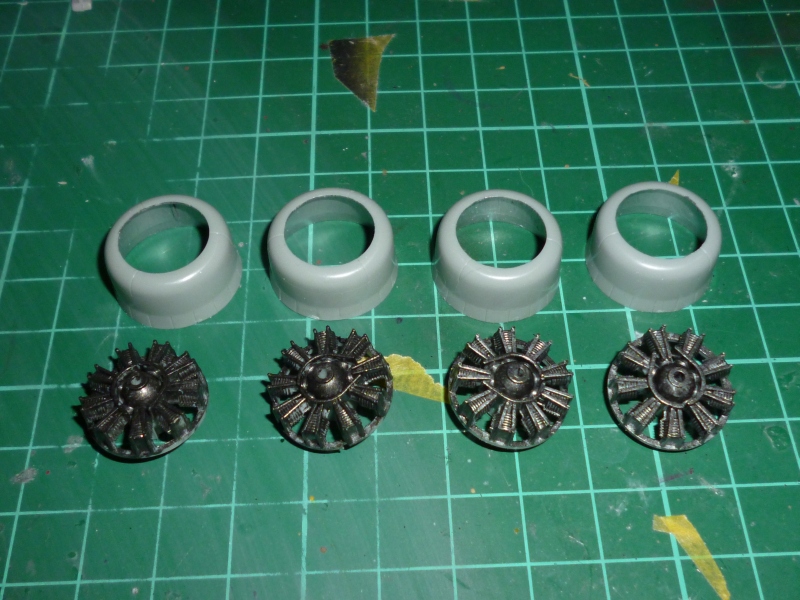
Boat built...
Masking should happen tomoroow. No one makes masks for Academy B-17s so it is Maskol and tape fun-time!
Cheers
Warren
You may be right, I may be crazy.
South Australia, Australia
Joined: August 14, 2007
KitMaker: 5,926 posts
AeroScale: 2,201 posts
Posted: Tuesday, November 26, 2013 - 06:49 PM UTC
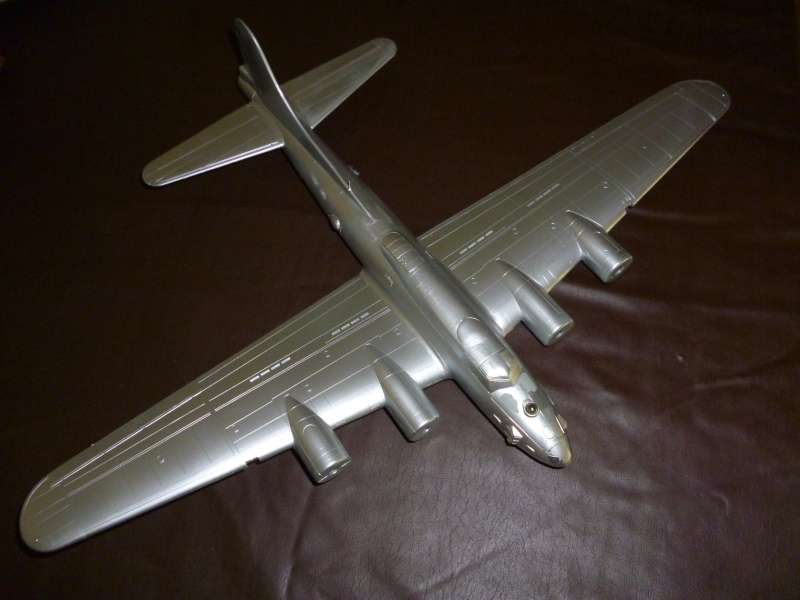
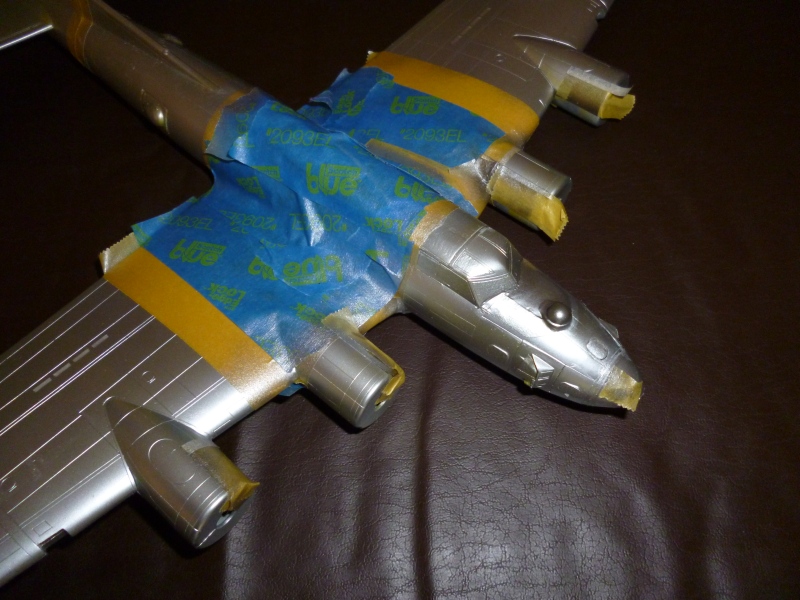
Well the SB is all masked up and ready for some paint..
I eventually used an Eduard Mask set but started masking the hard way until I remembered that I may have had an extra st for my Academy B-17F 'Memphis Belle', and when I finally went out and checked bingo there was one there!
That is lucky as everyone with decent p[ricing for postage seemed to be out of stock and I was getting frustrated trying the other way.
Will shoot it with some Model-Air Aluminium thinned with water tomorrow. No shininess here as the finish would have been nice and dull after sitting in the elements for years.
Cheers
Warren
You may be right, I may be crazy.
South Australia, Australia
Joined: August 14, 2007
KitMaker: 5,926 posts
AeroScale: 2,201 posts
Posted: Wednesday, November 27, 2013 - 08:06 PM UTC
Looks great doesn't it.. but it just flatters to deceive.. For some reason as soon as you put masking tape on it it lifts off..

I then tried to cover it with future to protect it but the future went all weird and wouldn't spread out evenly and formed puddles.. ARGH!!
So, tomorrow I will be spraying the yellow on the parts that need to be yellow, then waiting 24 hours till that dries then I will mask the yellow up and paint the silver.. again..
You may be right, I may be crazy.
South Australia, Australia
Joined: August 14, 2007
KitMaker: 5,926 posts
AeroScale: 2,201 posts
Posted: Thursday, November 28, 2013 - 08:48 PM UTC
Am I the only one still building for this campaign??
The SB-17 has been hidden in a cupboard for a few days while the nice Gunze H329 Yellow cures 100%. I hate getting finger prints in paint even days after you have sprayed it.. and I hate it even more when paint lifts with masking tape..

Cheers all
Warren
You may be right, I may be crazy.
New York, United States
Joined: March 08, 2010
KitMaker: 3,662 posts
AeroScale: 174 posts
Posted: Thursday, November 28, 2013 - 11:59 PM UTC
Quoted Text
Am I the only one still building for this campaign??
Cheers all
Warren
Warren your SB-17 is looking good

I'm still building here need to put the last few red warning strips around the tail rotor of my Bell an then a little touch up. I'll try and get some photos up later


Active Campaigns on the bench:
Operation Fall Gelb - Pz.Kpfw. IV Ausf. C
Engineering the Future - M-26 Recovery Vehicle
115 Campaigns completed

#259
Massachusetts, United States
Joined: October 23, 2011
KitMaker: 2,265 posts
AeroScale: 1,715 posts
Posted: Friday, November 29, 2013 - 09:40 AM UTC
Warren, you are amazingly prolific!
I expect to have some time in December for model building. I have work to do on my NAVY SAR Albrosses and hope to finish this campaign, though I have de-listed from some others.
South Australia, Australia
Joined: August 14, 2007
KitMaker: 5,926 posts
AeroScale: 2,201 posts
Posted: Sunday, December 01, 2013 - 07:41 PM UTC
Some prolificy... (is that a word?)
I have finished painting the beasty but have encountered a problem I get a fair bit and I have no idea how to stop it.
As you can see the aircraft was all masked up using proper masking tape...
Silver is sprayed agin and all is right with the world.. until I remove the masking tape from the yellow..
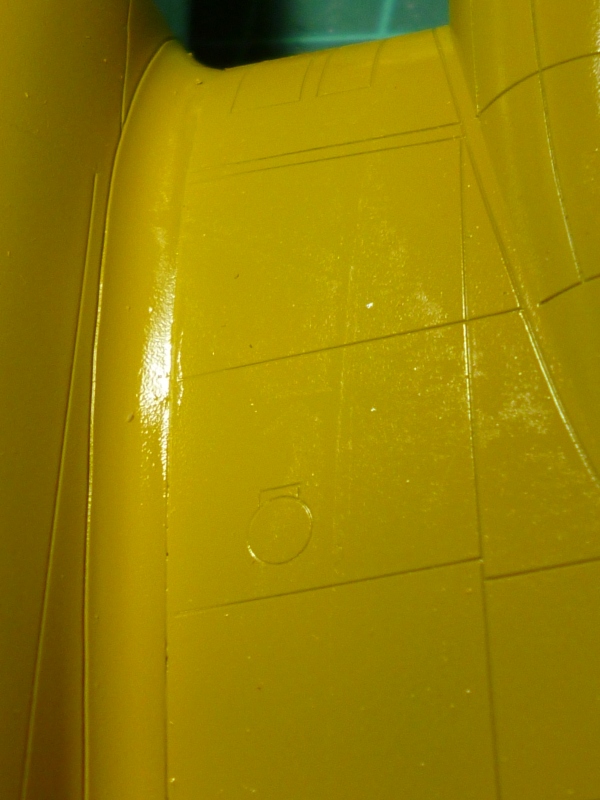
I am not sure if you can see it or not but where the masking tape was on the paint it has left a texture which has destroyed the shine of the paint and makes it look very dull.. Might be OK on matt but on gloss yellow not so good. Does any one know what causes this?
Cheers
Warren
You may be right, I may be crazy.
British Columbia, Canada
Joined: September 03, 2009
KitMaker: 6,965 posts
AeroScale: 6,247 posts
Posted: Sunday, December 01, 2013 - 07:57 PM UTC
It's likely that the tape's adhesive reacted with the paint. Gloss paint takes forever to cure completely, and even when it feels dry to the touch it really isn't. Try polishing it out with cut polish from your local automotive shop.
When once you have tasted flight you will walk the Earth with your eyes turned skyward.
For there you have been, and there you will always long to return.
-Leonardo Da Vinci
South Australia, Australia
Joined: August 14, 2007
KitMaker: 5,926 posts
AeroScale: 2,201 posts
Posted: Monday, December 02, 2013 - 11:06 AM UTC
Quoted Text
It's likely that the tape's adhesive reacted with the paint. Gloss paint takes forever to cure completely, and even when it feels dry to the touch it really isn't. Try polishing it out with cut polish from your local automotive shop.
I cured the problem.. Just sprayed a coat of Tamiya Clear over the yellow and all marks disappeared.
You may be right, I may be crazy.
New York, United States
Joined: March 08, 2010
KitMaker: 3,662 posts
AeroScale: 174 posts
Posted: Monday, December 02, 2013 - 02:50 PM UTC
@ Warren sorry to here you are having so much trouble with the masking. I painted my silver 1st as well I used Diluted Tamiya Chrome silver and hand no problems hope it all works out for you

I am ready to call my Bell finished

Top rotor is a little tilted it supported with a piece of paperclip melted into the plastic


I'll try and get some better shots tomorrow in natural light comments and criticism is always welcome
Active Campaigns on the bench:
Operation Fall Gelb - Pz.Kpfw. IV Ausf. C
Engineering the Future - M-26 Recovery Vehicle
115 Campaigns completed
South Australia, Australia
Joined: August 14, 2007
KitMaker: 5,926 posts
AeroScale: 2,201 posts
Posted: Monday, December 02, 2013 - 06:41 PM UTC
It has all come out fine in the end for both of us by the look of it Sal.
Just one thing, is the rotor supposed to be canted over to the left like that?
Cheers
Warren
You may be right, I may be crazy.
South Australia, Australia
Joined: August 14, 2007
KitMaker: 5,926 posts
AeroScale: 2,201 posts
Posted: Tuesday, December 03, 2013 - 08:51 PM UTC
You may be right, I may be crazy.
Ontario, Canada
Joined: February 04, 2008
KitMaker: 2,507 posts
AeroScale: 1,814 posts
Posted: Tuesday, December 03, 2013 - 11:33 PM UTC
Good job Warren!

" The Die Hards"
43rd MIDDLESEX REGIMENT
MACHINE GUN CORPS
XXX CORP
The most effective way to do it, is to do it.
- Amelia Earhart
Alberta, Canada
Joined: April 07, 2010
KitMaker: 1,028 posts
AeroScale: 939 posts
Posted: Wednesday, December 04, 2013 - 02:31 AM UTC
Looks really nice, Warren. I'm always impressed by your prolific modeling skills.
To prevent being called an 'expert', screw something up good every now and again.
#259
Massachusetts, United States
Joined: October 23, 2011
KitMaker: 2,265 posts
AeroScale: 1,715 posts
Posted: Wednesday, December 04, 2013 - 03:59 AM UTC
Quoted Text
I'll try and get some better shots tomorrow in natural light comments and criticism is always welcome
that's fabulous! As a kid growing up in the 70s, I cant tell you how important MASH was to me. it seems silly now, dam TV anyway - but in any event -
that model is just perfect and evokes all the same spirits.
South Australia, Australia
Joined: August 14, 2007
KitMaker: 5,926 posts
AeroScale: 2,201 posts
Posted: Wednesday, December 04, 2013 - 07:53 AM UTC
You may be right, I may be crazy.
England - South East, United Kingdom
Joined: August 15, 2012
KitMaker: 408 posts
AeroScale: 365 posts
Posted: Thursday, December 05, 2013 - 03:31 AM UTC
Quoted Text
Am I the only one still building for this campaign??
Warren
Nope - I'm still here, up to my eyeballs in masking tape. Another week on this one (minus 4 days in Belgium) and I'll be finished.

Well done Warren, that is one smart looking fort!
On the workbench
National Pride - 1/72 BAe Nimrod MR2.P
Tiger Meet! - 1/72 Panavia Tornado ECR (Luftwaffe)
Airfix III - 1/72 Hawker Hunter FGA.9
Hairy Brush - 1/72 P-51D Mustang
Mustang 75 - 1/72 P-51D "Ferocious Frankie"
England - East Midlands, United Kingdom
Joined: February 07, 2004
KitMaker: 911 posts
AeroScale: 415 posts
Posted: Sunday, December 08, 2013 - 02:45 AM UTC
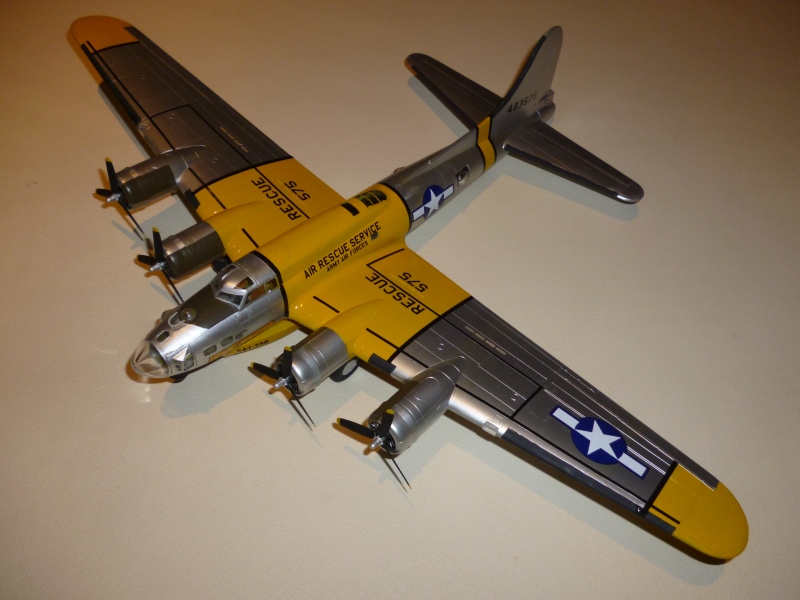
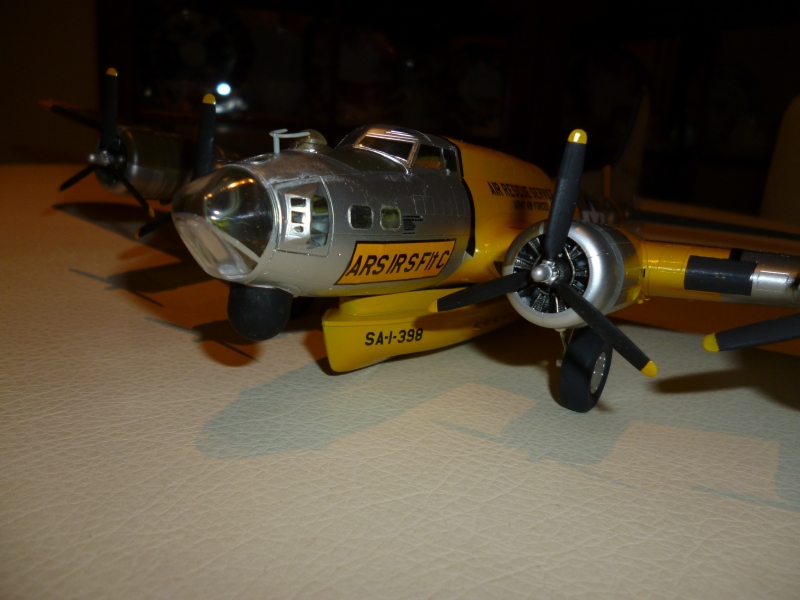
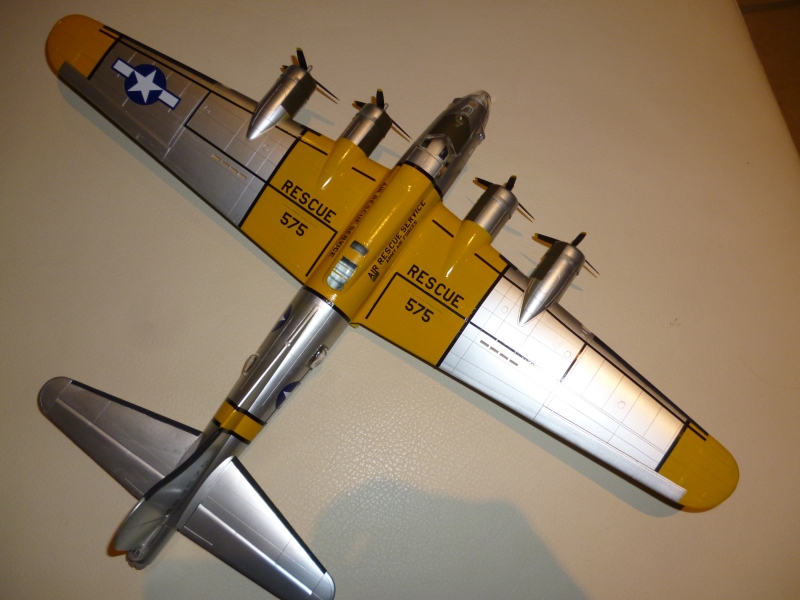
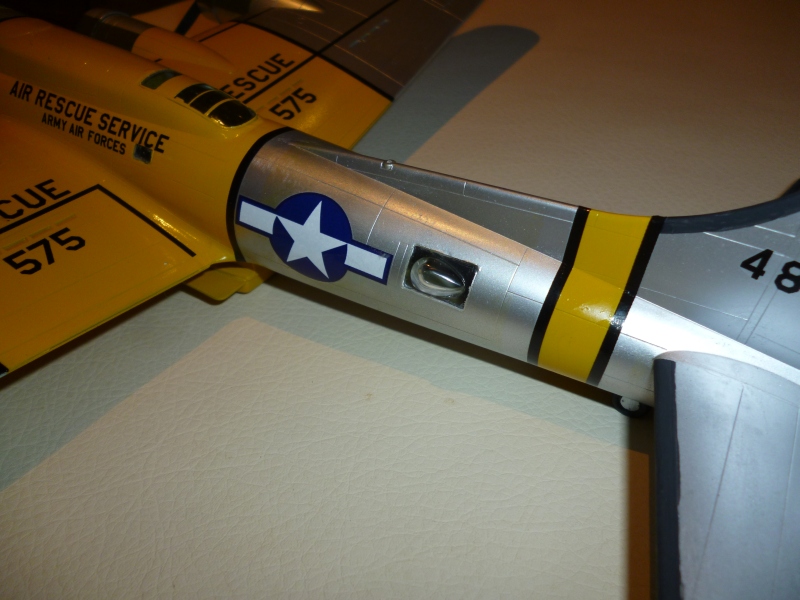
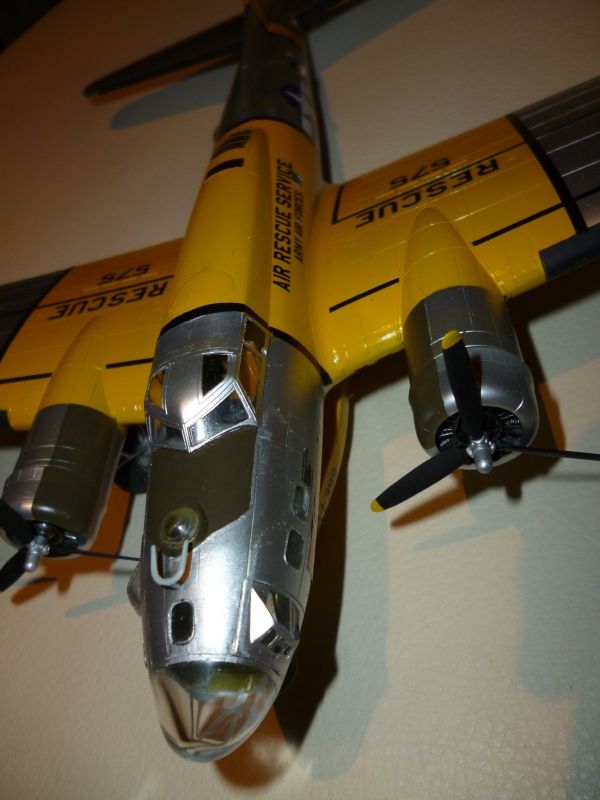
Warren, that SB-17 is absolutely gorgeous! You should definately enter it into the December model of the month comp.
"Nelson be damned.......Lets get the hell out of here!"
Stockholm, Sweden
Joined: October 24, 2012
KitMaker: 202 posts
AeroScale: 92 posts
Posted: Friday, December 13, 2013 - 03:09 PM UTC
Great work on that SB-17 Warren you make me want to try one for myself also pulling of a gloss yellow scheme that well takes some serious skill. Sal and Lee your work/progress looks great to.
I've also been busy painting yellow but thankfully in my case it was matt. Heres some pictures for your enjoyment.


Jakob
Ontario, Canada
Joined: February 04, 2008
KitMaker: 2,507 posts
AeroScale: 1,814 posts
Posted: Saturday, December 14, 2013 - 03:18 AM UTC
Tail and cockpit are on time for some more primer.

" The Die Hards"
43rd MIDDLESEX REGIMENT
MACHINE GUN CORPS
XXX CORP
The most effective way to do it, is to do it.
- Amelia Earhart
Stockholm, Sweden
Joined: October 24, 2012
KitMaker: 202 posts
AeroScale: 92 posts
Posted: Monday, December 16, 2013 - 02:13 PM UTC