


Air Campaigns
Want to start or join a group build? This is where to start.
Want to start or join a group build? This is where to start.
Hosted by Frederick Boucher, Michael Satin
OFFICIAL: Rescue Me Campaign

ljames0874

Joined: August 15, 2012
KitMaker: 408 posts
AeroScale: 365 posts

Posted: Friday, September 06, 2013 - 05:29 PM UTC
Hi Everyone! The move finally happened on August 23rd, and we have just got our internet connection restored. Now that the dust has settled, I have been able to start work on my Sea King. I have acquired a bit of aftermarket, namely PJ Productions SAR Sea King crew set, and a frame of photo etch from Airwaves. As to the kit itself, it needs a lot of TLC. It is old school Airfix all the way (most of the moulding dates from 1969!), and as such, there are a lot of unsightly ejector pin marks in not very useful places, and more flash than the average movie premiere! There is one newly tooled sprue, and a sheet of the now standard Cartograf decals.

RedwingNev

Joined: February 07, 2004
KitMaker: 911 posts
AeroScale: 415 posts

Posted: Friday, September 06, 2013 - 09:01 PM UTC
Good luck with the Airfix Sea King, it's um....... challenging 
ljames0874
Joined: August 15, 2012
KitMaker: 408 posts
AeroScale: 365 posts
Posted: Monday, September 16, 2013 - 10:48 PM UTC
Here we go with a little progress report on the Sea King. Cockpit is assembled and painting is underway. In typical fashion, I have made a rod for my own back, by building it with the side door open, with rescue crew standing in the doorway. This means there is a little scratch building to be done, though I am limiting it to just what can be seen in the doorway, in the picture below:


ljames0874
Joined: August 15, 2012
KitMaker: 408 posts
AeroScale: 365 posts
Posted: Sunday, October 06, 2013 - 01:59 AM UTC
Hmmm, seems to have gone very quiet on this campaign.... anyone alive out there?
Anyway, work continues on the Sea King. It really is a dog of a kit, every time I attach a part, I am finding another little job to do. Most of the fuselage windows have gaps around the edges to fill. I spent yesterday scratch building folded bench seats:
...and here they are, painted and fitted:

Having read a number of build logs for this kit, I knew there was a major fit issue on the nose. If you glue and clamp the nose gap together, then the cockpit canopy overhangs quite badly on both sides. I plan to fill the gap and smooth it all off. One half of the nose was a bit warped, so I had to drill and pin it on one side, so it is level across the nose:

The next piece with the searchlights under the nose also has fit issues, so there is lots and lots of filling to do:

Here you can see how test fitting the canopy shows how badly it fits, plasticard shims will be the way forward, methinks:

Apart from that, it's going great!
Anyway, work continues on the Sea King. It really is a dog of a kit, every time I attach a part, I am finding another little job to do. Most of the fuselage windows have gaps around the edges to fill. I spent yesterday scratch building folded bench seats:
...and here they are, painted and fitted:
Having read a number of build logs for this kit, I knew there was a major fit issue on the nose. If you glue and clamp the nose gap together, then the cockpit canopy overhangs quite badly on both sides. I plan to fill the gap and smooth it all off. One half of the nose was a bit warped, so I had to drill and pin it on one side, so it is level across the nose:
The next piece with the searchlights under the nose also has fit issues, so there is lots and lots of filling to do:
Here you can see how test fitting the canopy shows how badly it fits, plasticard shims will be the way forward, methinks:
Apart from that, it's going great!
RedwingNev
Joined: February 07, 2004
KitMaker: 911 posts
AeroScale: 415 posts
Posted: Sunday, October 06, 2013 - 06:41 AM UTC
I did warn you it was challenging!
ljames0874
Joined: August 15, 2012
KitMaker: 408 posts
AeroScale: 365 posts
Posted: Sunday, October 06, 2013 - 11:20 PM UTC
HELP! I've had a little disaster this morning. I have attempted to tint the upper windows in my Sea King's canopy transparency, using Humbrol clear green, which I thinned with cellulose thinners. As soon as I brushed it onto the transparency, it went cloudy, like this:

Can anyone tell me what I did wrong, and more importantly, how to fix it? Thanks in advance!
Can anyone tell me what I did wrong, and more importantly, how to fix it? Thanks in advance!
RedwingNev
Joined: February 07, 2004
KitMaker: 911 posts
AeroScale: 415 posts
Posted: Monday, October 07, 2013 - 05:46 AM UTC
I'm guessing it was the cellulose thinnners. I use Tamiya clear green and brush it straight on.
As for fixing it, you're probably going to have to sand off the top layer of plastic, then use something like the Mastercasters polishing sponges
http://www.mastercasters.co.uk/5.html
As for fixing it, you're probably going to have to sand off the top layer of plastic, then use something like the Mastercasters polishing sponges
http://www.mastercasters.co.uk/5.html
ljames0874
Joined: August 15, 2012
KitMaker: 408 posts
AeroScale: 365 posts
Posted: Monday, October 07, 2013 - 08:57 AM UTC
Cheers for that Neil, at first I thought that the cellulose thinners had reacted with the cyano I stuck the photo etch on with. I've ordered the Tamiya paint, by the time that turns up I should have sanded and polished it back to clear. Oh well, back to Phantom land I go!
ljames0874
Joined: August 15, 2012
KitMaker: 408 posts
AeroScale: 365 posts
Posted: Saturday, October 12, 2013 - 09:34 PM UTC
Hello boys and girls, welcome to part 6 of my series, entitled "Polishing a turd". I managed to sand the canopy back, and polish it up to something like clear. The Tamiya clear green works a treat (phew!), and I've made a shim for the back of the canopy, which can be seen below. I have attached the front of the engine housing, which required a lot of filler to blend in. The angled piece next to the canopy in the picture, is the piece of flash that was attached to the engine housing. The last time I saw that much flash it was on a vacformed kit!

Oh well, onwards and upwards, now where did I put that emergency tube of filler?
Oh well, onwards and upwards, now where did I put that emergency tube of filler?

ltb073

Joined: March 08, 2010
KitMaker: 3,662 posts
AeroScale: 174 posts
Posted: Saturday, October 26, 2013 - 05:48 AM UTC
Some slow going here looks like the only one making any progress is Lee James 
But I hope to be joining in with my build soon here is my start up photo

It will be built with stretchers that will replace the rocket pods and of course the Red Cross markings
But I hope to be joining in with my build soon here is my start up photo

It will be built with stretchers that will replace the rocket pods and of course the Red Cross markings

J8kob_F

Joined: October 24, 2012
KitMaker: 202 posts
AeroScale: 92 posts
Posted: Thursday, October 31, 2013 - 01:20 AM UTC
Nice work gentlemen!
I have started on a rescue Wessex as well. The plan from the beginning was to build a super puma for this campaign but after picking up the new HAS.3 from Italeri I soon changed my mind. The plan is to build an yellow chopper that has been abandoned. Heres my progress, I added some detail in the cabin area, the Italeri kit is really nice.


Cheers
Jakob
I have started on a rescue Wessex as well. The plan from the beginning was to build a super puma for this campaign but after picking up the new HAS.3 from Italeri I soon changed my mind. The plan is to build an yellow chopper that has been abandoned. Heres my progress, I added some detail in the cabin area, the Italeri kit is really nice.
Cheers
Jakob
J8kob_F
Joined: October 24, 2012
KitMaker: 202 posts
AeroScale: 92 posts
Posted: Friday, November 01, 2013 - 12:17 AM UTC
Another quick update!
I have painted and weathered the interior and next step is adding a couple of leaves, beer bottles and close the fuselage up and painting the exterior.


Cheers
Jakob
I have painted and weathered the interior and next step is adding a couple of leaves, beer bottles and close the fuselage up and painting the exterior.
Cheers
Jakob
ltb073
Joined: March 08, 2010
KitMaker: 3,662 posts
AeroScale: 174 posts
Posted: Friday, November 01, 2013 - 08:44 AM UTC
@ Jakob nice progress on your interior
Here is where im at

some flash and seam lines that need to be cleaned bit its progress
Here is where im at

some flash and seam lines that need to be cleaned bit its progress

JClapp

#259
Joined: October 23, 2011
KitMaker: 2,265 posts
AeroScale: 1,715 posts

Posted: Sunday, November 03, 2013 - 10:10 AM UTC
After I pulled the masks on my first Albatross, I realized I would need to do more masking and painting, so the project went into a box. You know how that can be. Now, since I know Im painting these colors again soon, and just a tiny squirt of each, I decided to build a second plane. I got a good days work done today. Im happy with these little Amodel kits.

Since Ive built the first one I realize the interior can be dispensed with. Even enlarging the windows, it is impossible to make out anything in the cabin.
Since Ive built the first one I realize the interior can be dispensed with. Even enlarging the windows, it is impossible to make out anything in the cabin.


windysean
Joined: September 11, 2009
KitMaker: 1,917 posts
AeroScale: 563 posts
Posted: Monday, November 04, 2013 - 01:41 AM UTC
Lee, I finished that kit in the original Hangar Queen campaign, with heavy modifications. I definitely feel your pain! 
-Sean H
-Sean H
J8kob_F
Joined: October 24, 2012
KitMaker: 202 posts
AeroScale: 92 posts
Posted: Thursday, November 07, 2013 - 04:35 AM UTC
Another little update! First of the kit is little of a mixed blessing the interior looks great with a little work and the fit of the interior in the fuselage halves are great. The fit of the two fuselage halves are however a different story and the panel lines and rivet detail is gone in some places but thats nothing you cant work around. I have just finished the interior and I added some more weathering, leaves and there are also some cigarettes in there if you look closely. So here are the pics for your enjoyment, please comment:


And good work everyone!
Cheers
Jakob
And good work everyone!
Cheers
Jakob
ltb073
Joined: March 08, 2010
KitMaker: 3,662 posts
AeroScale: 174 posts
Posted: Saturday, November 09, 2013 - 01:36 PM UTC
Jakob your interior is looking real good is that leaves that have blown into your helo 
I have made some progress on my Bell

I added some seat belts and stretcher belts and I like that the kit came with a decal for the instrument panel
I have made some progress on my Bell

I added some seat belts and stretcher belts and I like that the kit came with a decal for the instrument panel
J8kob_F
Joined: October 24, 2012
KitMaker: 202 posts
AeroScale: 92 posts
Posted: Wednesday, November 13, 2013 - 08:02 AM UTC
Quoted Text
Jakob your interior is looking real good is that leaves that have blown into your helo
I have made some progress on my Bell
I added some seat belts and stretcher belts and I like that the kit came with a decal for the instrument panel
Thanks Sal! Yeah it's suppose to be leaves (it's actually real leaves). The chopper has been left with the door into the cockpit open thus leaves blows into it.
Jakob

Jessie_C


Joined: September 03, 2009
KitMaker: 6,965 posts
AeroScale: 6,247 posts

Posted: Wednesday, November 13, 2013 - 08:36 AM UTC
Quoted Text
Yeah it's suppose to be leaves (it's actually real leaves). The chopper has been left with the door into the cockpit open thus leaves blows into it.
It needs a bird nest or two...
J8kob_F
Joined: October 24, 2012
KitMaker: 202 posts
AeroScale: 92 posts
Posted: Wednesday, November 13, 2013 - 08:53 AM UTC
Quoted Text
Quoted TextYeah it's suppose to be leaves (it's actually real leaves). The chopper has been left with the door into the cockpit open thus leaves blows into it.
It needs a bird nest or two...
Yeah, i saw the H-21 build here and thought about it but the task off scratching a bird seems a little daunting to me. But maybe...
Jakob
Jessie_C
Joined: September 03, 2009
KitMaker: 6,965 posts
AeroScale: 6,247 posts
Posted: Wednesday, November 13, 2013 - 09:13 AM UTC
Quoted Text
Yeah, i saw the H-21 build here and thought about it but the task off scratching a bird seems a little daunting to me. But maybe...
Well it doesn't need to have a whole bird, and a nest is easy enough to make from stretched sprue and fishing line.
J8kob_F
Joined: October 24, 2012
KitMaker: 202 posts
AeroScale: 92 posts
Posted: Wednesday, November 13, 2013 - 10:45 AM UTC
Quoted Text
Quoted TextYeah, i saw the H-21 build here and thought about it but the task off scratching a bird seems a little daunting to me. But maybe...
Well it doesn't need to have a whole bird, and a nest is easy enough to make from stretched sprue and fishing line.
You mean i could have half a bird
. Thanks for answering the question about making a nest, been looking all over the internet to find a guide. Jakob

warreni

Joined: August 14, 2007
KitMaker: 5,926 posts
AeroScale: 2,201 posts
Posted: Sunday, November 17, 2013 - 09:13 PM UTC
Hello Everyone.
Nice builds happening here. I don't remember having any trouble with my turd, the Airfix Sea King.. but I did build it about 35 years ago.. The Fujimi one is excellent..
Be that as it may I present to you my entry in this Campaign, Academy's 1/72 Boeing SB-17G of the Air Rescue Service.
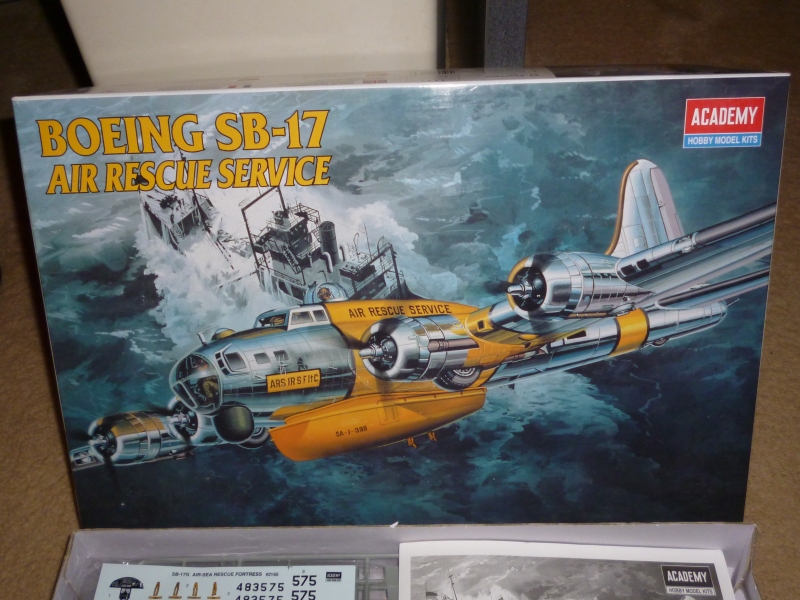
It is a largish aircraft but the parts count is very low as all the armament has been removed from these aircraft, no bombs no nuffin..
I was considering a Felixstowe F.2A from Roden but it seems it was never used for rescuing anyone, just long, boring U-Boat patrols.. that got very exciting all of a sudden when the German W.29 floatplanes turned up and started downing the boats at a great rate of knots.
So the SB-17G it is with the lifeboat slung under the fuselage.
Something a little different to the usual helicopters..
Cheers everyone
Warren
Nice builds happening here. I don't remember having any trouble with my turd, the Airfix Sea King.. but I did build it about 35 years ago..
The Fujimi one is excellent.. Be that as it may I present to you my entry in this Campaign, Academy's 1/72 Boeing SB-17G of the Air Rescue Service.
It is a largish aircraft but the parts count is very low as all the armament has been removed from these aircraft, no bombs no nuffin..
I was considering a Felixstowe F.2A from Roden but it seems it was never used for rescuing anyone, just long, boring U-Boat patrols.. that got very exciting all of a sudden when the German W.29 floatplanes turned up and started downing the boats at a great rate of knots.
So the SB-17G it is with the lifeboat slung under the fuselage.
Something a little different to the usual helicopters..
Cheers everyone
Warren
warreni
Joined: August 14, 2007
KitMaker: 5,926 posts
AeroScale: 2,201 posts
Posted: Monday, November 18, 2013 - 09:19 PM UTC
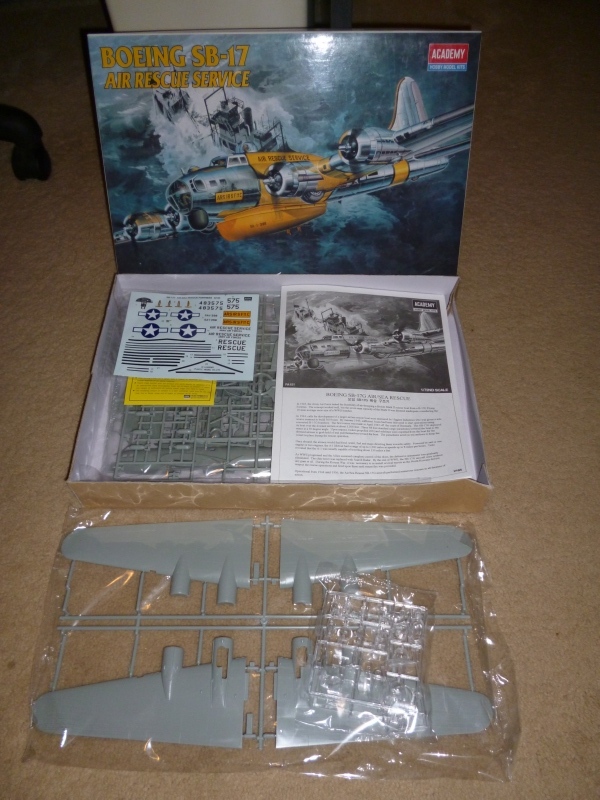
Got the SB-17G started today..
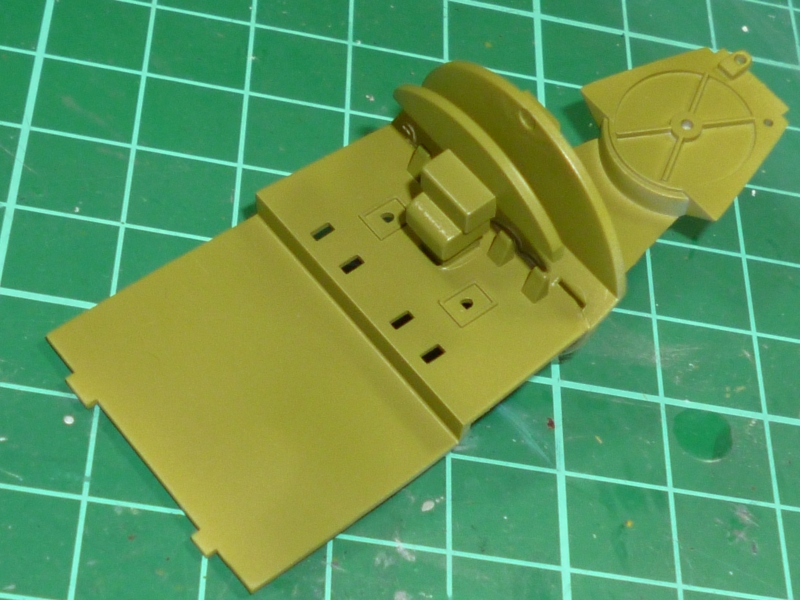

Just got the cockpit area basics done and the various areas painted zinc chromate green.
Cheers
Warren
Just got the cockpit area basics done and the various areas painted zinc chromate green.
Cheers
Warren
ltb073
Joined: March 08, 2010
KitMaker: 3,662 posts
AeroScale: 174 posts
Posted: Tuesday, November 19, 2013 - 01:33 AM UTC
@ Warren that is a cool kit  I build that for the SAR Campaign a few years ago and really enjoyed it. Have you given any thought to what you are gonna do for the yellow
  I use cheap craft store acrylic thinned out with alcohol and it worked real good the color was spot on

I build that for the SAR Campaign a few years ago and really enjoyed it. Have you given any thought to what you are gonna do for the yellow I use cheap craft store acrylic thinned out with alcohol and it worked real good the color was spot on 
 |

WEB HOSTING BY


Copyright ©2021 AeroScale and Kitmaker Network, a subsidiary of Silver Star Enterprises
All Rights Reserved. Please read our Conditions of Use and Privacy Policy.
All Rights Reserved. Please read our Conditions of Use and Privacy Policy.