OFFICIAL: Looney Toons Campaign
United States
Joined: December 26, 2008
KitMaker: 288 posts
AeroScale: 195 posts
Posted: Monday, December 24, 2012 - 03:39 AM UTC
With the holiday season upon us, I think it is time to properly start this build. Revell molds their 767 fuselage halves with open windows with the idea that you will either keep these open in the finished model (rather chilly at 35K feet?)or fill them in with white glue. I prefer using window decals for my 1/144 airliners so my first step is to fill in the open spaces. With no clear parts supplied in the kit for windows, I first glued a plastic strip inside the fuselage to serve as a backdrop or dam for the putty.I found from experience that it will be easy to push the putty into the glued fuselage if you don't add the backing! I then mixed up a batch of Apoxie putty (like Milliput) and applied it from the outside. You can see the interior backing strip and the applied putty in this photo:

Once the putty is fully cured, it will be sanded smooth. I can work on other subassemblies while waiting.
Merry Christmas and Happy New Year to my fellow modelers!
Mike

England - North East, United Kingdom
Joined: October 20, 2005
KitMaker: 1,045 posts
AeroScale: 622 posts
Posted: Friday, December 28, 2012 - 11:19 PM UTC
Ive managed to do some more work on the Spitfire this morning. Got the cockpit painted, weathered and sandwiched into the fuselage. The wings are attached to the fuselage and the cowlings are all on but will need some filling. I think they were designed to be left off. The gaps are not too bad just awkward.
Will get the pics up later once I find the phone cable
Angel by day, Devil by night
United States
Joined: December 26, 2008
KitMaker: 288 posts
AeroScale: 195 posts
Posted: Saturday, December 29, 2012 - 03:44 AM UTC
One of the few problems with the Revell 767 (at least to clumsy ole me) is that Revell designed the kit to add the front landing gear as you join the two fuselage halves together. I can gaurentee that I'l break the fragile gear off before I even get the model it's first coat of paint! I checked with the Airline Modelers Group (AMD) for a solution and the best one I received was a short article from the UK IPMS publication. However, my landing gear bay did not look like the one in the article BUT it did give me an idea for a solution on how to add the gear late in the build.

I cut a small piece of Plastruct "u" shaped channel and glued it to the front of the wheel well, This will serve as a rest for one of the bottom of the gear. The other will rest on the floor (roof?) of the bay. I then added two small pieces of brass wire as additional support and followed it up with some 5 minute epoxy for additional strength. A few photos are more easier to understand!


I then cut of the small pins on the landing gear and this can be added at any time later in the build.
Have fun modeling!
Mike

England - North East, United Kingdom
Joined: October 20, 2005
KitMaker: 1,045 posts
AeroScale: 622 posts
Posted: Saturday, December 29, 2012 - 03:57 AM UTC
Here we go photographic evidence that I actually managed to get the work on the Spitfire done. Actually Ive had a productive day all round for once

Angel by day, Devil by night

#042
England - North East, United Kingdom
Joined: November 18, 2006
KitMaker: 2,828 posts
AeroScale: 1,720 posts
Posted: Monday, December 31, 2012 - 11:06 AM UTC
Modellers Creed: This is my toolbox. There are many like it, but this one is mine. My toolbox is my best friend. It is my life. I must master it as I must master my life. My toolbox, without me, is useless. Without my toolbox, I am useless.
United States
Joined: December 26, 2008
KitMaker: 288 posts
AeroScale: 195 posts
Posted: Tuesday, January 01, 2013 - 03:51 AM UTC
I am almost ready to close things up on my B767. First, I needed to add some noseweight to keep the 767 from sitting on its tail. I added a lead fishing weight on top of the front landing gear bay and used 5 minute epoxy to seal everything nice and tight.

Hope everyone has started the New Year off well!
Mike
#047
England - East Anglia, United Kingdom
Joined: September 13, 2005
KitMaker: 2,016 posts
AeroScale: 475 posts
Posted: Wednesday, January 02, 2013 - 03:23 AM UTC
Greetings team

Well done Sam ,that spits flying together

whos the little dude in your last pic,he looks cool
Mike ,where are the crew going to sit?,some loonies dumped a great big lead ball up the front

Allen, Have you got shares in the ACME clamp company
All looking great chums
Andy
Major Caryle,
"Shall we have a go at the far end now,sir?"
Lt Colonel "Johnny" Frost,
"Having a go,is hardly text book terminology Harry"
Major Caryle,
"But you'll let us try sir?"
A Bridge Too Far
Lottery Campaign "Oh de Vichy"
England - North East, United Kingdom
Joined: October 20, 2005
KitMaker: 1,045 posts
AeroScale: 622 posts
Posted: Wednesday, January 02, 2013 - 04:00 AM UTC
Was flying together but noe trying to build up the enthusiasm to start filling the wings where the clear part pannels located and some of the other pannels fit didn't look or feel too bad just plastic but far more obvious now primmed

Hopefully will start filling this weekend but someone came off her horse yesterday in a spectacular way (I have not fallen off in almost a year) and struggling to sit at the moment done my back and left side/ hip again so once I can sit will be back at the bench.
The little guy in the background is one of the minions from the film 'Despicable Me'. He is a kit by retrokit and Allen got him for me for Christmas the model is entitled 'Bananaaaaa'. I think most the Bulldogs picked the kit up at Telford but by the time I went to buy one late Saturday afternoon as we arrived Saturday lunch time they had all been sold

 meet the minions banana
 Angel by day, Devil by night
United States
Joined: December 26, 2008
KitMaker: 288 posts
AeroScale: 195 posts
Posted: Saturday, January 19, 2013 - 04:15 AM UTC
Hi ! I am back again with a short update on my 767 build. I now have the fuselage together and am working slowly to fill in the seems and flaws around the fusleage. The two parts of the fuselage are quite long and I have several sections that were slightly warped on the top & bottom. This is one of the sloooow times of building an airliner so I wil be stuck at this stage for a bit. Unfortunately, a long, white fuselage without wings is pretty boring so I did not take a photo of it.
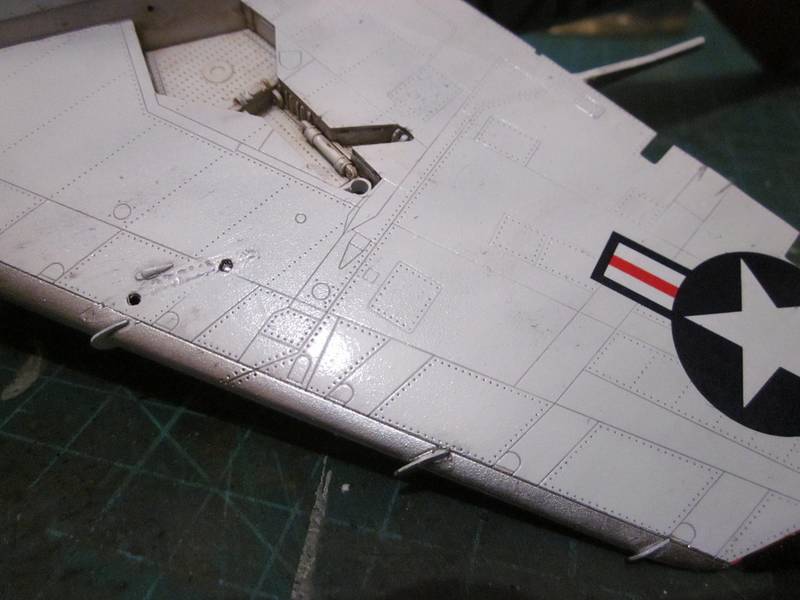
I did record some work I am doing on the wing at the same time. I wanted to add a little visual interest to the wing so I decided to cut out the two position lights on each wing and substitute some clear colored plastic. Here is the wing with the red light when adding a lump of clear pastic.

Here is the same wing tip after sanding and polishing the light.

I'll protect the light with some masking fluid as I clean up the wing and paint it. The other side is in green plastic of course.
Have fun modeling!
Mike
Michigan, United States
Joined: January 02, 2012
KitMaker: 139 posts
AeroScale: 70 posts
Posted: Monday, January 21, 2013 - 01:53 PM UTC
In progress:
MPC Boeing B-17G Mighty Eighth Campaign
Michigan, United States
Joined: January 02, 2012
KitMaker: 139 posts
AeroScale: 70 posts
Posted: Monday, January 21, 2013 - 02:05 PM UTC
Let me add these...


We've seen these before, I wanted to show these to be new in package. Thank you.
Once again cheers
In progress:
MPC Boeing B-17G Mighty Eighth Campaign
England - West Midlands, United Kingdom
Joined: August 01, 2012
KitMaker: 960 posts
AeroScale: 391 posts
Posted: Monday, January 28, 2013 - 05:44 PM UTC

Here is my Brewster Buffalo "Felix" from the USS Saratoga that I'll be building for this Looney Toons Campaign. It like many in my collection is an old 1964 print date, kit. The decals may be a challenge. I may need to find some aftermarket decals some place. Any help in this regard would be appreciated.
British Columbia, Canada
Joined: September 03, 2009
KitMaker: 6,965 posts
AeroScale: 6,247 posts
Posted: Monday, January 28, 2013 - 06:00 PM UTC
Hi Brent,
Starfighter Decals has what you're looking for.
When once you have tasted flight you will walk the Earth with your eyes turned skyward.
For there you have been, and there you will always long to return.
-Leonardo Da Vinci
England - West Midlands, United Kingdom
Joined: August 01, 2012
KitMaker: 960 posts
AeroScale: 391 posts
Posted: Tuesday, January 29, 2013 - 03:55 AM UTC
Jessie_C,
Thank you, I just stumbled onto the site and have the order out for the Buffalo as well as a Marine Tigercat (Monogram) an Devastator (Airfix).
Brent
#047
England - East Anglia, United Kingdom
Joined: September 13, 2005
KitMaker: 2,016 posts
AeroScale: 475 posts
Posted: Wednesday, January 30, 2013 - 02:16 AM UTC
Hi Toonies
Its been a while since I posted but what with work and PC problems plus I've lost loads of pics

its time for an update.
Its brilliant to see so many builds up and running and starting to take shape.
Heres the Demon after my most disliked part of building the masking,the main painting is done
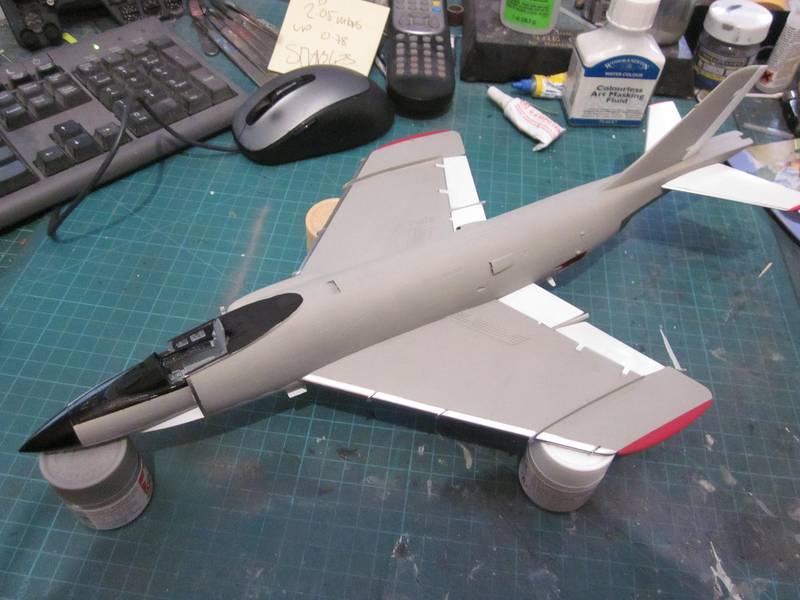
One of my favorite jobs,decals,this is where it comes to life

a splash of colour,thats why I love USN aircraft in the grey over white
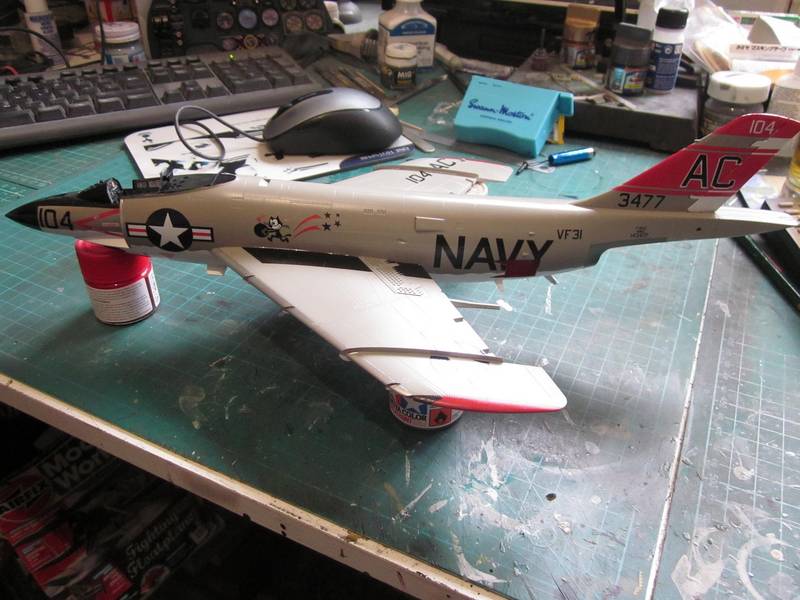
Washes next,black on the upper and grey on the lower
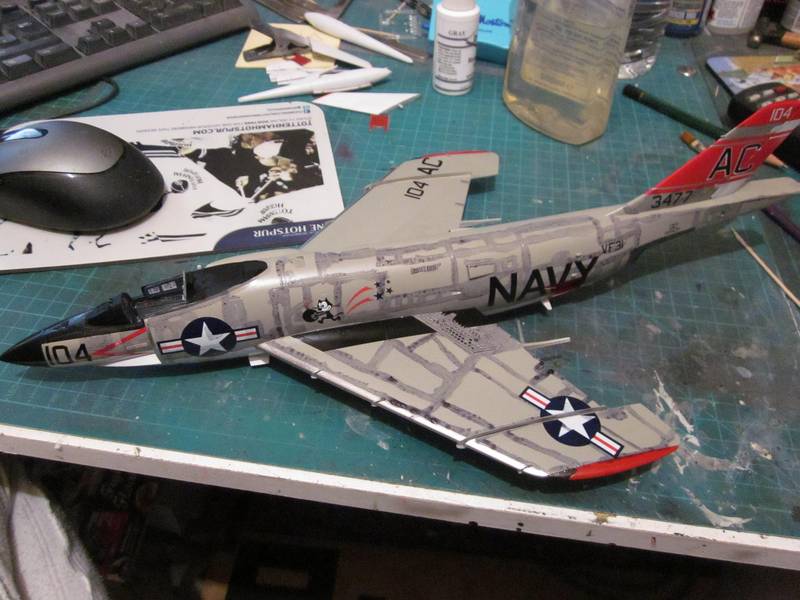
Then HEY PRESTO job done
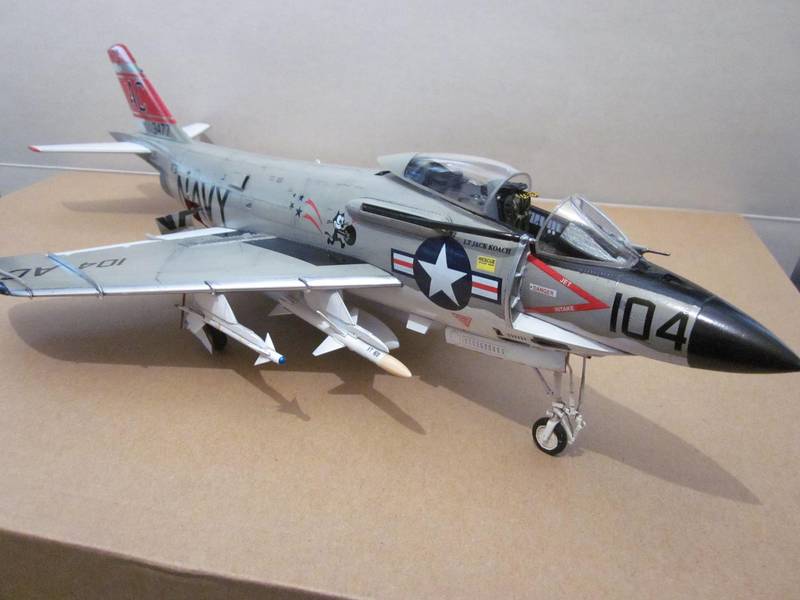
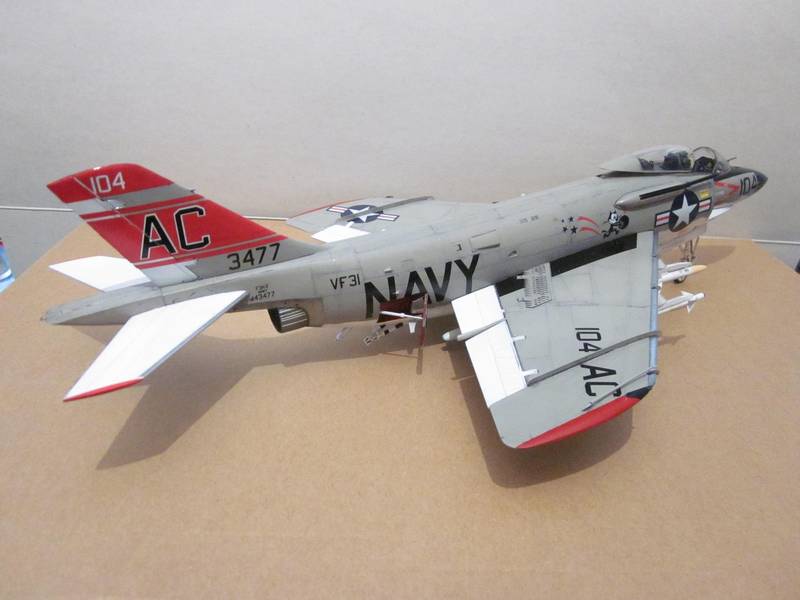
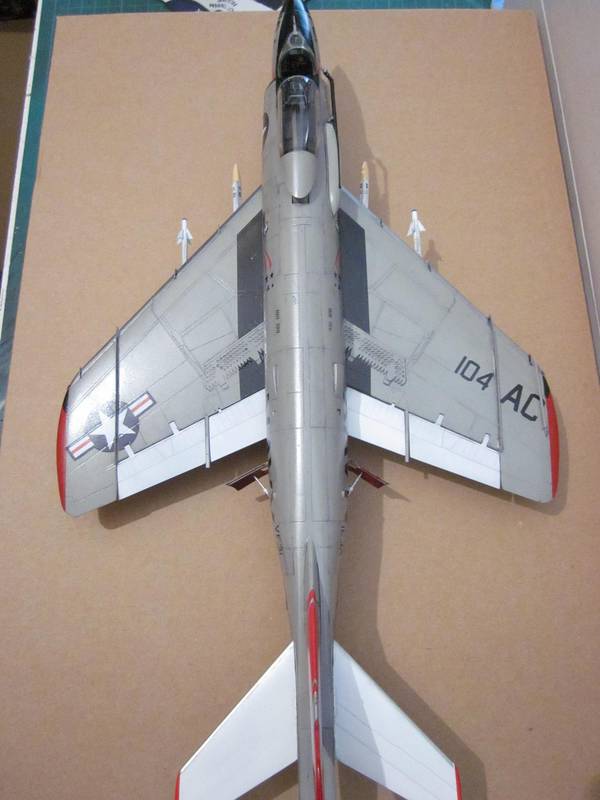
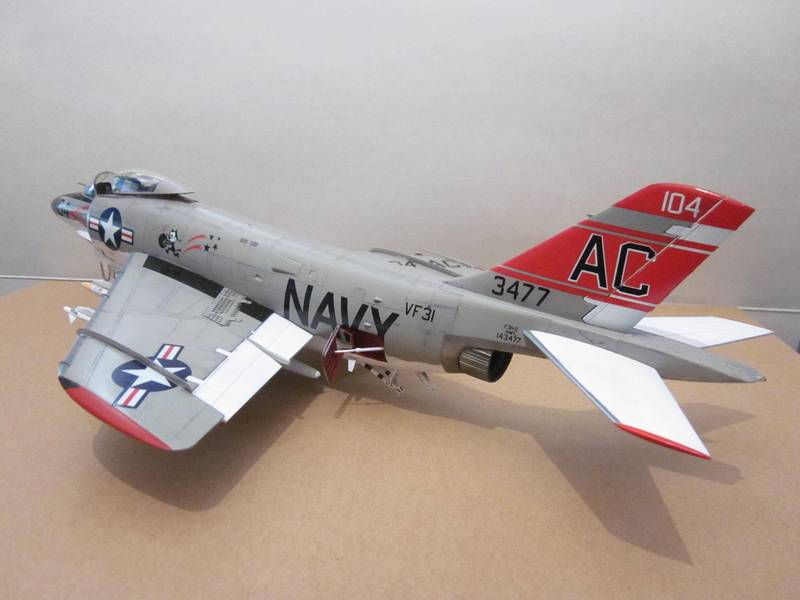
I've really enjoyed this kit ,my 1st Demon and my 1st Hobbyboss,no major problems and only a minimal amount of filler on the spine joint,the decals were perfect and went on lovely with Tamiya "Mark Fit".
I will build another one one day just because of the beautiful shape of it

ooohhhh those wings
Hope you like
Andy
Major Caryle,
"Shall we have a go at the far end now,sir?"
Lt Colonel "Johnny" Frost,
"Having a go,is hardly text book terminology Harry"
Major Caryle,
"But you'll let us try sir?"
A Bridge Too Far
Lottery Campaign "Oh de Vichy"
Michigan, United States
Joined: January 02, 2012
KitMaker: 139 posts
AeroScale: 70 posts
Posted: Thursday, January 31, 2013 - 01:20 PM UTC
I like. Cool! Painting the final colors on mine now.
FirstSergeant
In progress:
MPC Boeing B-17G Mighty Eighth Campaign
#042
England - North East, United Kingdom
Joined: November 18, 2006
KitMaker: 2,828 posts
AeroScale: 1,720 posts
Posted: Saturday, February 02, 2013 - 04:36 AM UTC
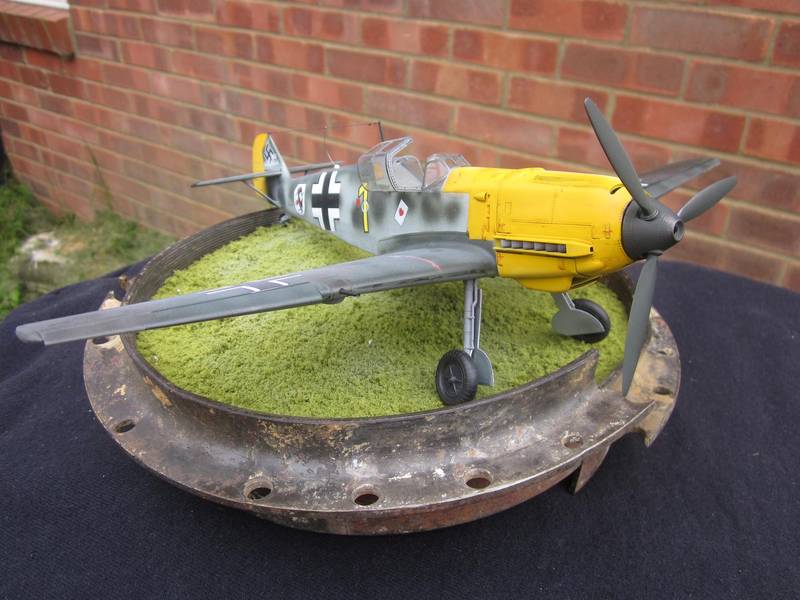
Got some more paint on Gallands's 109 only the second time that I've done mottling so I'm reasonably happy with the result.


Next will be some more masking ready for the yellow tail and nose.
Modellers Creed: This is my toolbox. There are many like it, but this one is mine. My toolbox is my best friend. It is my life. I must master it as I must master my life. My toolbox, without me, is useless. Without my toolbox, I am useless.
United States
Joined: February 01, 2009
KitMaker: 1,233 posts
AeroScale: 663 posts
Posted: Saturday, February 02, 2013 - 01:17 PM UTC
Andy, that Demon is beautiful. I love VF-31 and that build is really awesome.
Best wishes, Ian
It is a fact that under equal conditions, large-scale battles and whole wars are won by troops which have a strong will for victory, clear goals before them, high moral standards, and devotion to the banner under which they go into battle.
-Georgy Zhukov
United States
Joined: December 26, 2008
KitMaker: 288 posts
AeroScale: 195 posts
Posted: Sunday, February 03, 2013 - 04:15 AM UTC
Andy
Fantastic job on the Demon!VF-31 is probably my favorite Navy squadron and you really did this model justice.
Have fun modeling!
Mike
#047
England - East Anglia, United Kingdom
Joined: September 13, 2005
KitMaker: 2,016 posts
AeroScale: 475 posts
Posted: Sunday, February 03, 2013 - 11:43 PM UTC
Thanks for the comments guys
Allen,I like the mottle mate,what yellow are you going to use as I found the Revell Aqua Color 36310 Lufthansa yellow to be a very good match ,just about right for that orange/yellow and those Revell aquas airbrush lovely
Andy
Major Caryle,
"Shall we have a go at the far end now,sir?"
Lt Colonel "Johnny" Frost,
"Having a go,is hardly text book terminology Harry"
Major Caryle,
"But you'll let us try sir?"
A Bridge Too Far
Lottery Campaign "Oh de Vichy"
#041
Kobenhavn, Denmark
Joined: July 20, 2006
KitMaker: 10,069 posts
AeroScale: 3,788 posts
Posted: Monday, February 04, 2013 - 07:15 AM UTC
Nice job on the Demon, Andy. It looks great with subtle weathering and cool markings.
Campaign'oholic - 252+ campaigns completed
#042
England - North East, United Kingdom
Joined: November 18, 2006
KitMaker: 2,828 posts
AeroScale: 1,720 posts
Posted: Monday, February 04, 2013 - 10:03 AM UTC
Thanks Andy, the yellow i've used is Gunze H413 RLM04 Gelb. I'm really liking the Gunze range of paints and they airbrush wonderfully.

Unfortunately there has been a slight mishap while un-masking the kit which has caused the engine to come away from the kit snaping the already fragile engine bearers.

So now i've decided to do this all buttoned up. The difficult bit will be to glue the panels on correctly without damaging too much of the paint work
Modellers Creed: This is my toolbox. There are many like it, but this one is mine. My toolbox is my best friend. It is my life. I must master it as I must master my life. My toolbox, without me, is useless. Without my toolbox, I am useless.
England - North East, United Kingdom
Joined: October 20, 2005
KitMaker: 1,045 posts
AeroScale: 622 posts
Posted: Thursday, February 07, 2013 - 12:58 AM UTC
A bit of an update from me. The Spitfire and I have parted company it has been relegated to a very high shelf until I can get the enthusiasm to start attacking it again. So at the moment I don't know if it will come down again in time to be finished for this campaign or not.
Angel by day, Devil by night
#047
England - East Anglia, United Kingdom
Joined: September 13, 2005
KitMaker: 2,016 posts
AeroScale: 475 posts
Posted: Friday, February 08, 2013 - 04:28 AM UTC
Major Caryle,
"Shall we have a go at the far end now,sir?"
Lt Colonel "Johnny" Frost,
"Having a go,is hardly text book terminology Harry"
Major Caryle,
"But you'll let us try sir?"
A Bridge Too Far
Lottery Campaign "Oh de Vichy"
Ontario, Canada
Joined: March 29, 2010
KitMaker: 1,151 posts
AeroScale: 985 posts
Posted: Friday, February 08, 2013 - 06:34 AM UTC
Quoted Text
With the holiday season upon us, I think it is time to properly start this build. Revell molds their 767 fuselage halves with open windows with the idea that you will either keep these open in the finished model (rather chilly at 35K feet?)or fill them in with white glue. I prefer using window decals for my 1/144 airliners so my first step is to fill in the open spaces. With no clear parts supplied in the kit for windows, I first glued a plastic strip inside the fuselage to serve as a backdrop or dam for the putty.I found from experience that it will be easy to push the putty into the glued fuselage if you don't add the backing! I then mixed up a batch of Apoxie putty (like Milliput) and applied it from the outside. You can see the interior backing strip and the applied putty in this photo:
Once the putty is fully cured, it will be sanded smooth. I can work on other subassemblies while waiting.
Merry Christmas and Happy New Year to my fellow modelers!
Mike
Have you ever used clear resin? You can buy crude resin for small castings at art supply stores. You can apply Scotch tape (thoroughly burnished) on the outside and just glaze the interior with resin until the windows are filled. Once it's hard sand it then polish it with pumice and you've got windows! Then it's time to put LED's in....