OFFICIAL: Spitfire/Seafire Campaign
Maryland, United States
Joined: January 21, 2007
KitMaker: 25 posts
AeroScale: 22 posts
Posted: Friday, February 04, 2011 - 07:38 AM UTC
Just wanted to take a minute to post a couple of pictures of the Aires interior. First I preshaded with blaci and then over sprayed with RAF Interior green, did some detil work, flat coated, touched up and flat coated again. As you can see I also cut out the door are on the port side as the aircraft will be displayed with the door open.
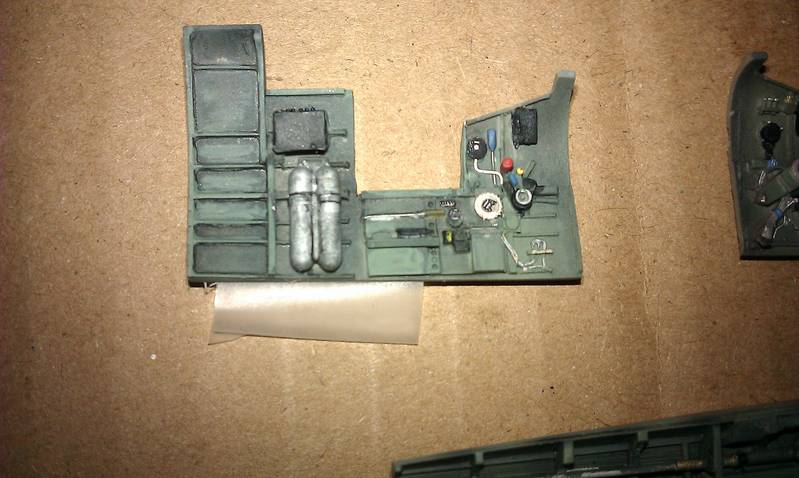
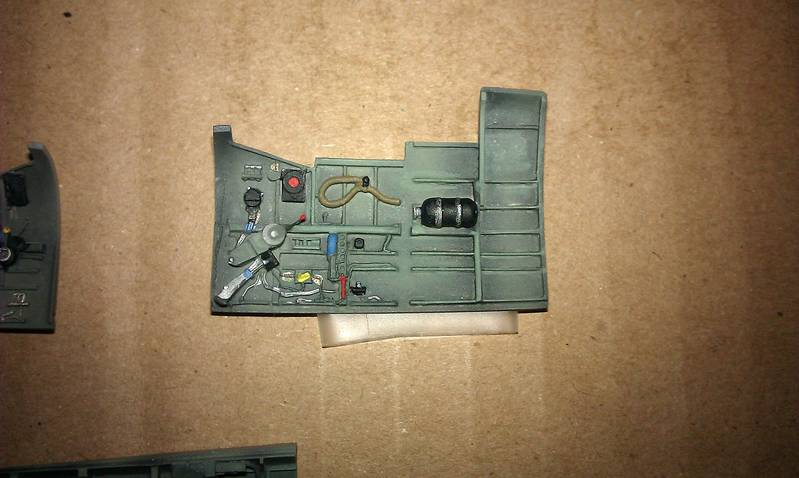
I know that this will be one of the last 1/48th scale planes that I build as the eyes just aren't what they used to be.
litespeed
 News Reporter
England - North West, United Kingdom
Joined: October 15, 2009
KitMaker: 1,976 posts
AeroScale: 1,789 posts
Posted: Friday, February 04, 2011 - 07:57 AM UTC
I have to say Roger your work on the Aires interior looks fantastic. An excellent example of what resin detail sets can bring to a model. Nice one.
So far folks I am very, very impressed with the work that has been done so far, well done.
All the best.
Maryland, United States
Joined: January 21, 2007
KitMaker: 25 posts
AeroScale: 22 posts
Posted: Friday, February 04, 2011 - 09:54 AM UTC
Thanks Litespeed. THe resin set is really quite good. THere was so much more detail I wanted to add but the space just isn't there. I will be returning back to my first love of 1/32 scale after this and a Spit Mk. Vb is in the top 5 of kits to build.
Now on to the instrument panel.
California, United States
Joined: April 01, 2002
KitMaker: 4,287 posts
AeroScale: 1,164 posts
Posted: Friday, February 04, 2011 - 01:57 PM UTC
"Don't fear the night, fear what hunts at night"
litespeed
News Reporter England - North West, United Kingdom
Joined: October 15, 2009
KitMaker: 1,976 posts
AeroScale: 1,789 posts
Posted: Saturday, February 05, 2011 - 12:51 AM UTC
Hi Matt.
That scratch built sutton harness looks excellent Matt, nice one. What material did you make it from?
All the best.

tim
California, United States
Joined: April 01, 2002
KitMaker: 4,287 posts
AeroScale: 1,164 posts
Posted: Saturday, February 05, 2011 - 01:14 AM UTC
Thanks Tim. Lead foil for the belts and silver solder for the somewhat over sized buckles. I remembered I have an entire PE sheet with nothing but buckles on them after I finished building this.

Oh well.. I'm finding some warts on this thing too. Twin sink marks at the wing roots are two that readily come to mind. I'll keep at it though. Thanks again for the compliments, much appreciated. "Q"

"Don't fear the night, fear what hunts at night"
England - North East, United Kingdom
Joined: May 22, 2008
KitMaker: 649 posts
AeroScale: 434 posts
Posted: Saturday, February 05, 2011 - 03:49 AM UTC
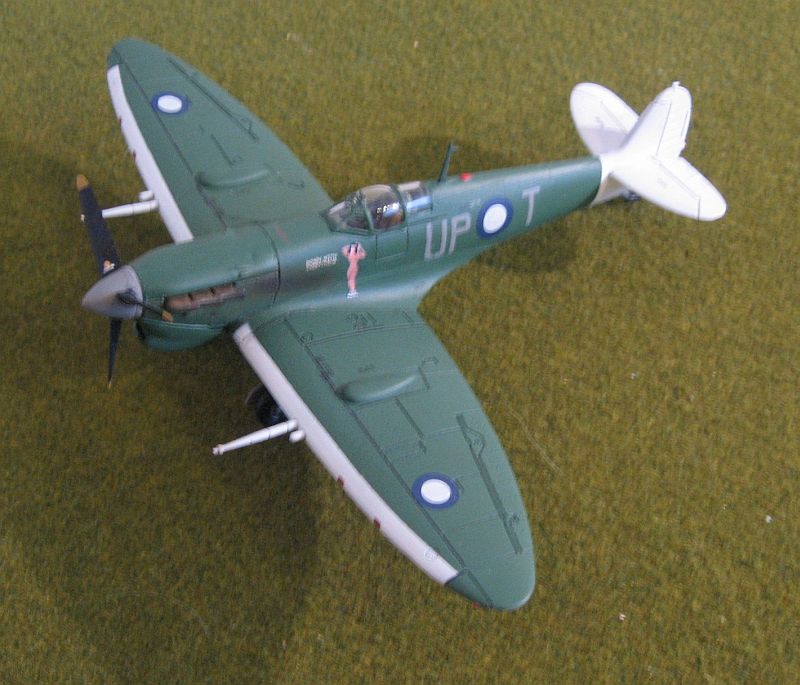
My very green RAAF Spitfire Vc Trop is in the gallery now.
Sadly the memory card from my camera and my card aren't working so I had to borrow my Dad's camera. As a result of unfamiliar equipment and bad light (its grey, overcast and wet here in North West England) means the photos haven't turned out too good. The pics I took on my camera yesterday were far better but I can't do anything with them!
I have used Airwaves etch to give it some kind of cockpit detail and True Details weighted wheels.
Is it ok to post pics of other Spitfires in the gallery without updates? I've just about finished a PR 19 that I started on Thursday and I'm about to build a Mk IX.
thanks
Mike
MichaelSatin
Campaigns Administrator Colorado, United States
Joined: January 19, 2008
KitMaker: 3,909 posts
AeroScale: 2,904 posts
Posted: Saturday, February 05, 2011 - 04:01 AM UTC
Hey guys, where's the gallery? I can't find it under "campaigns" in the galleries section

Michael
On the bench:
Sorta depends on your definition of "on the bench"...
litespeed
News Reporter England - North West, United Kingdom
Joined: October 15, 2009
KitMaker: 1,976 posts
AeroScale: 1,789 posts
Posted: Saturday, February 05, 2011 - 04:09 AM UTC
Hi Michael, updates are important not only to allow other modelers to see your build progress. We all learn from seeing others modelers techniques. It also ensures that modelers entering campaign are not just taking images of aircraft they finished before a campaign started and submitting them for campaigns. As long as you have built a Spitfire with some progress pictures, there no reason why you cannot submit more images of finished aircraft on the campaign thread or in the gallery. Don't forget you only recieve one campaign award.
By the way Michael your Spit looks superb, a very attractive scheme you have done, well done. Hope you don't mind me posting the image. Looking forward to seeing your other Spits.
Hope you sort out your camera, it is very frustrating. I have just had the same problem myself.
All the best.
tim
litespeed
News Reporter England - North West, United Kingdom
Joined: October 15, 2009
KitMaker: 1,976 posts
AeroScale: 1,789 posts
Posted: Saturday, February 05, 2011 - 04:21 AM UTC
Quoted Text
Hey guys, where's the gallery? I can't find it under "campaigns" in the galleries section
Michael
Hi Michael.
Go to the photo link on the blue Aeroscale banner.
YOU MUST LOG IN once your in the Kitmaker Gallery.
Click on the Aeroscale link under Members gallery.
The campaigns is the eleventh link down.
Click on 2011 Campaigns.
Click on Spit/Seafire campaign.
Upload your images.
Remember Michael you must log on to post any images in the Gallery.
Hope this helps.
tim
England - North East, United Kingdom
Joined: May 22, 2008
KitMaker: 649 posts
AeroScale: 434 posts
Posted: Saturday, February 05, 2011 - 04:24 AM UTC
Thanks Tim!
The situation is that the Mk Vc is my own personal project, hence the aftermarket parts etc and is intended as my actual entry for the award. So I did do the progress pics for that.
The PR XIX and Mk IX are models I'm building for my business. To help raise funds, I'm building a load of (mainly) Airfix kits to auction off. We can't compete with other people just selling Airfix kits but lots of people are willing to splash out on ready built kits.
They are 1/72 Airfix kits and are both oob builds using the same techniques as all my builds, except no aftermarket bits. I was just thinking of adding them to the gallery as a bonus, so people could see them. I figured why not, seeing as I'm building them at the moment, in fact I've just finished the PR XIX and have undercoated the IX.
thanks
Mike
South Australia, Australia
Joined: August 14, 2007
KitMaker: 5,926 posts
AeroScale: 2,201 posts
Posted: Saturday, February 05, 2011 - 08:11 AM UTC
Aeroscale campaign galleries are under Aeroscale. All the other Armorama etc ones are under Campaigns, but not Aeroscale for some reason. Probably to do with hosting.
Keep up the great work guys and gals.
You may be right, I may be crazy.
Maryland, United States
Joined: January 21, 2007
KitMaker: 25 posts
AeroScale: 22 posts
Posted: Saturday, February 05, 2011 - 11:01 AM UTC
Hey Matt you're off to a great start! Can't wait to see the end result.
Michael your Spit looks great!!!
Hope my turns out as well.
California, United States
Joined: April 01, 2002
KitMaker: 4,287 posts
AeroScale: 1,164 posts
Posted: Saturday, February 05, 2011 - 01:35 PM UTC
"Don't fear the night, fear what hunts at night"
Ontario, Canada
Joined: November 14, 2009
KitMaker: 270 posts
AeroScale: 264 posts
Posted: Saturday, February 05, 2011 - 02:34 PM UTC
And I've got the last colour down.
 USAAC Spitfire Vb
 by
mawz_models, on Flickr
And true to form, once peeled I realize I made the fuselage ID band too wide. Gonna have to fix that.
 USAAC Spitfire Vb
 by
mawz_models, on Flickr
MichaelSatin
Campaigns Administrator Colorado, United States
Joined: January 19, 2008
KitMaker: 3,909 posts
AeroScale: 2,904 posts
Posted: Sunday, February 06, 2011 - 06:42 AM UTC
And... I'm changing my mind. Again.

I think I'm back to my first love, the Israeli Air Force Spits. As such, logically (hah!) I should do the first one, salvaged by the infant IAF from RAF dumps. So...
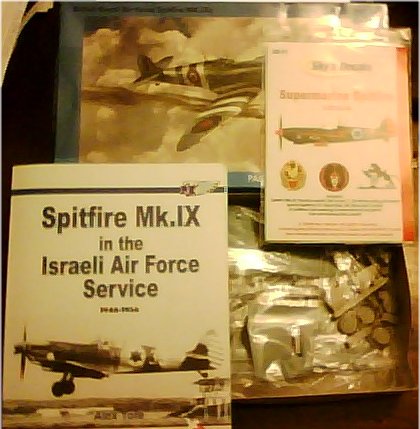
1/32 Pacific Coast Spitfire IXc with Sky's Decals using the IAF Spitfire bible by Alex Yoffe as a source.
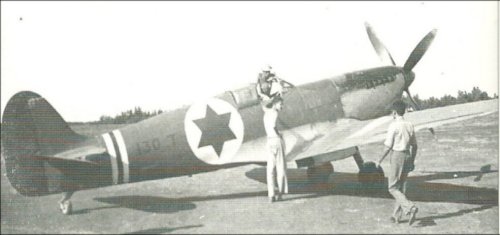
That's Ezer Weizman standing by the wing.
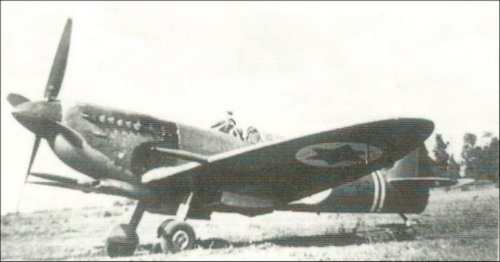
Yoffe interprets the photos as a green overall primer with an original grey/green cowl; midstone/earth side panels taken from a shot down Egyptian plane; red spinner; and bare metal wing root fairings and gun covers. Should be colorful!
Michael
On the bench:
Sorta depends on your definition of "on the bench"...
England - South East, United Kingdom
Joined: September 27, 2006
KitMaker: 246 posts
AeroScale: 234 posts
Posted: Wednesday, February 09, 2011 - 09:12 AM UTC
Well, the Tamiya Mk.1 is done:-
Marking are for Sqd. Ldr Horace Darley, c/o 609 Sqd 15th August 1940.


Hope you like,
Steve
"We will always remember. We will always be proud. We will always be prepared, so we may always be free."- Ronald Reagan
On the bench:-
Airfix Lancaster 1/72nd New Tool
litespeed
News Reporter England - North West, United Kingdom
Joined: October 15, 2009
KitMaker: 1,976 posts
AeroScale: 1,789 posts
Posted: Wednesday, February 09, 2011 - 10:13 AM UTC
Excellent work Steve, very nice weathering underneath and around the ammo bays. Well done.

Dont forget to post some images in the gallery.
All the best.
tim
New South Wales, Australia
Joined: March 09, 2006
KitMaker: 248 posts
AeroScale: 160 posts
Posted: Wednesday, February 09, 2011 - 06:53 PM UTC
Hi everyone,
Just a few quick pics of My hasegawa 1/48 Mk. VIII to be done in Aussie markings.
This will be my first Spitfire and i was a bit surprised at the 1mm gap on the wing joins. I am progessing on cleaning them up after filling with tamiya Putty and a bit of Mr Surfacer.


Hopefully can get some more done tonight!
Cheers,
Mark
On the Workbench:
1/48 Academy P-38L (Pin ups II Campaign)
1/35 Dragon King Tiger
California, United States
Joined: April 01, 2002
KitMaker: 4,287 posts
AeroScale: 1,164 posts
Posted: Thursday, February 10, 2011 - 01:07 AM UTC
Hmmm,Israeli huh...never made the Connection Mike.

(Inside joke for those not in the know) Looking forward to seeing your work. I'm tackling the Airfix new tool MkIIA at the moment. Pics to follow shortly. "Q"

"Don't fear the night, fear what hunts at night"
MichaelSatin
Campaigns Administrator Colorado, United States
Joined: January 19, 2008
KitMaker: 3,909 posts
AeroScale: 2,904 posts
Posted: Thursday, February 10, 2011 - 02:04 AM UTC
Quoted Text
Hmmm,Israeli huh...never made the Connection Mike. (Inside joke for those not in the know) Looking forward to seeing your work. I'm tackling the Airfix new tool MkIIA at the moment. Pics to follow shortly. "Q"
Hey Matt! I had no idea the Brits flew Spitfires with tracks, armor and huge guns. Learn something new every day, looking forward to seeing how yours looks!!
Mike
On the bench:
Sorta depends on your definition of "on the bench"...
California, United States
Joined: April 01, 2002
KitMaker: 4,287 posts
AeroScale: 1,164 posts
Posted: Thursday, February 10, 2011 - 11:20 AM UTC
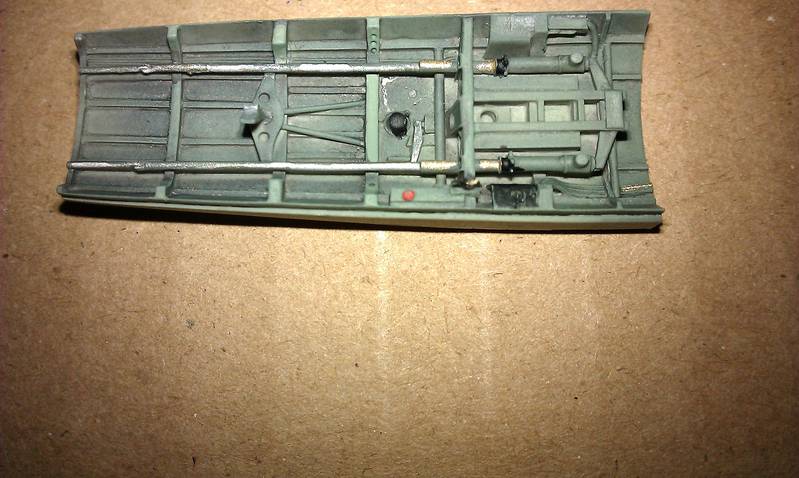
Very funny wise guy
Well, tracks and a big gun it doesn't have, but my Spitfire is about ready for paint. Just waiting on the clear parts to dry so I can mask and paint. I'm not overly fond of the kit. Lots of putty required at the rear where the wings meet the fuselage and at the front. Extremely soft plastic that sheds merely looking at it hard enough. About the best thing going for it is the price and the decals. I paid less than $20 for the kit, and the decals look gorgeous. Another item I found to be
off is the pilots door. The kit provides the option of displaying the door open by providing a separate piece that you add after cutting the molded on door out. I'm glad I didn't do it as the canopy will not sit in it tracks where it would be if slid back by the pilot. There would have be some surgery required to do so. As such, mine will be all buttoned up. More to follow. Thanks, "Q"

"Don't fear the night, fear what hunts at night"
Alberta, Canada
Joined: March 08, 2009
KitMaker: 394 posts
AeroScale: 360 posts
Posted: Thursday, February 10, 2011 - 11:54 AM UTC
Quoted Text
And I've got the last colour down.
Hi mycroft. An excellent job on the camo, bye-the-way.
Looks like you cut the masking tape to suit your camo pattern. I was wondering if you found that easier than using the "rolled-up-sausage" TicTac method used on projects by others. Did you have any issues with the tape lifting paint?
Current Projects: 1/144 R5D-3 (MiniCraft)
1/48 Ford Flivver (Williams Bro.)
1/72 UC-64A Norseman (MatchBox)
MAAC No.51187
IPMS CANADA No. 3369
California, United States
Joined: April 01, 2002
KitMaker: 4,287 posts
AeroScale: 1,164 posts
Posted: Friday, February 11, 2011 - 06:55 AM UTC
"Don't fear the night, fear what hunts at night"
New South Wales, Australia
Joined: March 09, 2006
KitMaker: 248 posts
AeroScale: 160 posts
Posted: Friday, February 11, 2011 - 08:25 AM UTC
Nice job on the paint there Mathew, exactly the same method I will be using (hopefully this week sometime) once I get the Hasegawa wing join filling and sanding completed...then the fun part re-scribing the panel lines and details!
On the Workbench:
1/48 Academy P-38L (Pin ups II Campaign)
1/35 Dragon King Tiger