The Morane-Saulnier M.S.406 can be considered the first modern French fighter, revolutionary for its time, but not enough, as it was quickly rendered obsolete by rapidly advancing technology. The type performed adequately in the early stages of WW2, but it wasnt a match for its main adversary, Germanys Bf 109. During the war, M.S.406s served in several countries, including Finland.
During the Russo-Finnish Winter War, France donated 50 Moranes to the Finnish air force, although only 30 of them were received. After the war, during the brief interim peace and the following Continuation War, with France occupied, more fighters were bought from German war booty depots. These planes bought from the Germans were of both M.S.406 and 410 variants, including several subtypes.
In Finnish hands, the Moranes fared better against the VVS than the French air force performed against the Luftwaffe, but with Soviet technology advancing and newer planes introduced, the types performance began to suffer. It wasnt however withdrawn from service, but improved. Performance was boosted by changing the engine to a more powerful Russian Klimov M-105P, giving out 1100 hp. Only a couple of the modifications were completed during the Continuation War, the type seeing service in the following Lapland War against the Germans. Mörkö-Moranes served until September 1948.
Preface
M.S.406 hasnt been a popular subject with kit manufacturers; the only 1:48 scale kits Im aware have been from Hobbycraft and the more recent Classic Airframes release (well, still from the last millennium). But with both kits having more or less room for improvement, the really definitive M.S.406 kit hasnt been available yet. In the following article, Ill take a look at the AZ Model kit, comparing it to scale drawings and wartime photographs.
Notice: I have no experience of CAs Morane kit, Ill be comparing this new kit with MPMs Mörkö-Morane which I built last year - this was based on the C.A. M.S.406 and the kits are nearly identical, except for the nose.
Glancing inside the box
AZs kit comes in a reasonably sturdy end-opening box, with the painting and decals placement drawings printed on the back. Looking inside the box is a pleasant surprise and a strange déjà vu experience at the same time. In the box we find two sprues of light tan coloured injection moulded styrene parts, a bag of resin parts and a length of steel tubing, two vacuum-formed canopies, a small fret of pre-painted PE parts, and pre-cut paint masks for the canopy and wheel hubs (apparently both by Eduard). There was less flash than on the MPM kit, surface details were improved, and the addition of most often needed aftermarket parts is great. So overall, the kit looks much more complete and well thought-out than the CA/MPM kit. But then, I could see areas needing further attention. And this is still a limited-run kit, lacking locator pins and other luxuries found in mass-produced mainstream kits.
Looking closer
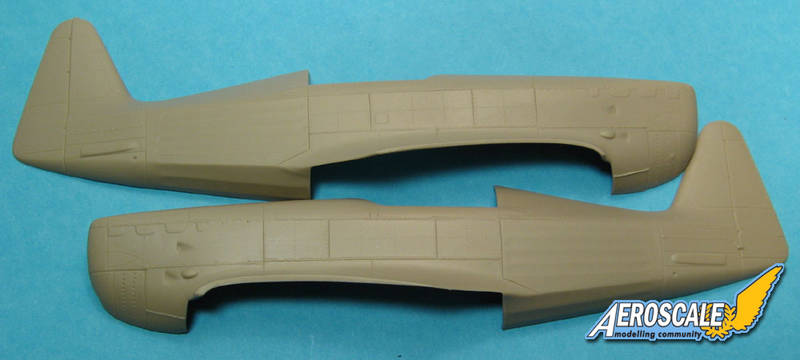
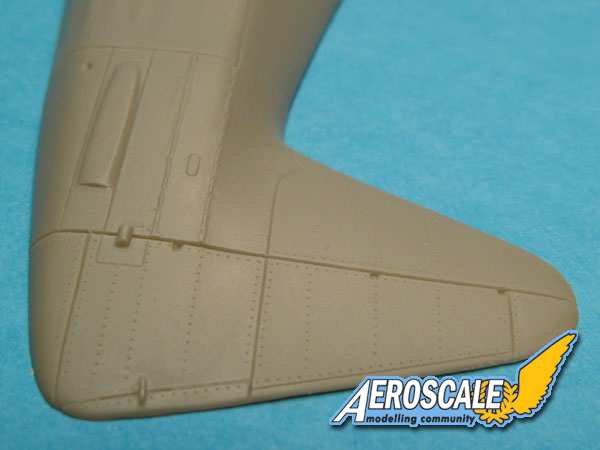
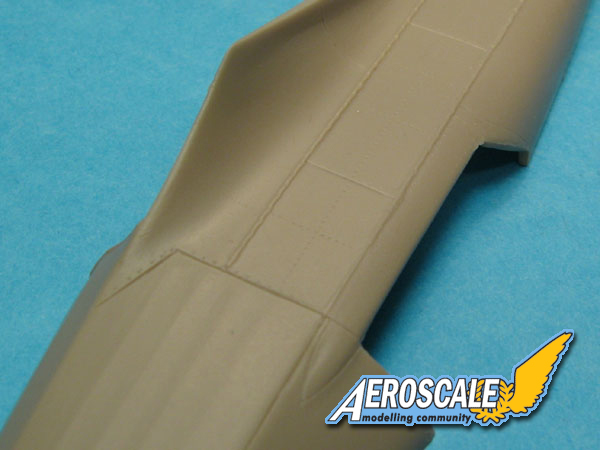
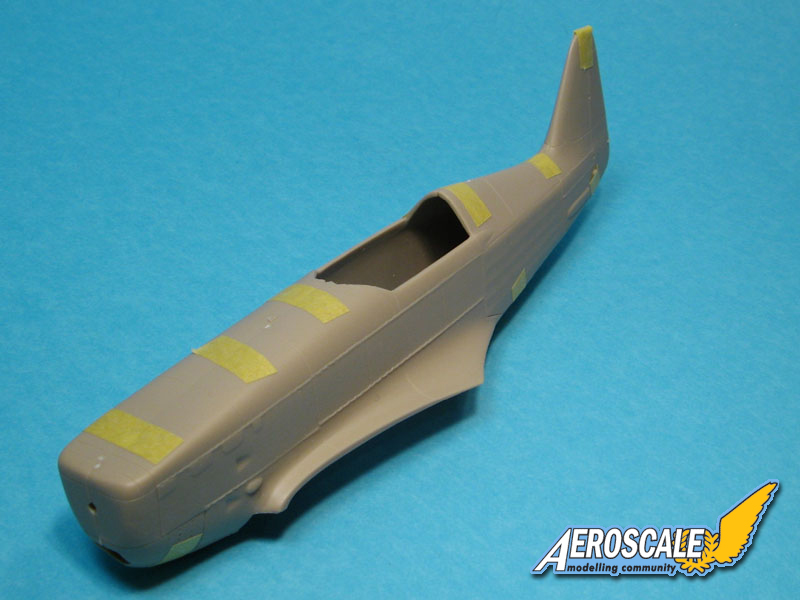
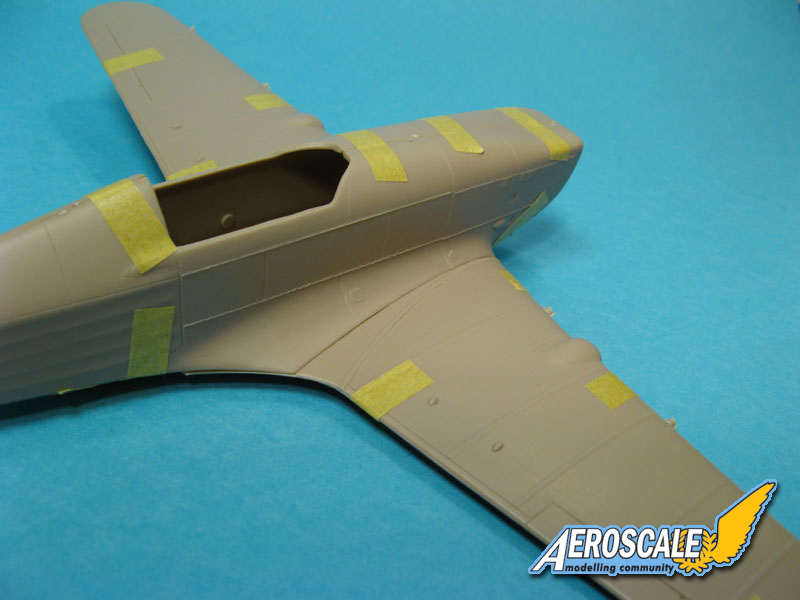
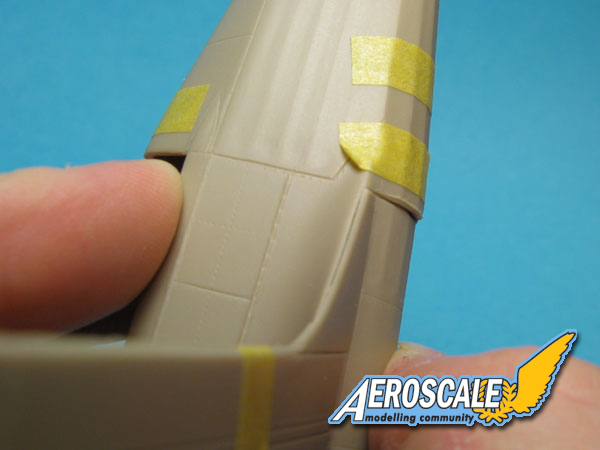
First of all, for all of those people (me included) who were hoping for an all-new kit of this aircraft, this is a slight disappointment. It looks like an improved version of CAs kit, with modern goodies included in the box. The most visible changes are done to the exterior surface details. Where CA/MPM had only delicate, slightly inconsistent and faint recessed panel lines and quite shallow representations of fabric covered sections, this new kit features greatly improved details. Panel lines are crisp, raised details look good, and the exterior features recessed rivet detail similar to that found on recent Eduard kits, I also noticed that the originally very delicate (Id call it too delicate) fabric effect has been made more prominent, at the same time avoiding a saggy look. Comparing the main airframe parts to scale drawings, I found some dimensional errors however.
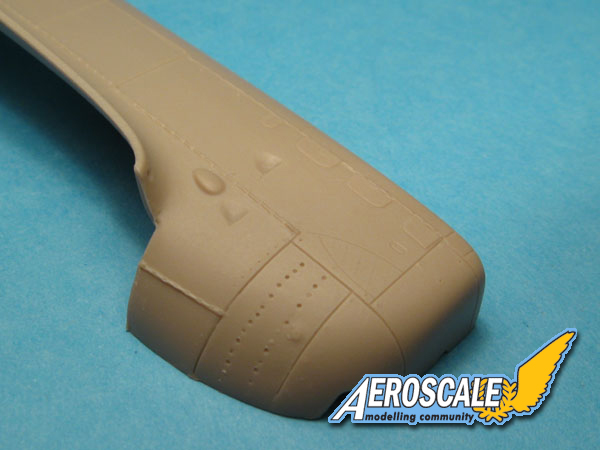
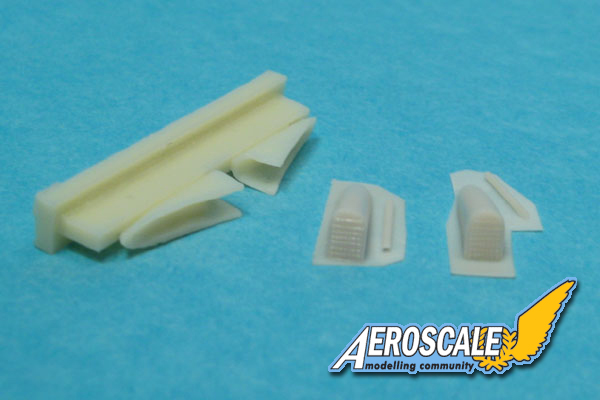
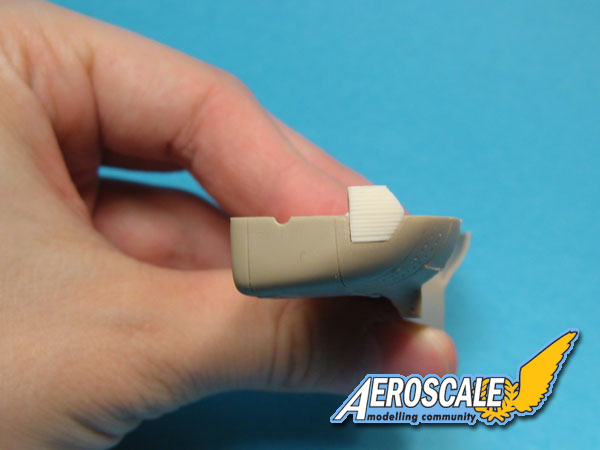
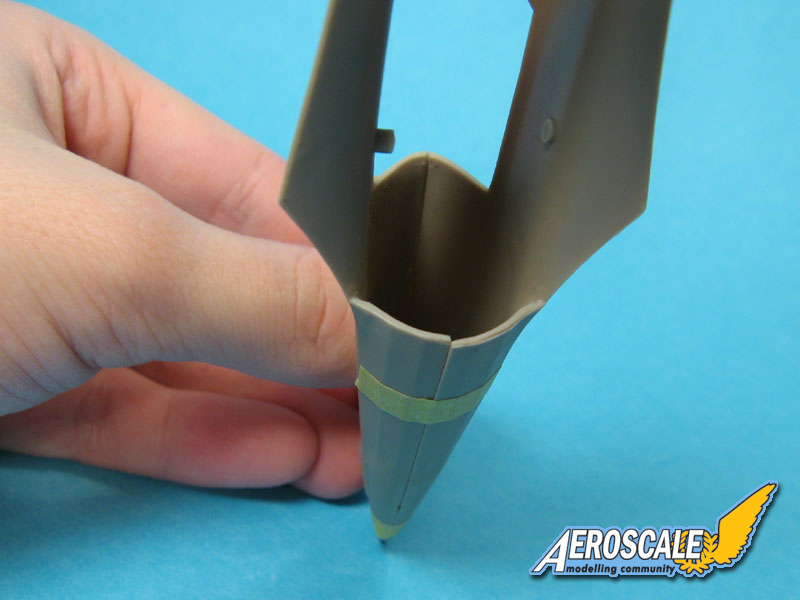
The fuselage is a couple of millimetres too short, and slightly too tall just before the rudder. A small short rod on top of the rudder is missing. On the right side of the nose, there should be a rectangular opening, but here it is scribed on (if one decides to carve it open, if one chooses to open it, Id recommend correcting its position at the same time, as the opening should be a tad longer and positioned a little lower). I was a little surprised to see the exhausts as moulded-on blank shapes, to which photo-etched rims are glued on, as I feel that separate individual tubes would work better in this scale. Bronzavia exhausts used on some planes for night flying are not provided, neither is the air intake used with Berezina machine guns that were installed in some aircraft in Finland.
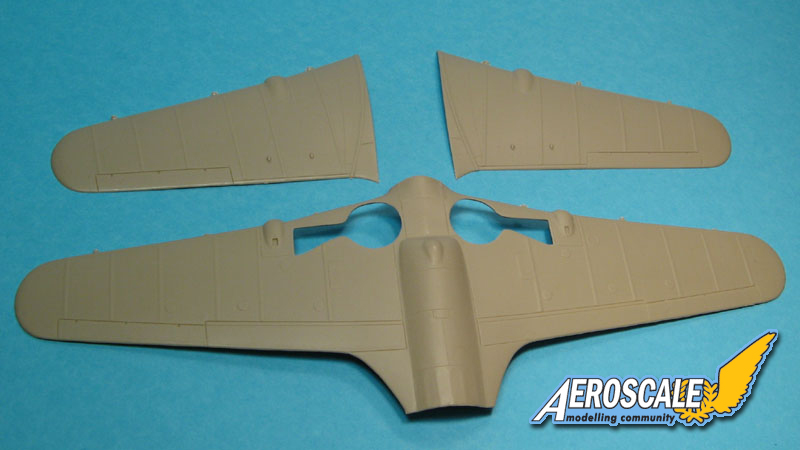
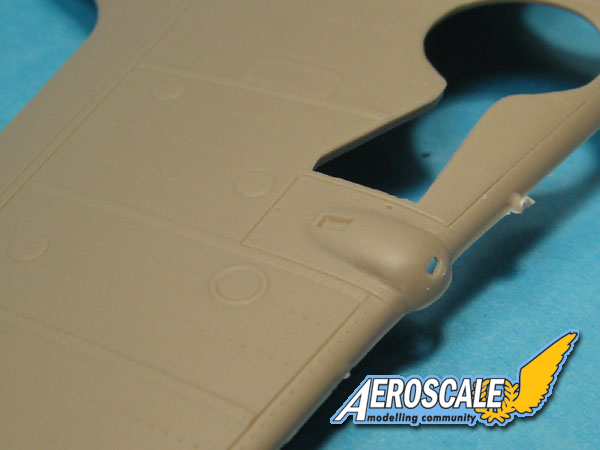
Comparing the wings to the built-up MPM kit showed them being quite similar, the difference being mainly in the level of detail. Against the scale drawings, they appeared to be a bit too short and narrow. The raised ribs on them are too pronounced, so sanding them down a little wouldnt hurt (Masking the wings prior to sanding will protect the delicate rivets from damage while working on the ribs). The machine gun bulges seem to be still somewhat too rounded when viewed from above like on the earlier kit(s), but on the other hand, the machine gun openings have been corrected. Now theyre proper holes instead of grooves. My references show these holes being more rectangular than rounded, but sharpening the edges shouldnt be a big chore. Metal tubing is provided for the MG barrels, instructions pointing out a length of 1 cm to be cut into two 50 mm pieces (5 mm sounds more realistic. A typo perhaps?). My reference drawings indicate that the barrels should protrude 6 mm from the wing, when viewed from above. Measurements for the pitot tube are also given, but they appear to be inaccurate as well. Again, when viewed from the top, the tube portion should protrude 19,3 mm, the pitot head being 4,5 mm. Looks like theres not enough tubing for all the parts needed. The single landing light is represented by a raised circle outline, with no option to pose it lowered.
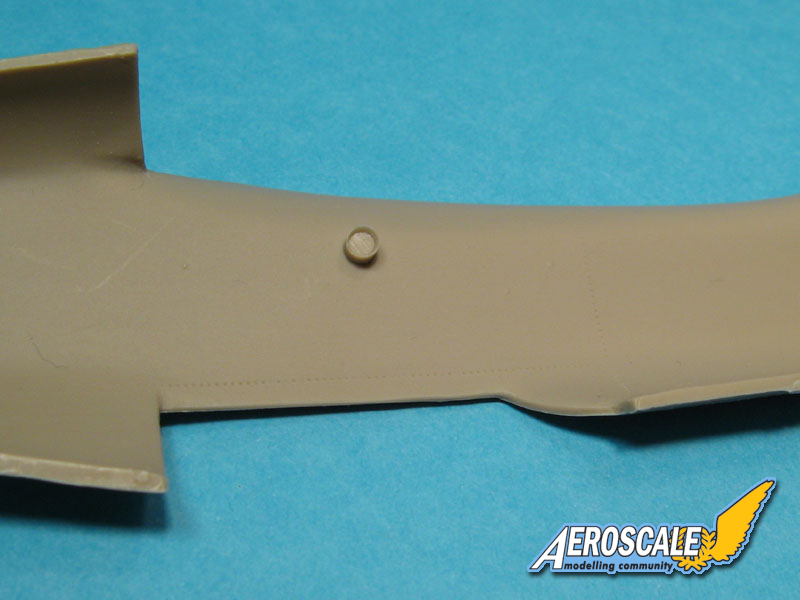
Stabilizers have been modified further than just the surface detail; the hinge line issue of CA/MPM kit is fixed (on the earlier kit, when assembled straight from the box, the stabilizers hinge lines are slightly angled back). As with the earlier kit, no locators are present, just butt joints. I recommend pinning the joints for both strengthening them and ensuring correct alignment.
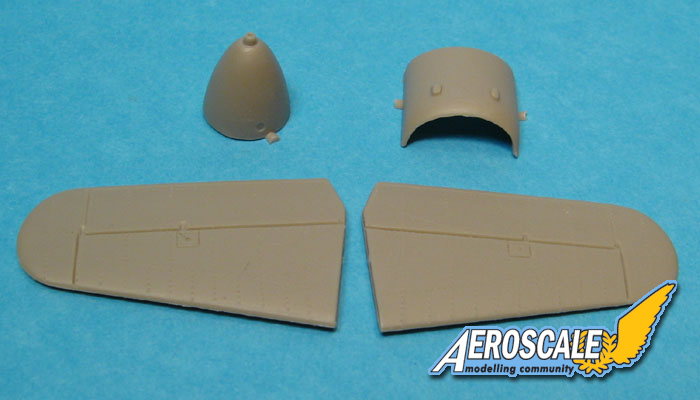
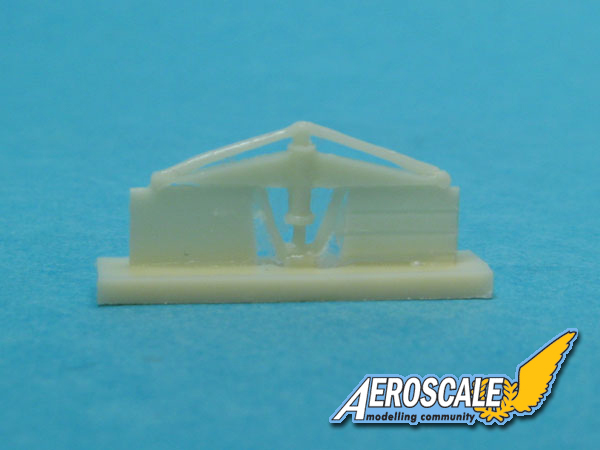
The characteristic retractable radiator is made of a plastic housing and two photo-etched screens. Passable, but it leaves much room for improvement. First, the radiator housing is almost semi-circular, while it should have flattened sides. Secondly, it cant be built in the lowered position out of the box, the PE screens are shaped for the retracted position, and the mesh pattern isnt 100% correct. No parts for the radiators retraction mechanism are provided either - a strange omission I think, the parts being quite prominent. (CAs kit had a resin screen part with moulded-in retraction mechanism instead of the two PE screens in this one)
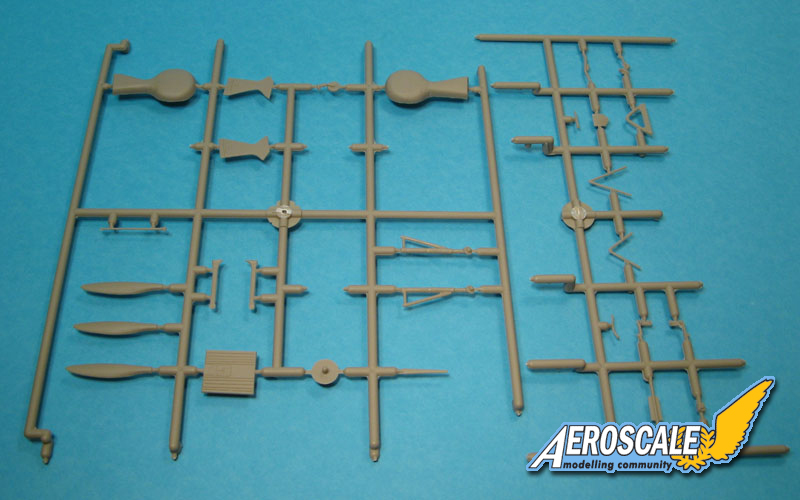
Other styrene parts dont appear to have changed much. They are moulded a bit better and some have been reproduced in plastic instead of resin (gunsight, cockpit floor, the fuselage front radiator, rudder pedals and control stick for example).
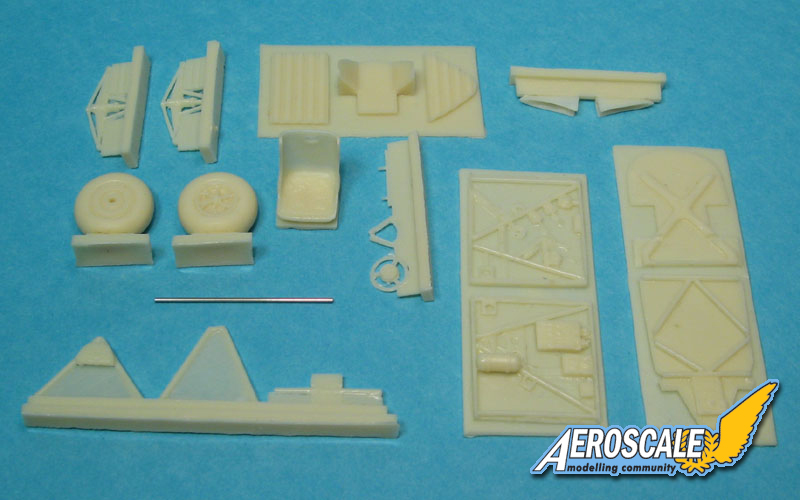
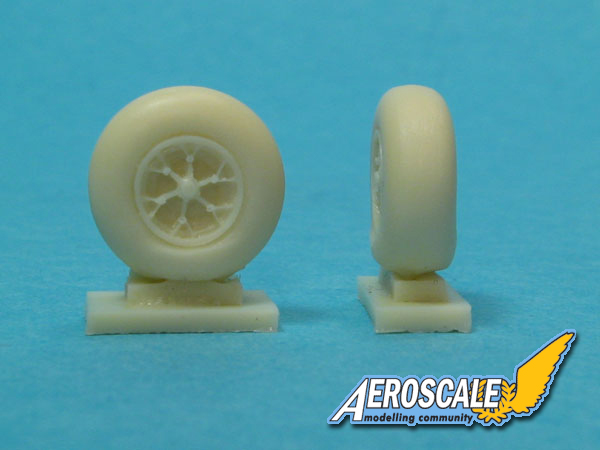
The majority of the resin parts are for the cockpit and are mainly similar to the earlier kit(s). The biggest changes I spotted are the instrument panel, which is now blank because of the included PE, hollow air intakes (with PE screens provided, as opposed to solid parts in the earlier releases), and the landing gear retraction struts now have a correct more hollowed appearance. The wheels also appear to be new, with much better hub detail. They also feature moulded-in bulging, something that would normally be a nice touch, but this time its a detriment. To me, it appears that the flat spots are horizontal! At the least, this shortcoming will require careful sanding to restore the proper angle to the flat spots. At worst, itll require re-shaping the wheels by sanding, filing and re-building with putty in order to get rid of the bulging. Or then the problem could be circumvented with aftermarket products.
Moving to parts going inside the wings and fuselage, one thing I noticed in the instructions was that the modeler is advised to file the tops of the wheel wells. This gave me unpleasant flashbacks of the biggest chore in the earlier kit, grinding and sanding down wheel wells, upper wing halves, cockpit sidewalls and the fuselage halves in order to get everything to close properly. I was informed by a fellow modeler Steffen Arndt that the cockpit fits in fine as long as the instructions are followed, the cockpit sidewalls sanded until the solid walls are gone, leaving the correct tubular frame.
Although the wheel wells feel a little thinner, Id first check the fit, and if needed, file both the insides of the upper wing halves and the wheel wells to avoid accidentally going through. The wheel wells look to be the same as earlier, with little details, mainly location markers for the main landing gear and some delicate recessed rivets.
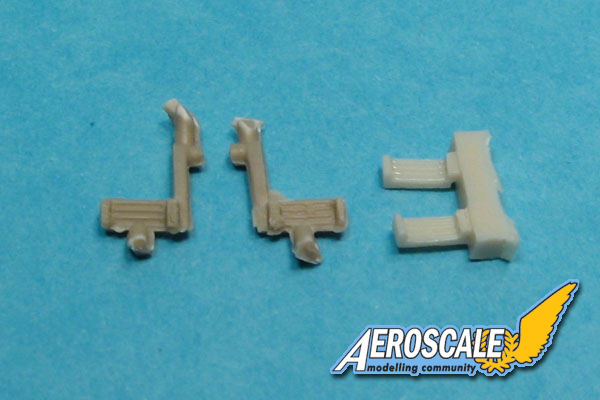
Looking at the landing gear, these look familiar, with too much angle in the wheel mounts (fortunately the instructions have a head-on drawing showing the correct angle) and only butt joints to the wheel wells (I highly recommend strengthening the joints with styrene or metal rod inserted between the parts. The retraction struts are cast in resin as earlier, and exhibit improved detail, as I mentioned before. Brake lines are not mentioned in the instructions, so consult your references when installing them. Both a tail wheel and a skid are included. (Most of my reference photos show Finnish planes with a tail wheel, or a ski during wintertime.) Main landing gear doors are missing a small rectangular bulge at the end, and could use some thinning too.
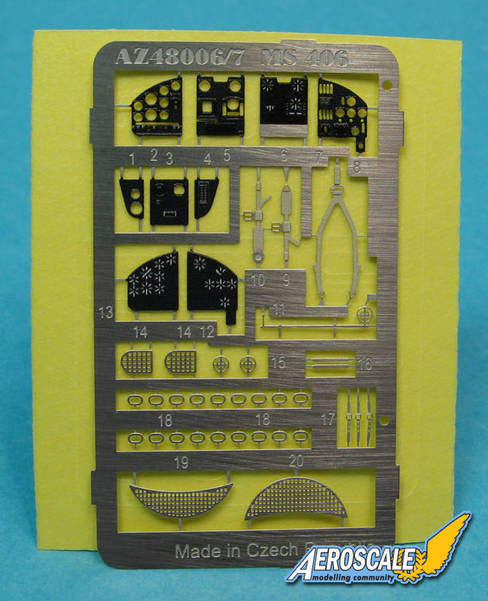
The cockpit is similar to the old, the biggest differences being the blank instrument panels, change of material in some parts and some added detail. This time, PE parts are included for the seatbelts, rudder pedal straps and of course, the instruments. The latter is of the current Eduard style, using only pre-painted PE instead of having acetate film instruments. The lack of printed-film instruments also means that the gunsight glass has to be sourced elsewhere, since the suggested excess material from the vac-canopies is way too thick for the scale. The instrument panel has separate sections for the middle and sides, a nice touch.
The photo-etched seatbelts are of the usual Eduard quality, but not all the parts are pre-painted, the small adjustment straps for the shoulder harness are left un-painted. For some reason none of the PE parts are referred to with their number in the instructions, although I think theres little or no room for confusion in this kit. (additionally, the etched exhaust tube rims are not mentioned at all, but I would recommend replacing them with flattened metal tubing anyway) The back-up ring and bead gunsight is provided both as a resin-PE combination and as a single photo-etched part.
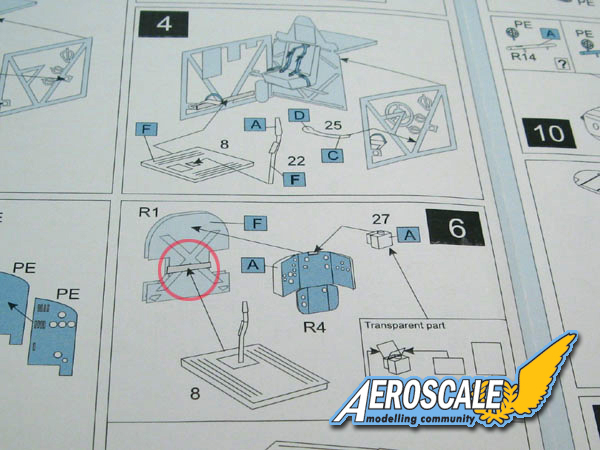
I spotted a mistake in the cockpit instructions. The floor part is pointed to be glued to the middle of the front bulkhead, but in the steps before and after that, its clearly seated much lower.
Now comes the tricky part, trying to decide what to say about the spinner and propeller. Theyre typical for limited-run kits: separate propeller blades fitting into holes in the spinner the modeler has to drill him/herself (recessed locators are moulded-in), the prop blades being a little thick but otherwise OK. Unfortunately, my references dont help much in determining the type of the spinner & props provided. Apparently, four different prop types were used in Finnish machines, with a fifth, the Swiss Escher Wyss V52, tested in a few aircraft. Judging from the longish spinner, it could of a Ratier? The inclusion of a shorter spinner seen on most wartime photos would have been nice. Now builders will either have to make do with the provided long version (or consult references for a plane having the provided spinner), resort to aftermarket parts or scratch-building. A cannon barrel is moulded-in, featuring an open muzzle. Adequate, but some modellers will want to replace it with metal tubing.
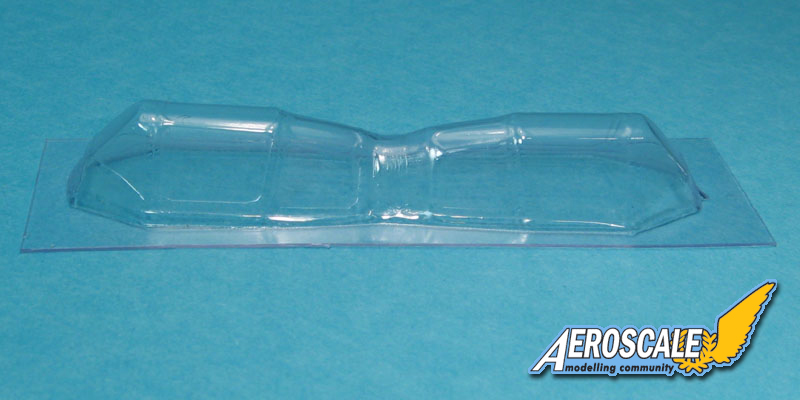
The two vac-form canopies included appear to be the same as in the earlier kit. Well-moulded, and reasonably clear & smooth. Dipping in future will improve them. Its nice to have two canopies in case of a slipped cut. Its also easier to make an opened canopy when you dont have to take risks cutting up a single item. The canopy can be detailed further by adding a rounded hand-hold inside the windscreen and a rear view mirror to the sliding portion.
MPMs Mörkö-Morane kit included some resin parts that were only used on MS.406. I dug them out of the spare parts box and compared them to the new parts. (The paler resin parts are from the older kit) These were the intakes that go to the sides of the nose, the front fuselage radiator, rudder pedals, and the plastic tail wheel. (I used a left-over spitfire wheel instead on my kit. The old wheel is whitish styrene) I also tested how the old resin radiator would fit to the fuselage halves.
Test-fitting
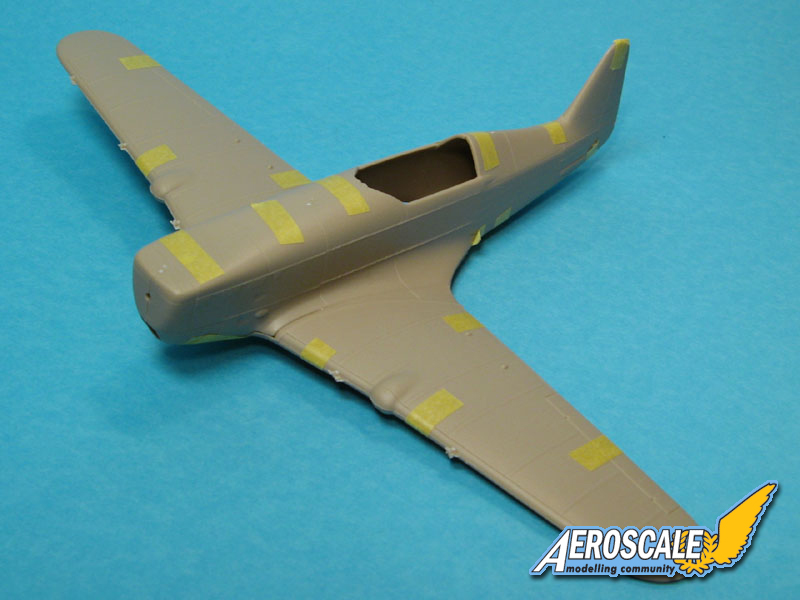
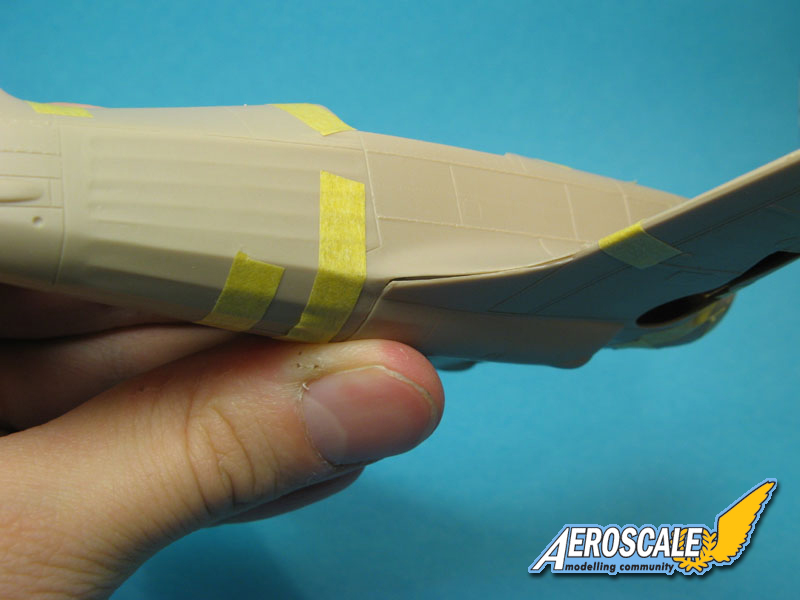
To see how the main airframe part fit together, I did some testing with the fuselage and wings components, joining the parts with tape. The fuselage halves went together well, except for a slight mismatch on the bottom, but this can be solved by holding the parts together firmly with tape or rubber bands while glue dries.
Wing parts fit together almost as nicely, only the leading edge could require a little putty. The wing component fits to the fuselage better than in the MPM kit I built, the wing-root joints being the best. The rear bottom joint requires some further attention. When aligning the wing bottom with the fuselage, it leaves a gap at the trailing edge of the wing on both sides. When the seam is pressed shut, theres an ugly (and difficult to fix, because of the fabric effect) step between the fuselage bottom and wing section. Id recommend adding styrene shims between the parts, shaping them before gluing the wings to the fuselage in order to minimize the need for putty and sanding.
Markings and painting
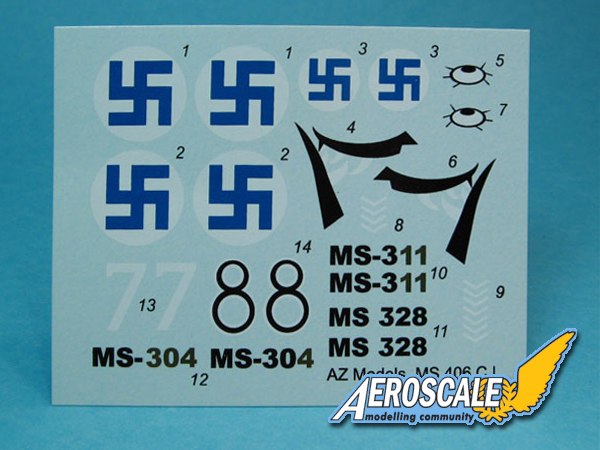
The supplied decal sheet looks to be of good quality, showing minimal excess carrier film and no alignment defects. The national insignias are in one piece, very good. Colors appear to be accurate. On the downside, I noticed some very slight spattering of ink on the registry and rudder numbers. I also hope the printing is opaque enough, as the white teeth on the shark mouth motif go over red.
Markings are included for three aircraft, MS-304, MS-311 and MS328. A painting & marking guide is only printed on the back of the box, and has a side view of only the left side of each plane, making the right sides a partial guesswork for people without further references.
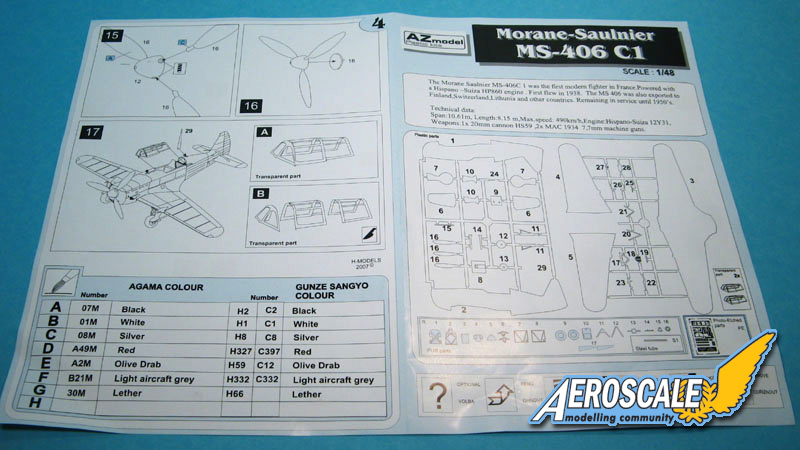
Paint numbers pointed out in the instructions refer to Agama and Gunze paints. I have no experience of Agama paint so I cant comment on those. The suggested Gunze shades differ from the usually suggested paints for Finnish camo. Number 65 suggested for the upperside green looks to match to RLM70 and #338 pointed out for the undersides is a grey, representing FS:36495. The most commonly referred paint for Finnish camo is FS:35414 for the undersides (the use of this so called DN-color started in May 1942), and FS:34096 for the upperside green.
The decals seem mainly accurate, although the designers goofed with the registry numbers. All of the codes are printed using a bolder font, which I found accurate only for MS328. (Amongst a few others, this aircraft was peculiar for retaining the un-hyphenated, bold registry font that was painted on planes assembled in Sweden) The other two had regular font registry codes. Notice: the marking guide shows MS328 having its codes hyphenated (MS-328), but the decals are correct, un-hyphenated. Staying with MS328, the white borders on the number 8s look too skinny.
Markings for MS-311 feature decals for the attractive shark mouth it had for a while in the summer of 1943. The red portion has to be painted, but theres no other help than the marking guide, masks would have been ideal for this.
Conclusion
M.S.406 in 1:48 scale has been a much-neglected subject for mainstream manufacturers, and still is. AZ Model's kit is a big improvement over the old Hobbycraft and the more recent Classic Airframes (on which it seems to be based on), but its still firmly a limited-run kit, requiring a builder with some experience in multi-media kits. It delivers mostly up-to-date details but leaves room for improvements and modification. The inclusion of the most commonly used PE parts and masks, combined to a price comparable with similar kits in this scale make this a bargain, although it requires additional effort and references to make it really shine. Recommended.
Please remember, when contacting retailers or manufacturers, to mention that you saw their products highlighted here - on AEROSCALE.
SUMMARY
Highs: Details enhanced from CA kit, most common aftermarket parts included, single-piece swastika decals, corrected wing MG area.Lows: Some dimensional errors still present, a few goofs in the instructions, some errors in decals, wheel bulges horizontal, no acetate film for the gunsight, only one spinner and propeller provided.Verdict: Leaves room for further improvement, but definitely the best kit of this type in this scale so far. Recommended for those with some experience and interest in Finnish WWII aircraft and less common types in general.


Comments