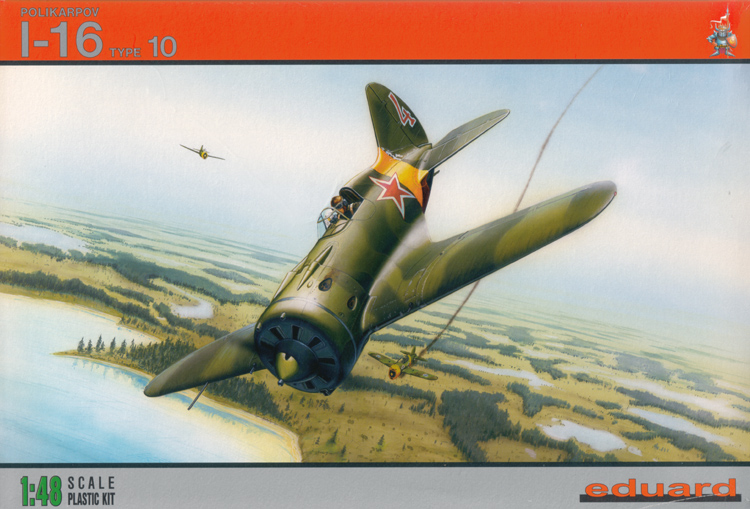
Eduard's Polikarpov I-16s have been one of the most keenly awaited series of kits in some time. Pre-release sprue shots led everyone to believe that Hobbycraft's old kit could finally be put out to pasture for a graceful retirement, so it was a huge surprise when the Type 10 was released and, almost immediately, a very public argument broke out over the accuracy (or not) of the kit, which reached the point where the many outstanding points of the new kit got entirely overlooked.
The furore centred on two main areas; the nose and the tail. Eduard quickly admitted that the profile of the cowling was too square compared with the real thing. The tail is another matter, and the two sides will have to agree to differ, as their views on the subject and the accuracy of their respective sources. I went by the old (unscientific) method and matched the fin to photographs of the real thing. I have to admit that the results were quite good - I think there may be a small discrepancy as regards the chord of the fin, but I think Eduard's rendition is generally accurate and certainly good enough to satisfy most modellers.
Another areas came in for some criticism; the rear decking is arguably a little too square - but note, this does seem to vary in some reference photos, so I was content to round off the "corners" a little and I think the result is perfectly acceptable.
So, turning to the job at hand, what do you get and how does Eduard's kit build?
The kit contains:
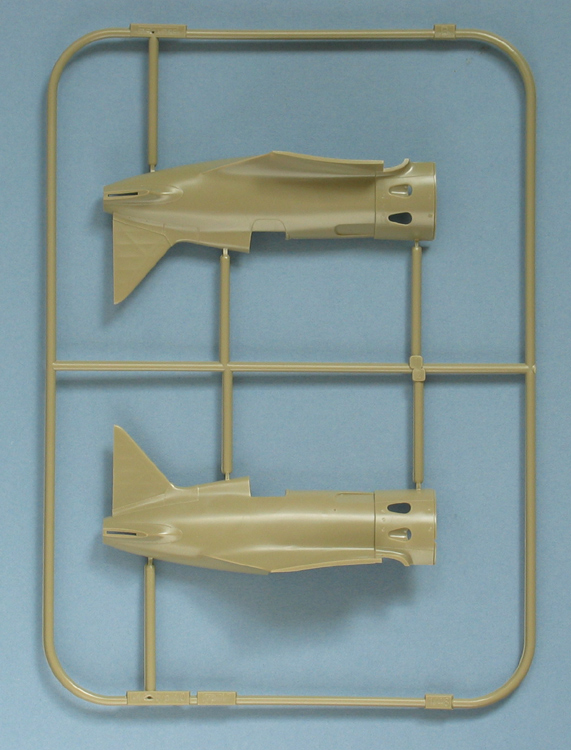
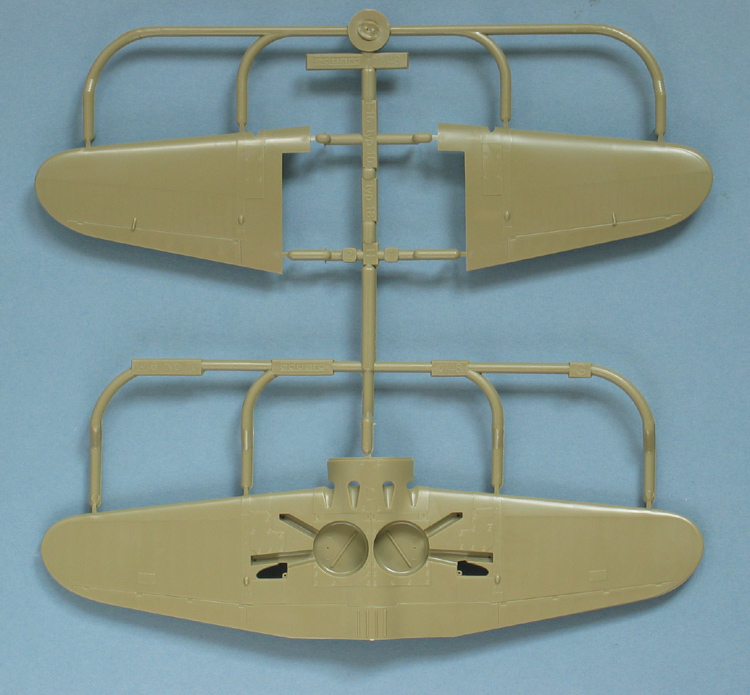
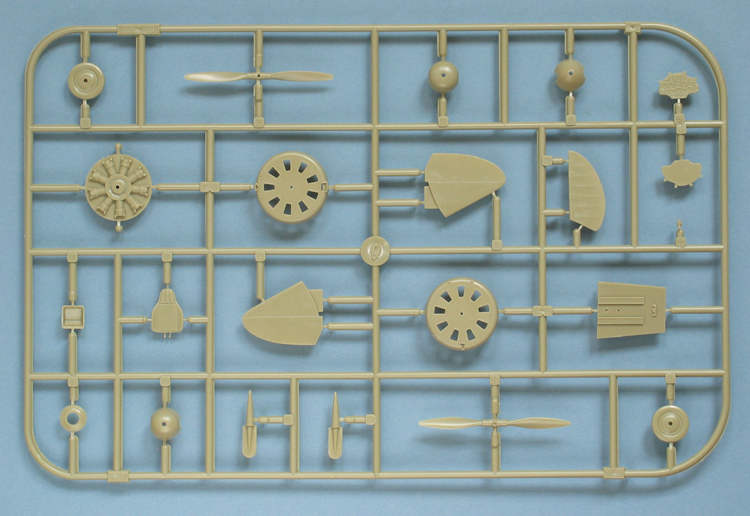
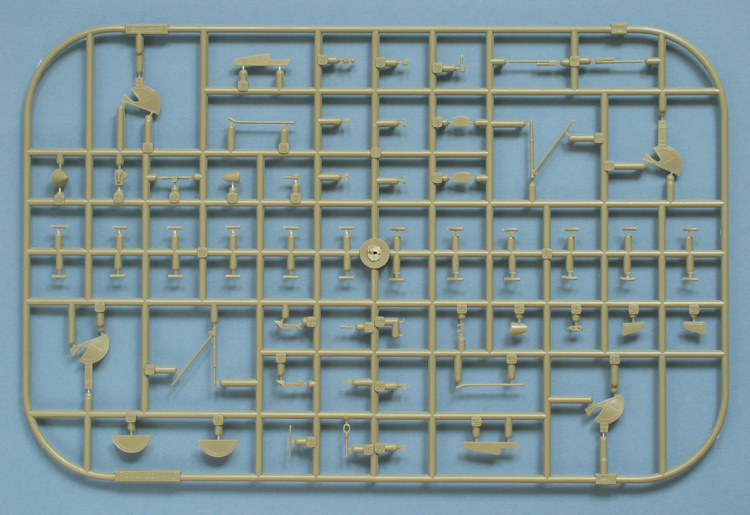
93 x parts in Eduard's distinctive pale olive styrene (17 are unused, intended for later versions)
2 x clear styrene parts
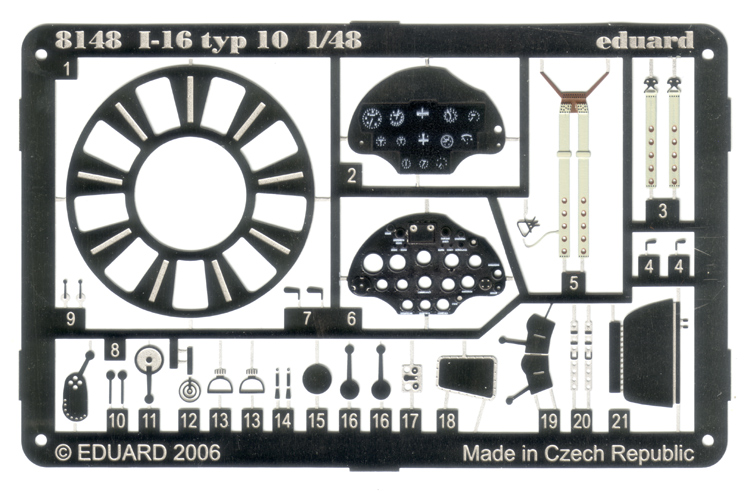
27 x etched steel parts, some pre-painted
Kibuki paper painting masks
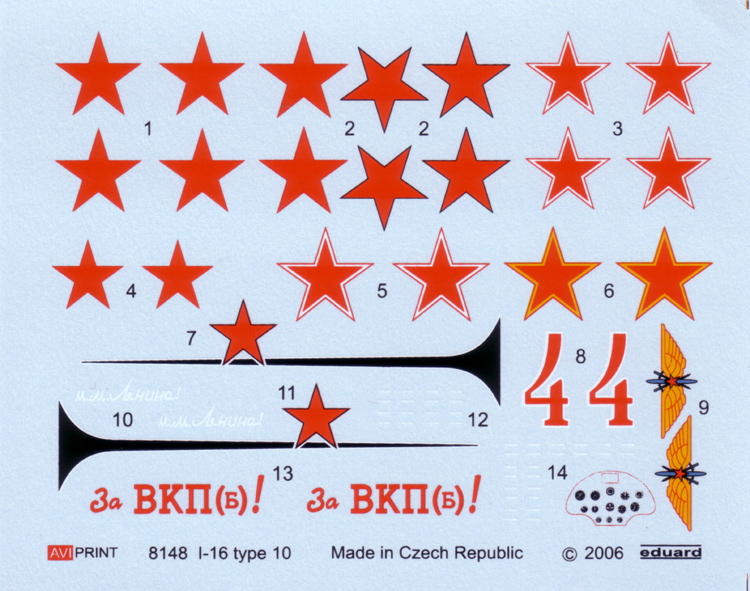
Decals for 4 painting schemes
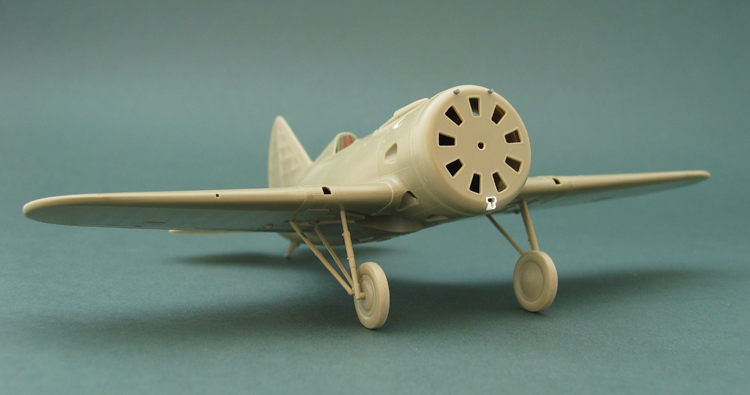
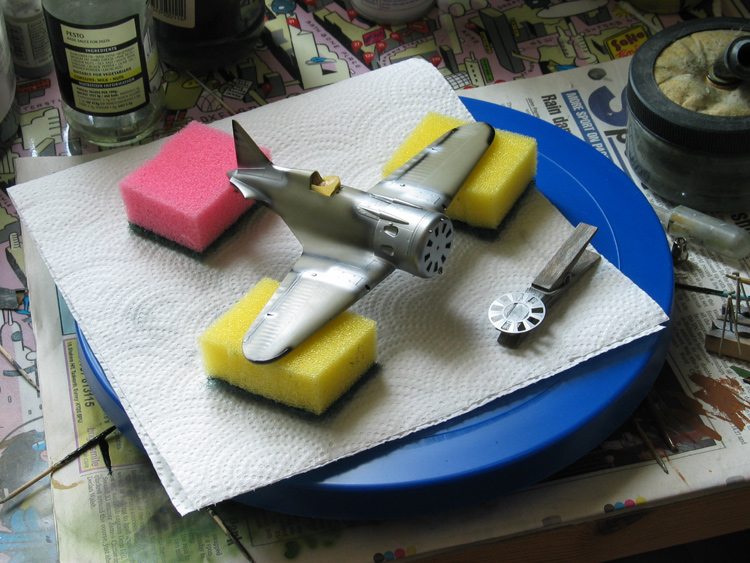
Initial inspection of the plastic parts shows some fantastic surface detail. The panels are a mixture of fine engraving and subtlely raised panels. The representation of the fabric surfaces is superb - probably the best in recent years in a mainstream plastic kit, and the suggestion of the interior structure under the fabric is a real credit to the designers. The moulding is exquisite - these are high pressure moulds to match the best produced in the Far East - Eduard's short-run origins are long, long gone.
A test fit of the major components shows things should go pretty smoothly - the parts fit very precisely and my only concerns were with the lower nose and wing roots - which fit well enough, but are unsupported joints, so I gave them a little extra attention when their turn came in assembly.
Construction Breakdown
The instructions are very clearly illustrated in a return by Eduard to traditional line-drawings. The stages aren't numbered, but the general sequence is quite logical. Despite my intention to build the kit OOB, I took a few liberties with the construction order, but Steffen Arndt (Alpha_Tango) followed things more closely in an almost simultaneous build and can testify to the fact that Eduard's sequence works fine.
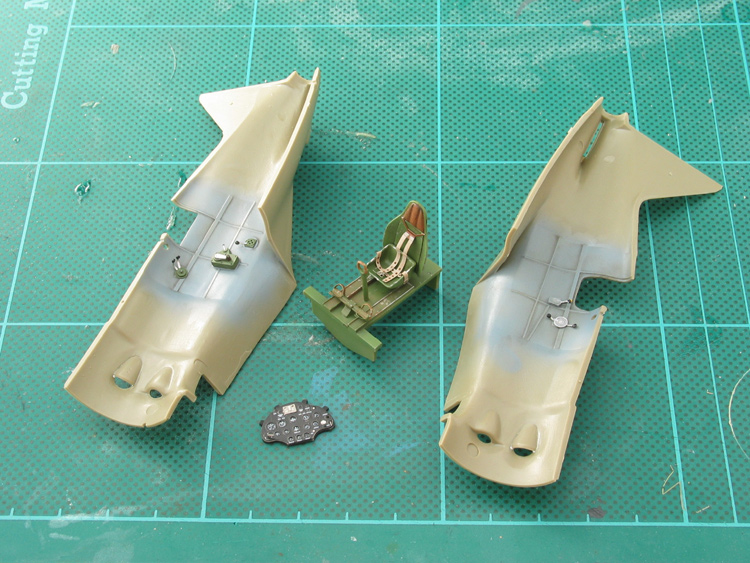
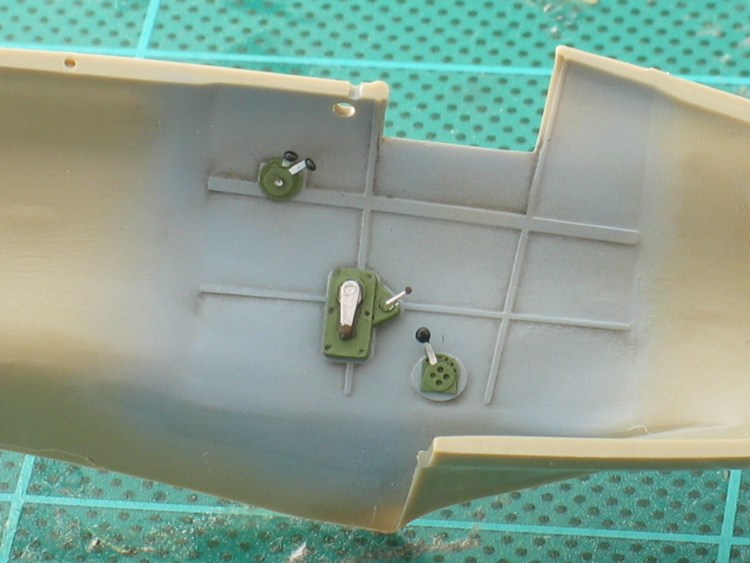
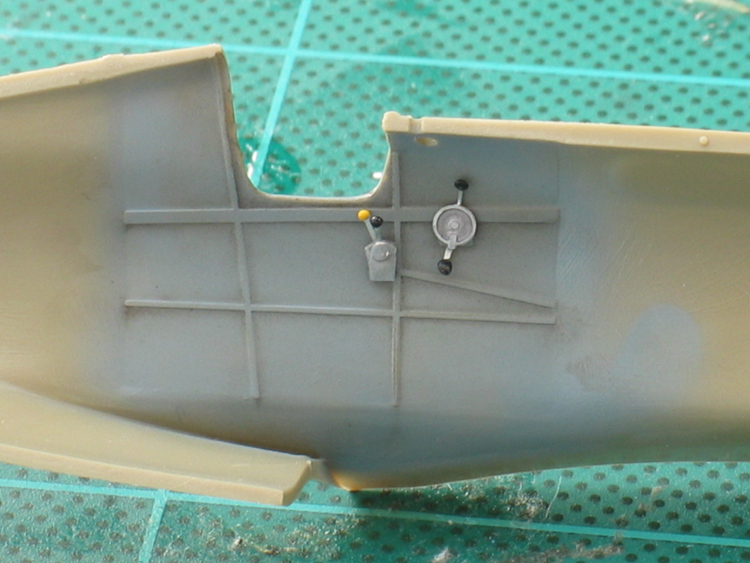
Page 3 - deals with the interior of the fuselage halves and joining them. This includes fitting the exhaust stacks and sidewall details, which offer a choice of plastic or photoetched items. I chose the photoetched items and they produce a simple, effective cockpit. Reference pics show there is more detail that can be added by way of cabling and throttle links, but I was still aiming to build OOB at this stage, so I kept it simple. I must admit to an early departure from the instructions though, because I didn't fancy fitting the exhausts at this stage (much to Steffen's concern) - preferring to leave them off until after painting the camouflage.
Page 4 - covers the main cockpit assembly. There's a choice of plastic of etched instrument panels. For me there was no question that the etched item beats the plastic one hands down. With it's pre-painted faces and bezels glazed with Klear/Future, it's very nice indeed. Neither panel has much by way of locating tabs, so a little extra support while the cement or CA dries does no harm.
I made a simple modification to part F15 - the cockpit floor. The original aircraft didn't feature a full floor, so I cut away the sides level with the heel-boards. Not a full solution, but an easy fix for an office which captures a little more of the look of the real aircraft. For colours, I used White Ensign's excellent VVS Colourcoats - with a combination of Grey primer and Green for the cockpit.
The fit and angle of the seat base and back/bulkhead are a little vague, so I made repeated checks with the fuselage to make sure no nasty surprises were in store. In fact, the top of the bulkhead fitted precisely into the headrest - and note, the small gaps at the sides are visible in photos of the real thing, so resist the instinctive urge to reach for the filler! The pre-painted etched harness is excellent and really catches the eye. The only additions I made to the cockpit were firing buttons on the control column. As a general colour reference, I recommend the on-line pics of the restored New Zealand I-16 - but beware, one of the pics of the cockpit is flipped left to right...
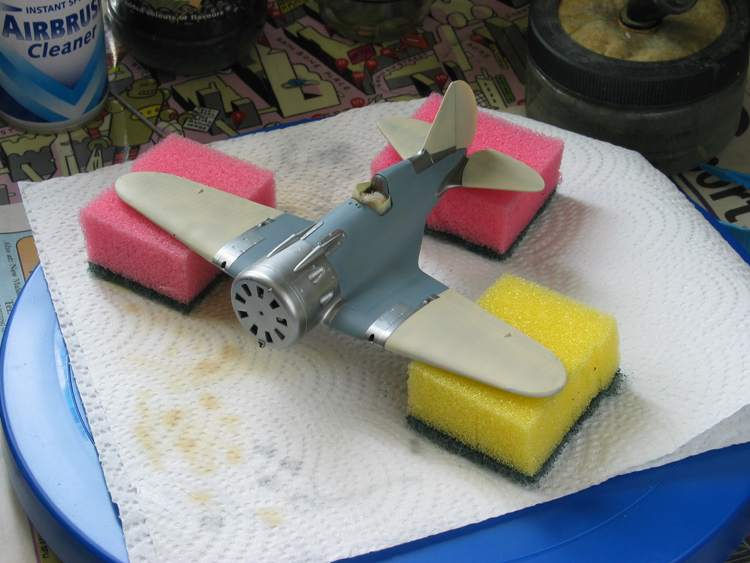
Page 5 - Building and attaching the wings. As supplied, the trailing edges are rather heavy, but a quick session with a padded file made a radical improvement. Looking at reference pics, I was struck by how smooth the fuselage/wing joint always seemed (the real "lumpiness" was in the detachable metal panels and fabric covered outer wings). With that in mind, I added some plastic card for the joints. Be very careful if you try this - I almost came a real cropper before I realised that the supports would be visible through the openings for the undercarriage retraction arms. So, just support the front of the joint if you feel it's needed.
When it came to attaching the wing, I found a little help was needed to ensure a circular cowling/wing root. It may well have been down to my sloppy building, but seeing as the kit doesn't include locating pins here, I took the simple precaution of adding a couple of support tabs, keeping them clear of the exhaust ports.
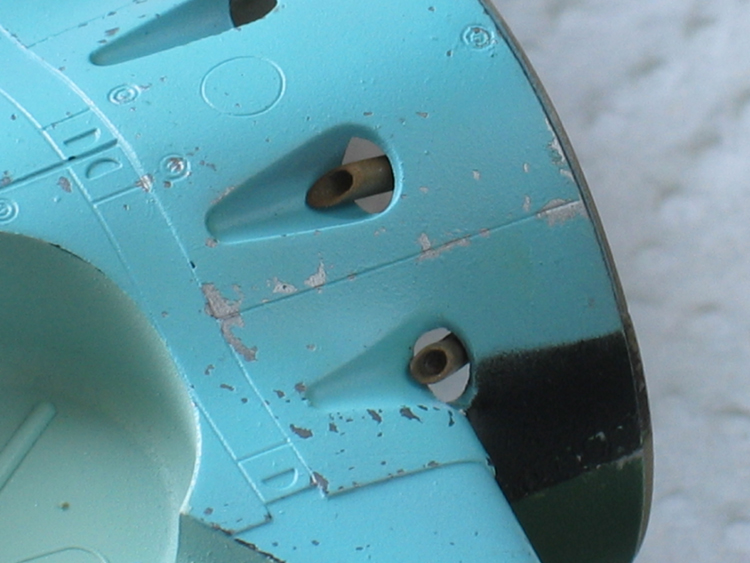
Finally, for this stage, the guns and pitot tube are added. The gun barrels are really rather overscale compared with photos, but I used them anyway, drilling them out for a better appearance. However, I left both the guns and pitot off until final assembly and, yes, my nerve held and I still didn't fit the exhausts...
Page 6 - Things are starting to look like an aeroplane... the stabilizers and rudder can be fitted. Nothing much to comment on here, except to note once again the lovely fabric effect...
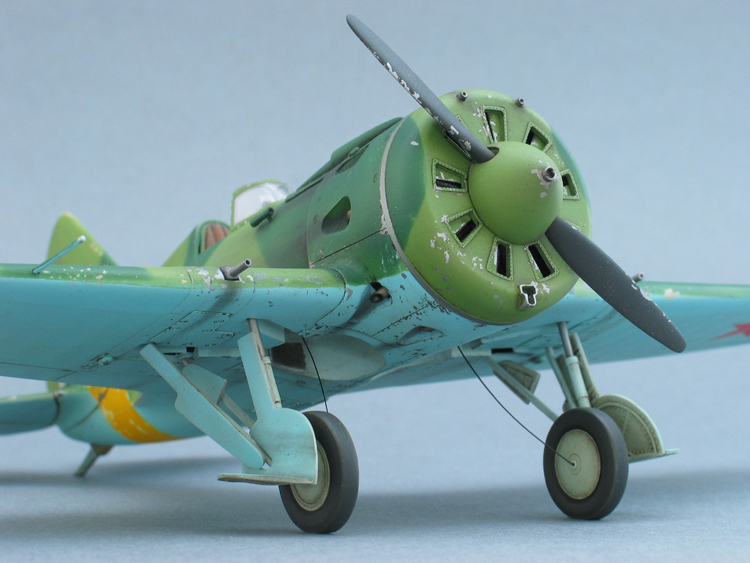
And then things turn to the nose - the source of most of the controversy surrounding this kit.
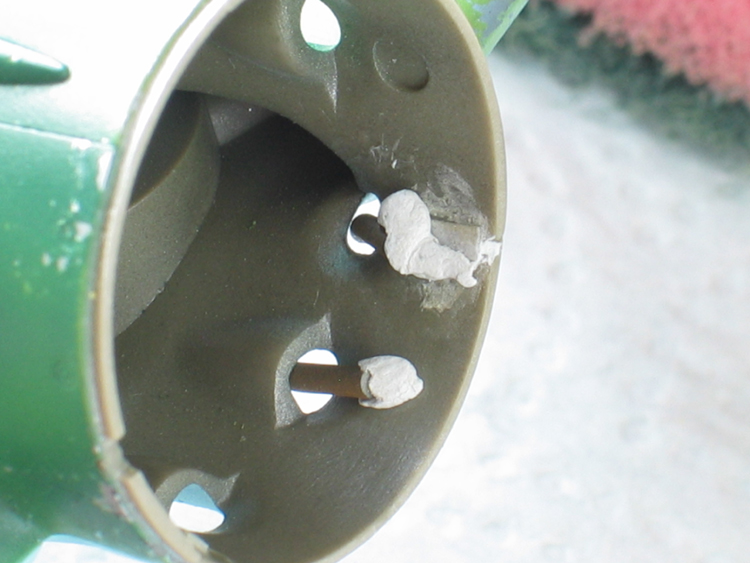
A rather basic engine-face starts things off - a bit bland, but push-rods and simple ignition harness helps brighten things up. To be honest, not much is visible behind the etched cowling shutter, which looks really neat once the embossed lines are added as per the instructions.
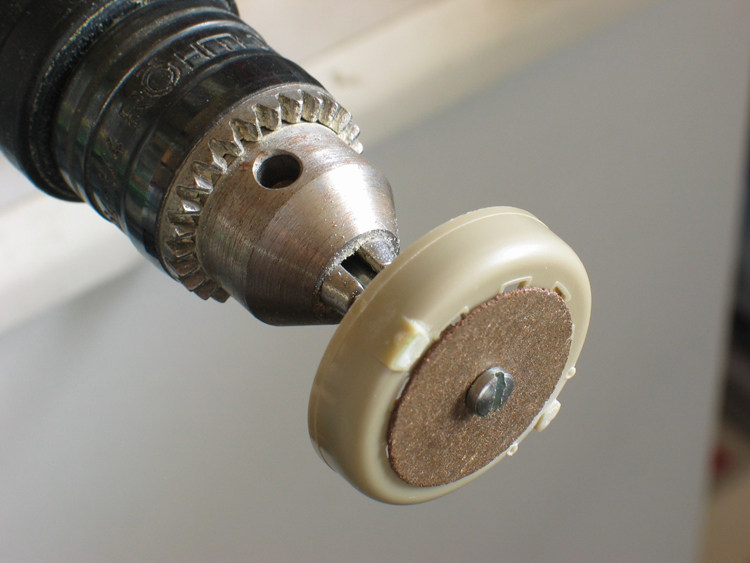
And then there's the cowling itself. There's no getting away from it - once your attention is drawn to it, it does look too square. But all is not lost! Thanks to Eduard planning for later versions, there's a spare cowl on the sprues. Heavily inspired by Steffen and with a built-in get-out-clause provided, there was nothing to stop me having a crack at improving matters! So I took the the alternative cowl and filled the intakes with Supafilla (talcum powder and cyano). Once all was dry, I mounted the part on a motor tool and set to work sanding it to something more like the shape of the original. I made sure to keep the detail on the front of cowl intact and, although it's undoubtedly not perfect, the re-profiled cowl is real improvement. With the reshaping done, I replaced the T-shaped intake and cowl guns. (Note: Eduard have now corrected the cowl. If you bought an original kit, you can obtain a replacement free of charge by contacting Eduard.)
At this stage, the instructions would have you add the final exhausts and cement the cowl in place along with the machine gun fairings. Well, I added the fairings. but just checked the fit of the cowl and left it loose so I could fit all the exhausts later.
Page 7 - The undercarriage. It looks nothing on paper - but do be careful to fit the legs and fairings correctly. I dry-fitted them at this stage to allow for painting. Eduard supply an etched part to represent the window at the rear of the wheel-well which allowed the pilot of the full-sized aircraft to check the undercarriage. This has come in for some rather unfair criticism from some quarters; trying to include the cut-out would be a nightmare in mould making, so I think the etched part is a perfectly acceptable compromise. If you want to try drilling/filing out the window, be warned - the angles are tricky and working space is limited... I used the etched part and tinted the "window" area with Tamiya Smoke.
Page 8 - Final Details. This actually starts with a useful alignment diagram for the undercarriage which would have been handy on the previous page, and then it's really downhill to the finishing post with items like the undercarriage retraction cables, propeller, gunsight and windscreen. Amongst the final additions are a pair of small cowling bulges which the instructions show attaching right on a panel line; this is incorrect - and something I spotted too late for my build. Photos of the full-sized aircraft show the bulges between the gun fairings and the panel line.
Painting and Decals
Eduard supply decals for four varied and attractive schemes:
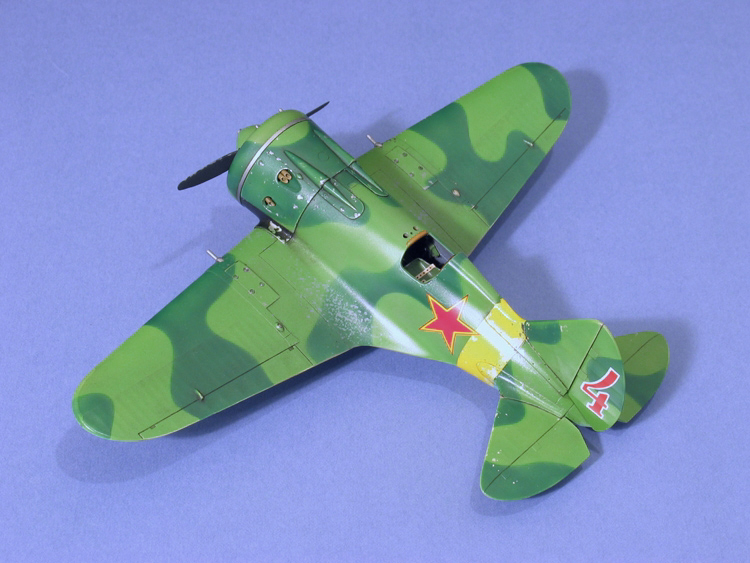
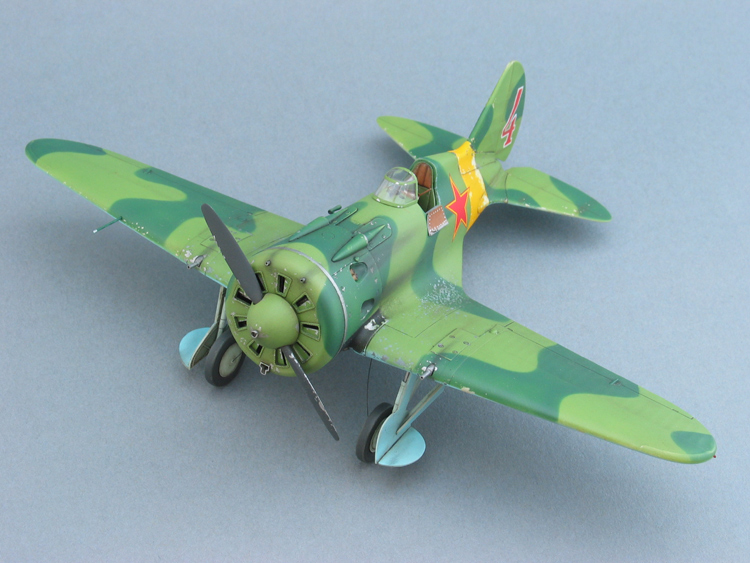
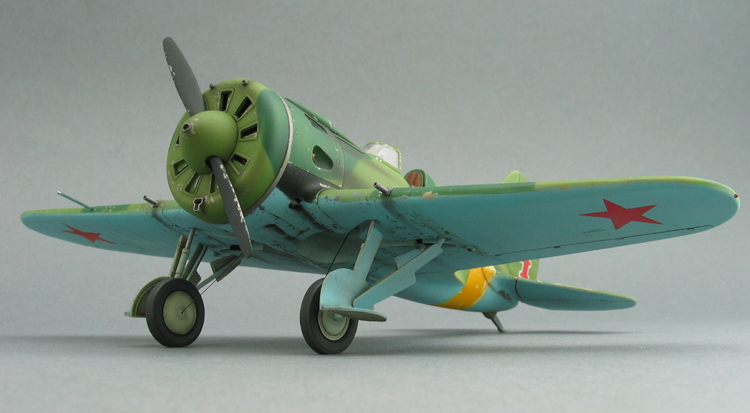
1. Maj. Mikhail Yakushin, Red Five Aerobatics Team, 1939, in a classic pre-war Grey scheme with a red fin.
2. Unknown unit, Ukraine, Summer 1941, with the vestiges of a mottled brush-painted Grey/Green upper surfaces and a spectacular fin emblem
3. Generalmajor Ivan Lakeev, Hero of the Soviet Union, 1941, in a classic AII Green/Blue scheme with patriotic slogans
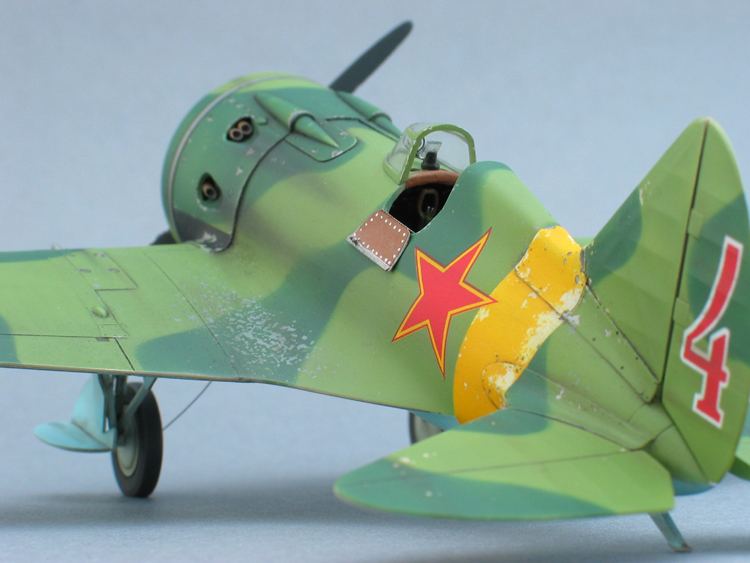
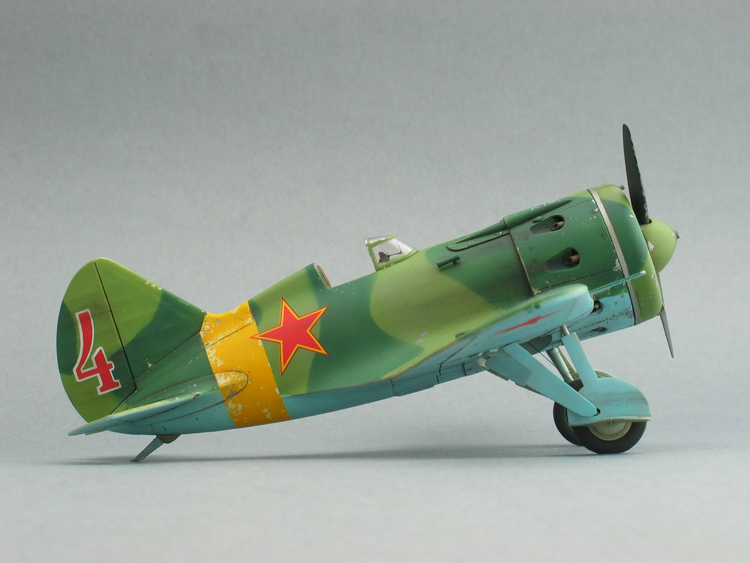
4. "Red 4", unknown unit, Leningrad area, 1944.
The last scheme is the real mystery. As far as I know, the only published reference for it is in Squadron's "In Action", with a single B&W photo which doesn't show the fin and and a colour profile which clearly contradicts the photo as regards what's visible of the camouflage scheme and adds a "Red 4" to the rudder.
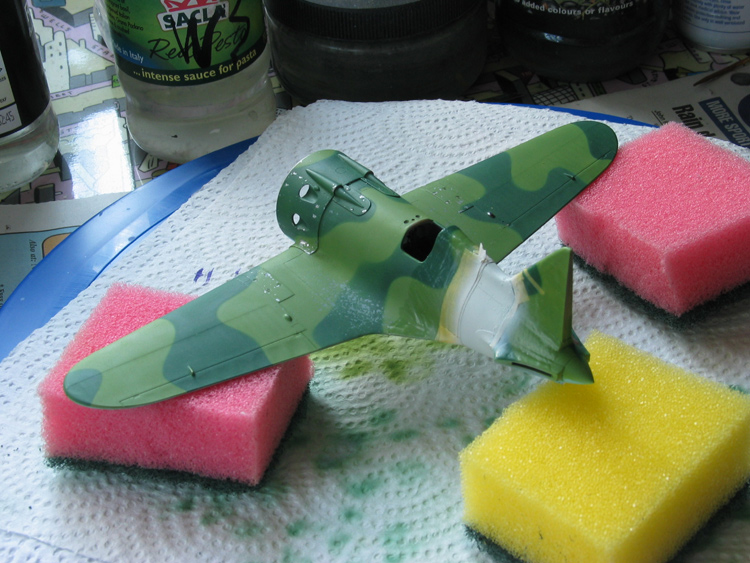
Throwing caution to the winds, I couldn't resist tackling the latter scheme - substituting WEM's new AII Green for what Eduard identify as Black to better match the tonal values in Squadron's photo. There's signs of a Black replacement lower cowling. The fuselage band is a real mystery; yellow was apparently rarely used on Soviet aircraft due its use by the Axis forces as a tactical colour, coupled with the indifferent quality of VVS yellow paint. Nevertheless, the band and star in the photo do look too dark to be white - and there's signs of lighter paint either unpainted or worn off at the rear of the band, so I made the call and went for a badly applied yellow band over a white original, with yellow Victory Stars which would at least match the supposed 1944 period.
The decals are thin and appear beautifully printed on the sheet. Once they were applied though, I found a little fringing on the stars where the yellow was misaligned. If I were to build the kit again I'd trim the markings carefully with a scalpel. As it was, considering the way the original aircraft seemed to have been crudely re-painted, I was content to leave them be.
As per my current penchant, I applied primer colours first, matching photos of a Spanish-built I-16 for a mix of Grey wood primer, with Alclad II n/m and beige clear dope. With that dry, I stippled on some Latex masking before spraying the camouflage colours and fuselage band. Removing the latex revealed a variety of "weathered" colours. After decalling and a coat of Klear to level everything, I mixed up a "grunge" of Burnt Umber and Payne's Grey oil paint. I applied it neat over the gloss finish and wiped of the excess (I don't bother with washes, preferring the effect of neat oils, including the slight staining which often happens - which all adds to a "used look").
With a deadline looming, I didn't give the oils as long as I'd like to cure before spraying a coat of Rowney's Galeria Matt Acrylic varnish. Then a mix of black, brown and grey pastels for exhaust stains etc. and a final dusting of Galeria before removing the masking from the windscreen to see just what I'd come up with...
Conclusion
I thoroughly enjoyed building Eduard's Type 10. For me is was a perfect mix of an excellent basic kit with just enough construction/correction work to satisfy that inevitable urge to stamp your own mark on a kit. The kit beats the old Hobbycraft model into touch on almost every count. Correcting the cowl may be seen by some as real pain, but for me it was a healthy reminder of what modelling's all about. That said, full marks to Eduard for rectifying the problem and offering a free replacement to their customers.
Useful references
Polikarpov Fighters In Action Pt.2 - Aircraft #162 - Squadron/Signal Publication
Soviet Air Force Fighter Colours 1941-1945 - Erik Pilawskii - Classic Colours
http://vvs.hobbyvista.com/
http://www.nzfpm.co.nz/aircraft/i16.htm
http://www.nzfpm.co.nz/articles/ratacwd2.htm
http://www.nzfpm.co.nz/articles/ratacwd3.htm
Thank you to Eduard for kindly supplying the review sample.
Please remember, when contacting retailers or manufacturers, to mention that you saw their products highlighted here - on
ARMORAMA


Comments