Founded in 1910 the Socie'te pour les Apparreils Deperdussin and bought by Louis Bleriot in 1914 and renamed Socie'te pour Aviation et ses De'rive's. In 1915 'Spad' designer Louis Bechereau began to design a series of fighter aircraft that would use the Hispano-Suiza engine. And its progressively higher horse-powered models. The Spad VII was first flown in combat in August 1916. It became the main French high altitude fighter, using powerplants of 140 - 170hp. Examples were also flown by the Belgian, Brazil, British, Czech, Finnish, Greece, Italian, Peruvian, Polish, Portugese, Rumanian, Russian, Siamese and Yugoslavian Air Services variously from 1918-1928. (Historical Notes courtesy of Stephen Lawson)
Kit Preview
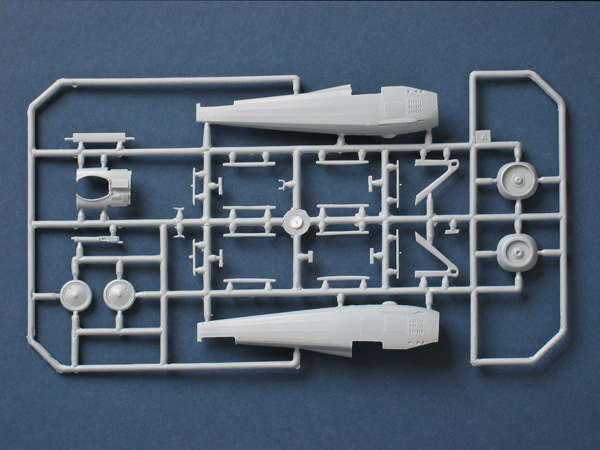
Special Hobby's second SPAD VII is typical of the new generation of short-run kits from Eastern Europe. The model comprises 41 plastic (1 un-used), 11 resin and 18 etched metal parts, along with a vacuform windscreen. Alternative radiators and propellers are provided for two versions.
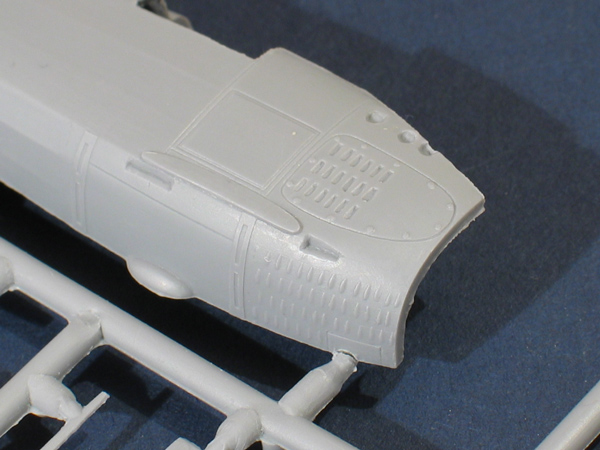
The main parts are low-pressure injection-moulded in soft mid-grey plastic. Despite their short-run nature, the parts are finely detailed and the sprue attachments are commendably small. A test fit of the fuselage shows everything lines up, with no sign of warping. Ejector-pin marks on the inside won't interfere with the cockpit parts.
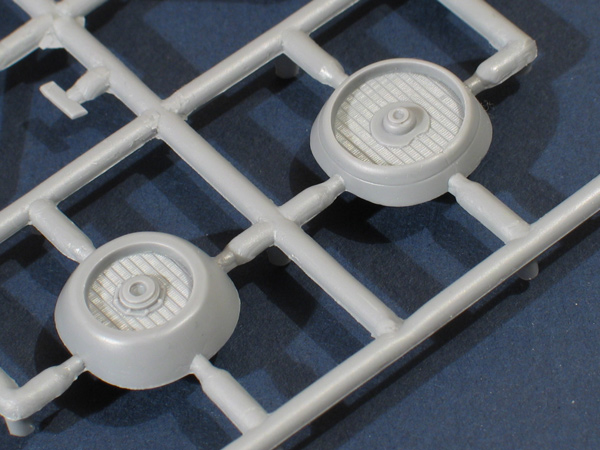
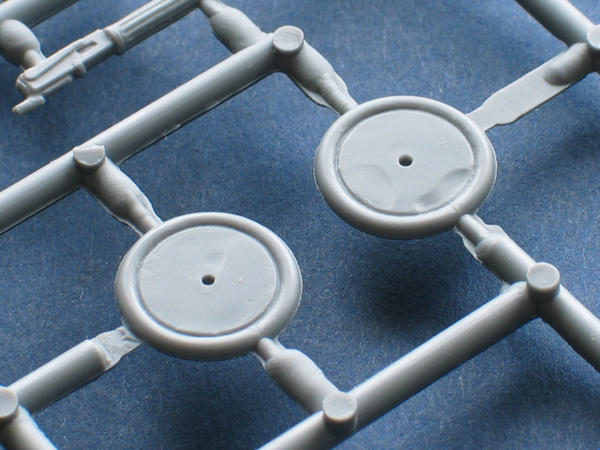
There is a little flash present, particularly on smaller parts. The Vickers machine-gun looks a little soft and one of its sprue attachments is poorly placed, so some careful clean-up will be needed. My kit shows two areas of shrinkage; on the rear face of the wheels and one of the propellers.
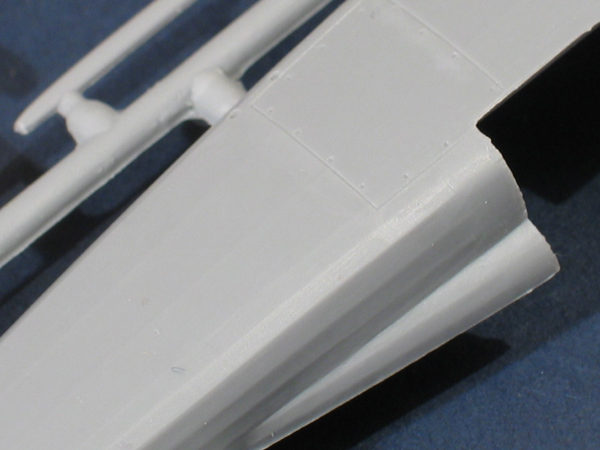
The fabric surfaces are very finely done. The wings are thin and warp-free, comprising a one piece upper wing and separate lower wings which butt-join to the fuselage. It will probably be a wise precaution to strengthen the joints with pins.
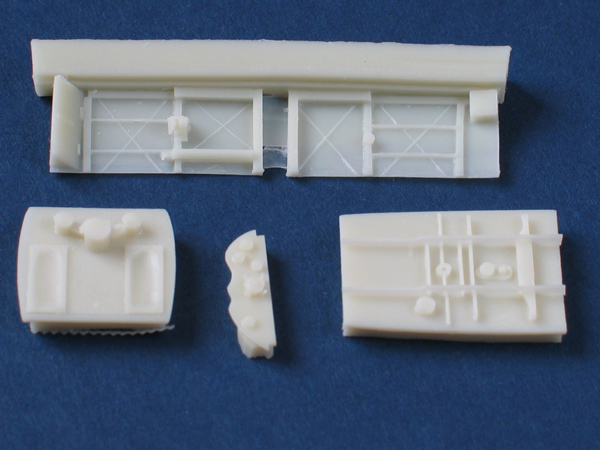
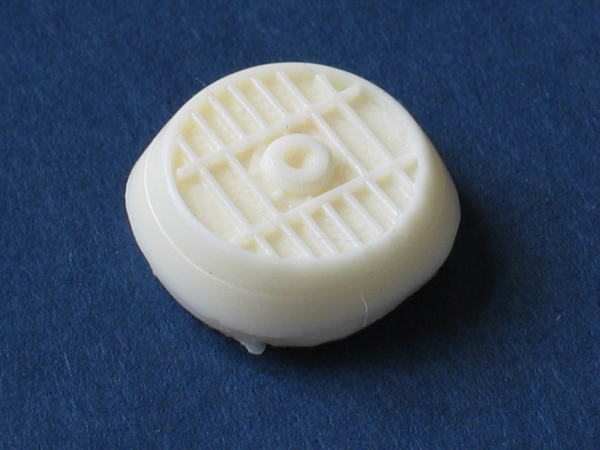
The cockpit is supplied as beautifully cast resin pieces, with sidewalls showing moulded-on bracing wires. The floor and front bulkhead are nicely detailed and the seat is moulded integrally with the rear bulkhead. An alternative radiator is supplied in resin, along with a cowling top with delicate ventilation holes.
A small sheet of etched parts provides a seat harness, throttle levers, rudder-pedal straps etc., a gunsight, plus aileron actuators which need to be folded before being attached
As mentioned, the windscreen is vacuformed and a spare is provided. It is reasonably clear, but a dip in Future/Klear will not go amiss.
Instructions & Decals
The instructions are nicely drawn in ten stages. The alternative choices are clearly shown, but the placement of some parts is rather vague. The most serious omission is a proper rigging diagram; the small "info view" and drawing for Stage 10 really are inadequate.
Decals are provided for 3 colour schemes; 103rd Aero Squadron, SPA 158 and 23 Squadron, RFC. The different camouflage schemes are clearly depicted and Humbrol paint numbers are quoted.
The decals are beautifully printed by Cartograph. All items are in perfect register on my sheet. I am a little uncertain of the colours chosen; the insignia red used seems quite dark and is identical for all three aircraft, and a number of references talk of French aircraft in the USAS and RFC wearing roundels painted French-blue.
In conclusion, this is a fine little kit. The complicated rigging and two-bay wings probably make it unsuitable for inexperienced modellers but, with careful building and adequate references, the finished kit should look great.
SPAD VII build by Stephen Lawson
Kit: Special Hobby SH48009
Contents: Plastic: 52 pcs
Resin: 13 pcs
Etched Metal: 14 pcs
Decals:S.115,S.116 & Italian.
Instructions: 10 step exploded views with text and parts map
Characteristics: 2 radiators & 2 Props
Of the seriously ignored kits this ranks high on the list. For years the only game in town was the 1/40 Smer Spad VII. The full shutter radiator arrangement in the Blue Max kit is engraved with the shutters 90 degrees from where they should be. The resin kit by JGMT while finely engraved is very expensive and the wings are very thin and very brittle. Now we have a very nice kit that has few flaws and as a build it goes together nicely with a little care. Predrill all rigging pilot holes and scribe through the separation lines for the control surfaces and reset at desired tilt.
Step 1.) Begins with the resin cockpit tub assembly (P #1-5) note that here P= Polyurethane / resin. Start with painting the cockpit tub sections to represent wood and fabric. Check your references. Don't assemble yet just familiarize your self and paint the pieces. Begin as every World War One aircraft kit should, with the cockpit. The cockpit floor (P 1) should be varnished wood with raised metal details. The top of the main fuel tank is centrally located within the forward third area of P 1 with the fuel gauge at its apex. This was either a bubble float in the fuel cap or a stick gauge, both working a gear mechanism on marked levels. The seat supports are molded to P 1 and actually the rear of the engine supports. The rudder bar is likewise molded to the floor and has photoetch pieces to be added for details. These and the forward firewall Section (P 4) the control column (P 9) are all bare metal. See your references on these details. Now, the Internal bracing wires (crisscrossing the bays) are already present in that they are molded in place. Add a compass face and paint the handle for the carburetor fuel and air adjustment levers (l 10 & 11) to look like stained wood. Close up the fuselage halves (A 1 & 2) blend the seams and consider a major alteration here. Thin down out the forward area of the united fuselage halves. Also the rear area of the kit radiator. At this point you can complete an Engine Compartment with some scratchbuilding and detail a 150-170hp Hispano-Suiza from Engine & Things (kit # 48147.) The forward sections of the engine bearers need to be scratchbuilt. Check your references for wiring and plumbing.
Step 2.) Guides you through the seat detailing. This is a good place to pre-drill all your rigging holes. A little planning here goes a long way to a great build. The seat on the rear bulkhead for the cockpit (P 5) is a early model type and should be painted as if upholstered (stuffed with material and covered) in leather. The lap belt (L 1, 3 &4) should be annealed then glued in place.
Step 3.) Assemble the cockpit tub pieces here then add the instrument shelf and panel. These should be simulated to look like wood. The instrument panel (P 7) Should contain (from left to right) oil & water temperature gauges then the switches for the motor air pump, main & auxiliary fuel tanks, and the manual air pump. Add a metal Aircraft Manufacture's Plate to the left side/wing of P 7. The support shelf (P 6) needs to be slightly trimmed down at its three outer contact edges to fit into the rear portion of A 5. Then add the faces for the oil pressure gauge and tachometer, altimeter to fit in the allowed space. The support shelf (P 6) may now be attached to the Cockpit assembly.
Step 4.) Join the fuselage halves (A 1 & 2) trapping the cockpit tub assembly between the halves. Turn the fuselage upside down . This allows the cockpit tub to seat exactly where its needed. Tack it in place with liquid super glue. If your going to install an aftermarket Hispano-Suiza engine this is the place to do it. The engine access panels can be cut away and microscreen installed here as well. Insert pins into pre-drilled holes in the resin engine heads and the eight connection ports of the exhaust pipes (B 2 & 3.) Some filling may be needed to allow for the distance of the exhaust port connections and the seated engine. Dry fit and measure carefully before permanently attaching either item. Install this assembly then begin completing the wiring and plumbing. Check your references.
Step 5.) Choose which radiator your going to install and how much detail in the engine compartment you'll add if any. The engine hood (P10) and the cockpit upper decking (A 5) are next. The engine hood (P 10) should be lightly sanded down its underside edges that will mate to the side cowlings and radiator. You can modify the radiator (A 3) by adding strip plastic to its front face only since I was not adding an engine to my build here. Another alternative is drill out the whole face and scratchbuild all of the veins and shudders then use True Details 'Micro Screen'. The radiator of the Spad VII like the XIII was bolted directly to the gear housing of the Hispano-Suiza engine. Imagine the vibrations and harmonics that this soldered brass unit was subjected to! No wonder Spad type aircraft were in the hangar an average of more than 30% of the time. Do yourself a favor and add the exhaust manifolds (B 8 X2) at this time. If you try to do this in Step 10 as th instructions recommend you will reach the height of frustration as you try to add them between rigging and struts and etc. Do it now before theirs anything in the way.
Step 6.) Here I pinned the lower wings (B 2 & 3) in place using brass rods inserted into pre-drilled holes. You can also pin the horizontal tail (B 5) unit in place on the fuselage rear shelf. The vertical tail unit (B 4) can also be attached by pinning but would do it separately from, and after the horizontal tail unit pinning. Then bring these components together with the fuselage using a 'Lego' block jig and let the assembly dry thoroughly. The referenced jig keeps everything lined up correctly. (Hint!!! If your kit is eyeballed by a contest judge and they find that it is NOT plumb or square, it will be dropped from further consideration.)
Step 7.) Start with the Vicker machine gun In most cases aircraft that were flown in captured markings had the machine guns removed or replaced. Not so with the profile I chose. Even weeks later after repainting it still carries its Vicker armament. I just didn't like the molded kit item so I replaced it with a spare DML/Dragon item. When it comes to adding struts do so from the center of the aircraft out. Start with the cabane struts (L 7 X 4) adjacent to the Vickers machine gun. I didn't use the plastic set (A 9 X 2 & 14 X 2)but added small sections of 'Aeroclub's Strutz' then the I added the kit interplane struts (A 8 X 2, 10 X 2 & 11 X4.) Fabric wrap reinforcement strips seen on the Interplane Struts can be done by using strips of decal film painted an off white colour. Wait to apply the rigging and the Bell Cranks (L 6 & 12.) Check your references but when you get the cabane struts right everything else goes great. When dry I add the top wing and simply snap the other interplane struts in place as I go. Keep both wing leading edges running parallel with each other. Now complete the rigging needed to finish the wings. Take your time here. Check your references.
Step 8.) No matter what don't add your choice of the windscreen yet, bad model company go sit in the corner. Take care when bending and adding the bell cranks (L 6 & 12.) The fuel/water plumbing fairing needs to be scratchbuilt along with tubing to the exposed engine and radiator. The modified forward area of the upper cowling (P 10) should reflect a cut out for these 'pipes'or the fairing that usually covered them. I also scratch built the pilot's step ( A 13) from brass wire.
Step 9.) Normally I would clip the plastic axle ends off of the axle/spreader bar (A 19) and added brass pins of the appropriate diameter in to pre-drilled holes. In this case since I did not add a motor to the build I left the axle stock. Paint and assemble the under carriage struts (A 6 & 20) and the axle spreader bar (A 19) to the fuselage underside, again insuring that it is plumb and square. The creative rigging of this unit can be functional in keeping the assembly together (even if dropped: The Voice of Experience.) I also replaced the tail unit support struts (A 15 X 2) with brass rod of the appropriate diameter.
Step 10.) Finish the rudder control rigging after the application of the national markings. Lastly the propeller (B 6 or 7) is considered. Check your references for the aircraft that you have chosen. All other details are completed per the kit instructions.
Decals
Spad VII S.115, Sgt George Guynemer Esc. N 3, Sept. 1916.
Spad VII S.116, Adjutant Maxime Lenoir Esc.N.23, Oct. 1916.
Spad VII Macchi built, Captano Fulco Ruffo di Calabria, 91a Squadriglia, Summer 1917.
All kit colour notations and profiles are generally accurate.
References
'A Man for Sonderfilme, Rudolf Windisch' by H Täger, Over the Front 17 #3, Pp.196-232.
'French Aircraft of the First World War' by J. Davila & A.M. Soltan, Flying Machines Press, 1997.
'Hispano-Suiza (Birkigt Patents), Cross & Cockade USA Vol. 10 #3, 1969.
'Mann Edgerton Spad 7.C1 B9916' by H.G. Fisher, Over the Front Vol. 8 #2 Pp.100-113.
'Markings of the Lafayette Escadrille' by B. Alexander, W. Michigan IPMS News 1976.
'Project Butterfly' by Hardesty, Hastings, and Toelle, Cross & Cockade USA Vol. 9, 1968 and 13, 1972.- (Most excellent articles on the French 5 colour camouflage patterns.)
'Spad Scouts S.VII - XIII' by J.M. Bruce, 1969. Reprint Osprey pub. for Glencoe Models, 1993.
'Spad VII Aces' by J.Guttman, Osprey Pub.#32. 2001.
'Spad VII - Original Bleriot Aeronautique general arrangement drawings' Cross & Cockade USA Vol.15 #4, 1974.
'Spad 7: 3 View Drawings', Cross & Cockade USA Vol.2 #1 , 1961.
'The Real Spad' by B.S. Kelsey, Over the Front Vol. 8 #2, Pp.114 -122.
SUMMARY
A double-review of Special Hobby's short-run SPAD VII C-1 - an In-Box look by the author, followed by Stephen T. Lawson's detailed construction notes for the standard VII.
About Rowan Baylis (Merlin) FROM: NO REGIONAL SELECTED, UNITED KINGDOM
I've been modelling for about 40 years, on and off. While I'm happy to build anything, my interests lie primarily in 1/48 scale aircraft. I mostly concentrate on WW2 subjects, although I'm also interested in WW1, Golden Age aviation and the early Jet Age - and have even been known to build the occas...